Terrain Workshop: Ork Village
3 Minute Read
Feb 19 2007

Advertisement
Who doesn’t love the orks?
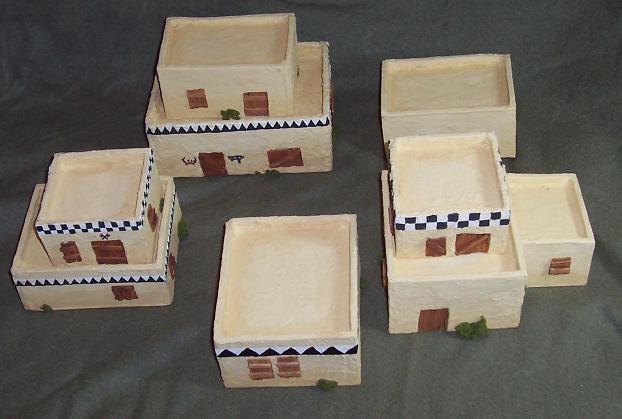
By far, the largest army I have is the orks, and I decided they needed a good place to play. An ork village is an easy way to add a lot of good looking terrain with a little bit of effort and cash.
I based the ork village off the old epic ork buildings; adobe with random ork patterns.
I made the walls and roof out of foam core. It is available at most craft stores inexpensively. Foam core is a thin sheet (1/4″ to 1/2″) of foam with paper backing on each side. It is lightweight, but sturdy.
The thing to remember with making ork buildings (and any other ork construct) is to not be consistent. So I made each ork building somewhere between 3″ and 3.5″ tall. For each one, I cut out the 4 walls and a roof section. One of the tricks to cutting foam rubber is to use an electric kitchen knife. My hobby knife kept getting dull and ripping the paper on the foam core, so I decided to try the foam rubber trick. It worked very well and gave good, straight lines. I cut a door into one of the walls because it was easier to do it here rather than wait until it was assembled.
Years ago, I made a set of city fight buildings out of foam core. After a while, the paper started pealing away from the foam and made a big mess. A strip of masking tape over all the edges on the ork builds should prevent this from happening.
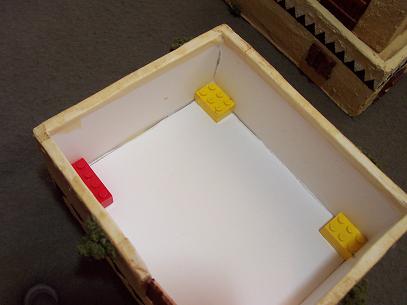 Once I had all the walls cut and taped, it was time to assemble. The roof needed to have enough support to hold a metal dreadnaught, so I glued small plastic blocks under each corner. Not only did this keep the roof fixed in place, it also kept the walls straight. To keep with the adobe house look, I made sure the roof was about 1/2″ below the top of the walls. This drop gave a low wall around the roof of the house (and good cover for the orks up there).
Elmer’s wood filler is a great for texturing and a bucket only costs a few dollars at home depot. I put a coat of this over the entire outside of the building. It dried to a nice shade of yellow, perfect for an adobe look.
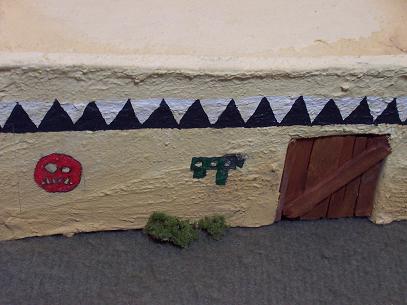 Another good terrain tip is that anything wooden can be made out of popsicle sticks. For the doors and windows, I took popsicle sticks and cut them down the middle. These are for orks, so they didn’t need to be perfectly symmetrical. I then used these pieces to build doors and windows. A brown wash and they were good to go.
 To give the buildings a bit of dimension, I put a very light wash of brown around the bottoms of the buildings and around the edges on the inside of the roof. A few ork glyphs, some dags around the top and a shrub or two on the outside, and the buildings were ready for the tabletop.
By making the buildings various sizes, I was able to stack smaller ones on top of larger ones to make multiple levels.
Bigred has been asking me to make about 10 or 12 more so we can play a “Blackhawk down” scenario, but I’ve been busy with other projects. More on that later….
Author: Guest Columnist
Advertisement
