TUTORIAL: Dipping Orks!
8 Minute Read
Jul 2 2007


Advertisement
So you’ve got yourself 160 assembled Orks to paint – what are you options? 1) Months of painting, shading, washing, re-washing, drybrushing, and more drybrushing, 2) shipping them off to one of the many excellent painting services increasing the cost of your already expensive army, 3) packing them up and forgetting them, or 4) spending a weekend mastering dipping.
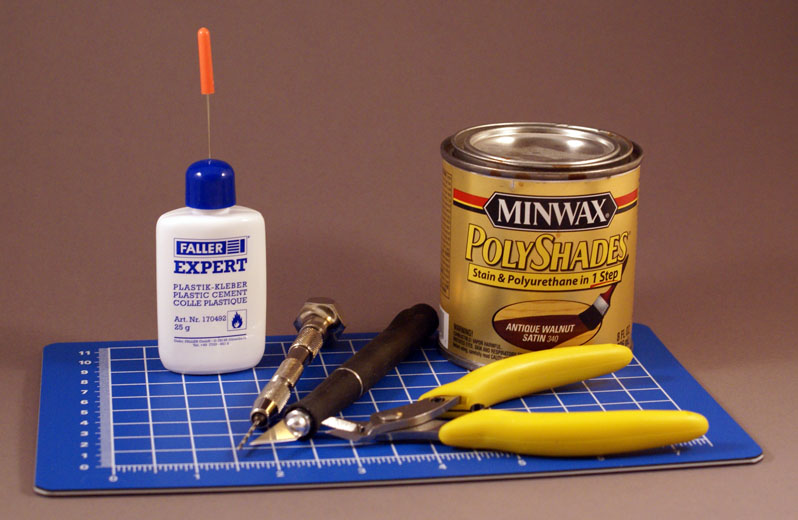 Let’s start with the key ingredient: Minwax Polyshades. This is a furniture stain that includes a polyurethane varnish. It’s designed as a one-stop finishing product for furniture.


 Prepare the Dip by shaking it up well (the stain settles to the bottom of the can). Next, take the model on the flying base and insert the flying base stem into the drill and tighten it. Make is tight enough that it won’t fly off, but not so tight that it will break the plastic stem.
 The goal when I started this army was to spend as little time painting as possible. I know, I know, it’s heresy, but I wanted to be able to paint a single night a week and still complete an army in a few months. Part of that strategy was to cut some corners when basing my models.
For my Orks, I’m using Krull’s infamous “Hive Fleet in a Day” painting technique. If you haven’t heard about it (and you are a lazy/bad painter, like me) then pull up a chair and be prepared to be impressed. I find that the technique works well with Orks, Tyranids and Necrons. I wouldn’t recommend it with any other army, but with a little experimenting you may have better results.
Let’s start with the key ingredient: Minwax Polyshades. This is a furniture stain that includes a polyurethane varnish. It’s designed as a one-stop finishing product for furniture. You can get it at any hardware store (in the paint section). There are several options so make sure you get the Antique Walnut Satin. This is important; I’ve tried other colors and finishes, but the Antique Walnut Satin is by far the best for miniatures. This is the “Dip” that makes this painting technique so effective. With some practice, the small can can dip 50-60 models.
In addition to the Dip, I use a handful of GW paints (I also like Vallejo and the new Citadel Foundation paints). The colors you choose isn’t that important because the magical Dip is going to help blend your colors together.
Let’s go through the process of dipping an Ork.
Step 1 — Assembly
Dipping works well with both plastic and metal miniatures. Due to the finishing process, you want to make sure that everything cleaned and glued well. For plastic, I use a quality plastic cement, like Faller Expert (great precision tip) and for metal I use Zap (the pink label is best because of the quick setting time). If there are heavy metal pieces (Nobs, Mega Armor, etc.), then pinning them is a good idea.
It’s also worth noting that I only use the GW black bases for painting. Once the model is done, I replace them with either a Gale Force 9 magnetic base or a scenic resin base.
Typically, I paint the model on the sprue because I paint 6-8 Orks at a time (this process works great as an assembly line). But for this article I assembled the model before painting so you can see each step.
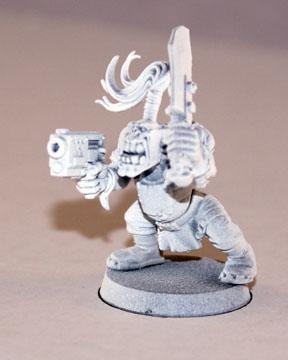
Step 2 – Basecoating (White)
I do a quick and light basecoat in white (but black works just as well). I don’t worry too much about covering the model completely, but I find that a little basecoat helps you paint a model quickly. Remember your goal is to paint a squad in a sitting so you want the paint to stick and dry quickly.
This painting technique requires no shading, no washing and no blending so don’t stress out too much about the basecoat. The key is to put it on light because it is going to be followed with paint and then a thick polyurethane layer. If you put your paint on too thick you are going to hide some of the detail on the model.
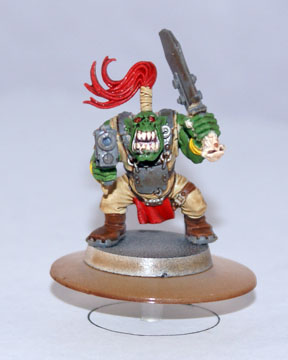
Step 3 – Pai nting
nting
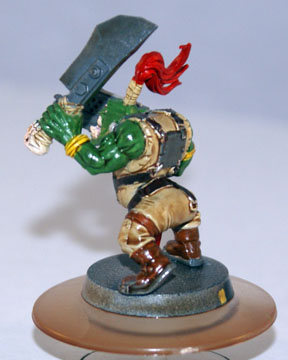
First of all, I told you I was a lazy and bad painter and the freshly painted Ork should burn that fact into your mind, but as I mentioned, this technique is for lazy and bad painters.
ntingFirst of all, I told you I was a lazy and bad painter and the freshly painted Ork should burn that fact into your mind, but as I mentioned, this technique is for lazy and bad painters.
Advertisement
I generally only use a few colors when painting my Orks. I find that too many colors makes the Ork too busy. I use Goblin Green for the skin, Bleached Bone and Bestial Brown for the clothing (I really like how nice Bleached Bone turns out), Codex Grey for metal (note that I don’t use Boltgun), and Sunburst Yellow (or Blood Red, etc.) for accent pieces.
Don’t worry if the colors are too bright, the Dip will fix it (it tones down and blends the colors). Don’t worry if your lines are straight or if you missed a spot (or ten), the Dip will fix it. Don’t worry about blending or highlighting or shading or washing, the Dip will fix it.
Step 4 – Dipping
Once I’ve painted the model, I glue it to a small GW flying base that I’ve assembled upside down. This gives me a little handle that I can hold when I dip the model in the Minwax. To make it secure I glue it at three points to the base (Zap is great for this), leaving enough room to fit a blade under the edge to pry it loose after it dries.
I’ve left the flying base attached to the model in the pictures so you can see it clearly (the stem is in a hole I punched in the cardboard box with a pencil).
Now it’s time to dip. When I started dipping, I would dip the model in the Minwax and shake it off by hand. After five or six models, my arm 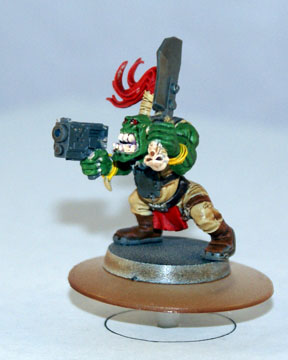 would get sore (you really have to shake it hard to get the stain off). So I developed a method that saved my arm. I use a drill to spin the Minwax off the model. It’s faster, easier and tends to keep heavy models together better than shaking them.
would get sore (you really have to shake it hard to get the stain off). So I developed a method that saved my arm. I use a drill to spin the Minwax off the model. It’s faster, easier and tends to keep heavy models together better than shaking them.To use the “drill method” you need a few things, including 1) a power drill, 2) a 5 gallon bucket (a cardboard box works fine), and 3) a drying stand. I usually make the drying stand out the box the small cardboard box the models came in but any box will do. I punch a few holes in it so that I can insert the stem of the flying base in them to hold them while they dry. You can see the drying stand in the picture at the left.
Advertisement
Prepare the Dip by shaking it up well (the stain settles to the bottom of the can). Next, take the model on the flying base and insert the flying base stem into the drill and tighten it. Make is tight enough that it won’t fly off, but not so tight that it will break the plastic stem. Then, immerse the entire model (including the base) in the Dip. You can remove it immediately, but let some of the excess drip off before spinning (I let it drip for 4-5 seconds). Finally, put the model and drill into my 5 gallon bucket and spin it at full speed for 4-5 seconds. All of the excess stain will be flung against the walls of the bucket, leaving the model perfectly and evenly coated in stain.
I’ve used the drill method to dip metal Nobs in Mega Armor and large Kannon models so don’t worry too much about the size of the model. Just make sure that it’s well attached to the flying base. It helps if its not off center and it’s okay if it comes flying off (the pieces will land in the bucket and bouncing around the bucket rarely leaves marks on the model).
Let the dipped models dry overnight.
Subscribe to our newsletter!
Get Tabletop, RPG & Pop Culture news delivered directly to your inbox.
By subscribing you agree to our Terms of Use and Privacy Policy.
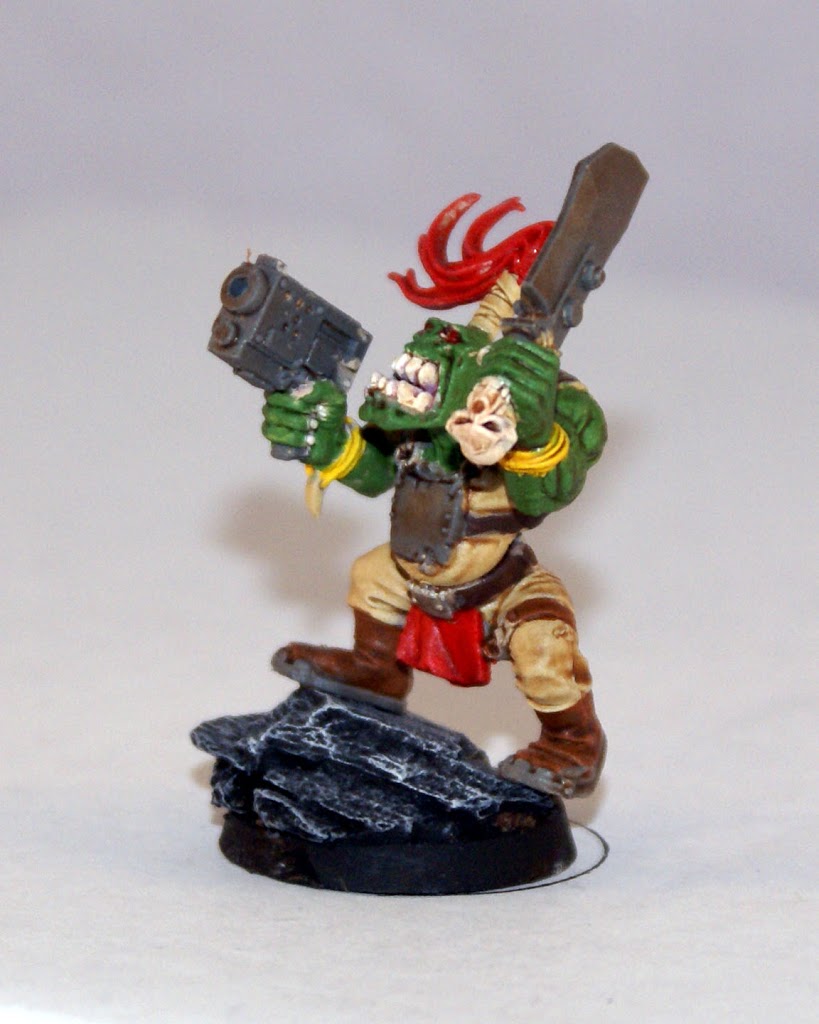
Step 4 – Finishing
Even though you used a “satin” varnish, your dry model is going to have a super glossy finish. This wet look looks fantastic on Tyranids and Necrons. Even some Chaos models work well without further finishing (Bigred’s Plaguebearers, for example), but for Orks you’ll need to tone down the shine.
This is also a good opportunity to do any additional painting. You can fix errors, touch up the whites or metals, drybrush, etc. I rarely do more than a little drybrushing and only on my “special” models.
Now matte coat the model. I use GW’s Matte Varnish, but any spray matte varnish works. I put on a pretty heavy coat (because the model is very shiny). You don’t need to varnish the model to protect. Even without a finishing varnish, the model has a very thick and durable coating of polyurethane. You couldn’t scratch it if you wanted to. I’m pretty sure that at the end of time there will be only cockroaches and dipped models left on the planet.
Advertisement
Step 5 – Basing
The goal when I started this army was to spend as little time painting as possible. I know, I know, it’s heresy, but I wanted to be able to paint a single night a week and still complete an army in a few months. Part of that strategy was to cut some corners when basing my models.So I scoured the internet and found some great pre-painted resin bases on eBay. They are made in Poland and I buy them in bulk. Two drop of glue and presto!
Typically, I paint models on the sprue and assemble them six or so at time. Once assembled I touch up the paint and put them aside. After I have 20 or 30 models painted, I go to the garage and dip them en  masse. It takes about 5 minutes to do all 30 models. Then I leave them in the garage to dry overnight (the polyurethane is strong so only work in a ventilated area). The next morning I matte coat them and cut them off the flying bases. Five minutes later and they are glued to their new bases.
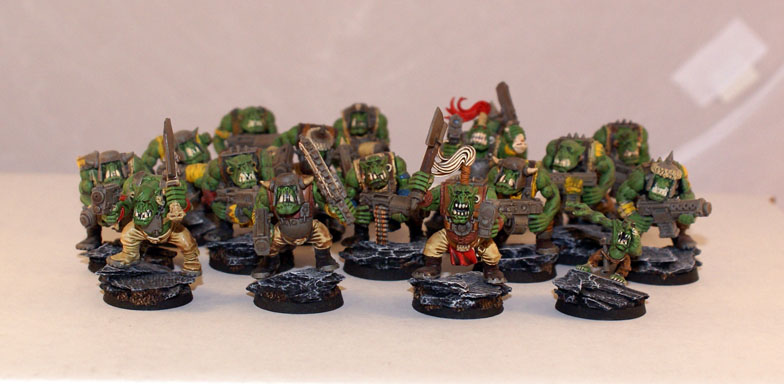
masse. It takes about 5 minutes to do all 30 models. Then I leave them in the garage to dry overnight (the polyurethane is strong so only work in a ventilated area). The next morning I matte coat them and cut them off the flying bases. Five minutes later and they are glued to their new bases.The sixteen Orks in the top photo took me about 6 hours to assemble, paint, dip, and base. In writing this article, I spent more time setting up my lights and taking pictures than I did modeling the subject. By the way, the Orks look much better on the table than in the pictures for some reason (I’m going to have to mess with my camera settings to improve the image).
If you haven’t tried it, dipping is a fantastic way to quickly (and nicely) paint an army in bulk. I was skeptical, but the very first models I painted with this technique were far superior to any that I’d done in the past. It’s great for horde painters, novices, and lazy/bad painters, like me.
I hope you enjoyed the article and if you want to see more of the army, just let me know. If you have any questions or experiences with dipping, please leave a comment.
Author: Guest Columnist
Advertisement

