Warhammer Hobby: Quick and Dirty Cygor

Hey Guys, the Col here with some tips on how to convert and paint a Cygor quick and dirty!
So recently I was commissioned to paint up a Cygor as a birthday present and I wanted to share with you guys how quick and easy a project like this can be. From sprue to finish this project took me 6 hours total. It would have been 3 hours faster but I had to let the green stuff set!
So a little background first before we jump into the actual building and painting. When it comes to the model itself wanted it to have a feeling of coming from the woods. Almost like an overgrown hermit. Because of this I decided to try and make his equipment as “organic” as possible, shying away from metals and extra gribblies where possible. I also decided to stick with earth tones for my pallet to help reinforce the theme. I also wanted to give him some kind of rock weapon. The kit is kind enough to provide us with one.. on a chain! So with that in mind I stared building and converting. Here is a list of what I used.
Materials
Warhammer Fantasy Battles Giant Kit
Green Stuff
GW Plastic Glue
Men-at-Arms Head
Paver’s Ballast
Elmer’s Glue
Static Grass
Tools
HP-B plus Iwata Air Brush + Compressor
Series 7 W&N Brushes
Exacto Knife
Color Shaper
Paints
P3 Line: Trollblood Base
P3 Line: Battle Field Brown
Citadel: Devlan Mud
Citadel: Badab Black
Citadel: Adeptus Battle Grey
Citadel: Codex Grey
Citadel: Skull White
Citadel: Chainmail
Citadel: Catachan Green
Citadel: Camo Green
Citadel: Mechrite Red
Citadel: Khemri Brown
Citadel: Graveyard Earth
Citadel: Chaos Black Undercoat – Spray Can
Testor’s Dullcote – Spray Can
Magic Water (1:10 mix of Liquitex Flo-Aid to distilled water) for thinning
Construction and Conversions
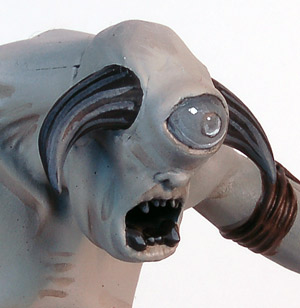
I started the model off by building the giant fairly normal. I glued all the limbs together as well as the body. Once these were dry enough I attached them all together and set him on the supplied base. I then took the head and shaved off the “lump” on the forehead with an exacto knife. For the eye I took the top of a Men-At-Arms head cut it off just above the brim and glued it to the shaved area I created on the creatures forehead. I then took super glue and applied it to any seams I could see and wiped it away quickly with my finger to act as an instant sealer for small gaps.
Once the glue set I busted out my green stuff and using a color shaper I molded it around the eye making sure to cover the old eyes and maintain the smooth transition for which the giant kit is known for. I let the GS set for about 2 hours then I went back with my color shaper and some water and continued to smooth out the eyelid. I then let this dry for another 2 hours, flocked the base with paver’s ballast and undercoated the model Chaos Black.
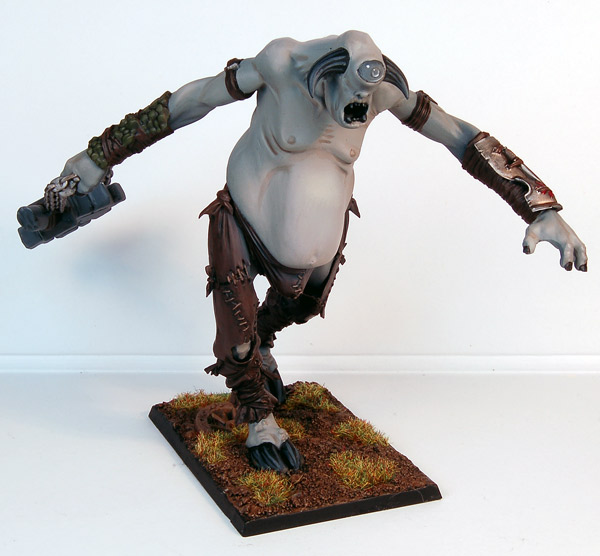
After allowing the undercoat to dry I busted out my Iwata Airbrush and gave all the skin on the model a coat of Trollblood Highlight from the P3 Line. I thinned it roughly 1:1 using magic water and put it straight through the airbrush. I applied a good even coat, followed by another coat from the top of the model to help naturally shade the big fellow. I then took Devlan Mud and applied thin layers of it to folds and creases in his skin. This helped to bring out more of an earthy element in the Trollblood Highlight and reinforce the fact that this guy is a giant dirty hermit with an eye of death. That completed the skin.
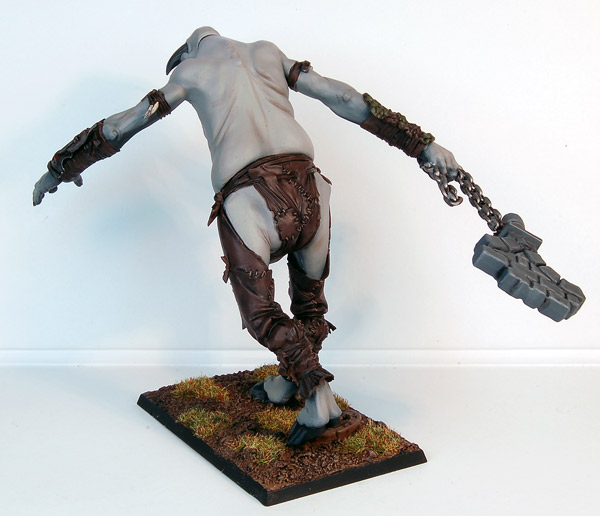
For the clothe/wrappings/so called pants I used P3’s Battlefield Brown followed by a Badab Black wash. Once the wash set I went back and highlight with Battlefield Brown again. Simple, yet effective. Making use of washes like this can be a great boon on large surface area models such as this. It also allows for some great speed painting. After the highlight was dry I took Khemri Brown and picked out all the stitches on the giants paints/clothes.
The dragon hide wrapping was a base of Catachan Green, followed by a Badab Black wash and then highlight with Catachan Green and Camo Green in a 1:1 ratio. The metals were all done with Chainmail followed by a wash of Badab Black and Devlan Mud. Armor details were picked out using Mechrite Red. The stonework was done by basing it with Adeptus Battle Grey, highlighting with Codex Grey and finished it with a wash of… you guessed it.. Badab Black.
The Dead Eye itself was painted using Gem Stone techniques working with Chaos Black, Adeptus Battle Grey, Codex Grey, and White. See my tutorial on gem work here for quick reference. The horns and nails were done by applying a base of Chaos Black and then highlighting with Adeptus Battle Grey. The model was finished off with an application of Graveyard Earth to the base followed by a wash of Devlan Mud. Once completely dry I varnished the Cygor with two even coats of Testor’s Dullcote and added static grass to the base. Giant one-eyed-beast complete! Here are some pictures of the finished product!
~ So there you have it! A quick and dirty way to create a Cygor for your Beastmen army. I hope you enjoyed the article and if you have any questions as always feel free to drop me a line at [email protected]! Festus out!