Hobby: FoW: French: Painting French Tanks
7 Minute Read
Mar 17 2011

Advertisement
 |
| Somua S-35 |
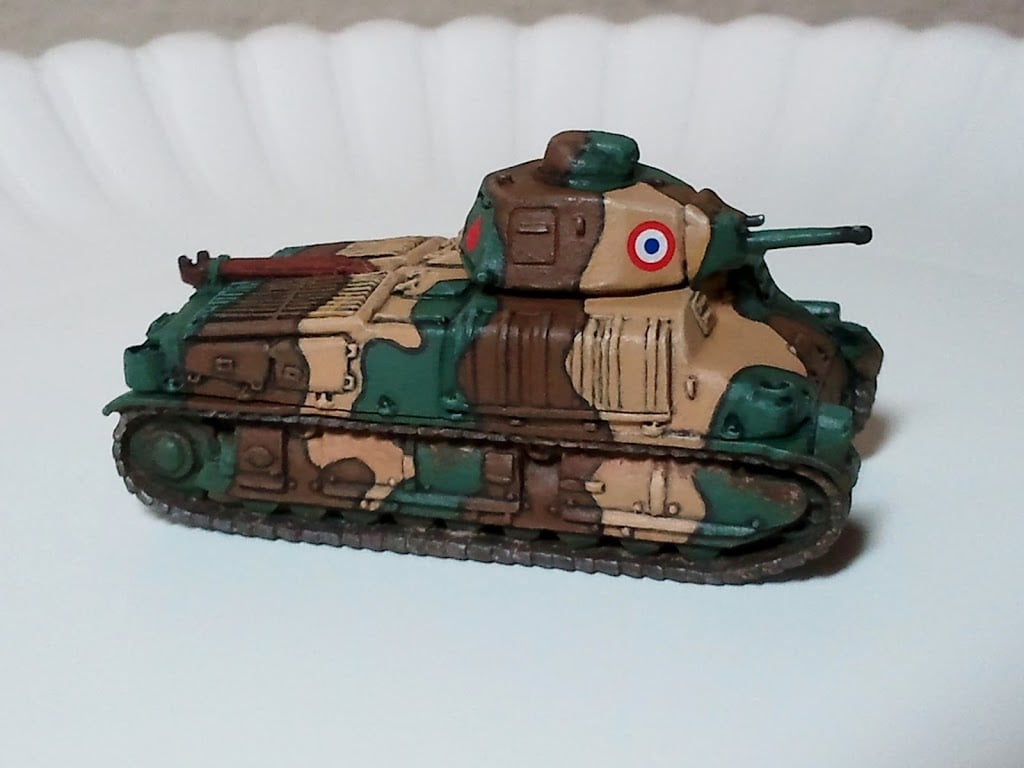
It is time, once again, to turn our attention to the paragon of military virtue known as the French Army. This time around I will discuss how I painted my FoW French vehicles, particularly the tanks, many of which had a peculiar outline of black around the different elements of their camouflage.
 |
| Somua S-35 with Green/Tan pattern |
In general, camouflage works by breaking up the outline of an object in order to make it less distinguishable from its environment. Myriad different forms of camouflage exist, some far more effective than others. Camouflage as a tool of warfare was still a fairly new concept at the onset of WWII, having only seen a great deal of use by the end of WWI. Tanks and other large vehicles, as well as artillery, relied on Camouflage to hide them from air reconnaissance and to make themselves more difficult targets for attack aircraft. Some armored vehicles also relied on camouflage to hide them from enemy view long enough to launch an ambush, or simply to make them more difficult to target.
The difficulty level of tanks in FoW varies depending a great deal on the basic color of the tank and what kind of camouflage, if any, it has. Most Soviet and American tanks are fairly straightforward, with camouflage being rather rare. German tanks used mostly soft camouflage, which can be done with some careful drybrushing or airbrushing. Hard-edged camouflage, especially with the near-black outline, can be quite a bit more difficult. There are some easier techniques that will yield acceptable results in a decent amount of time, and then there are time-consuming methods that try your patience and perhaps even sanity, but make for a very striking camo scheme that really catches the eye. What I will be showing you today is how I have (in my humble opinion) accomplished the latter. If you are looking for something a bit faster, Battlefront has a short tutorial on their site on painting French tanks that is quite a bit more forgiving, yet still gives impressive results.
I start by priming the tank and painting everything but the exhaust and tracks with Vallejo 895 Gunship Green. From there you have two ways to go that end in about the same result. You can either paint on your camouflage pattern and then paint the separating lines between the different colors, or paint on the lines as an outline, then fill them in. Using the former method, I first paint several camouflage patterns using Vallejo 983 Flat Earth, making sure to keep the patterns irregular while trying to break up the outline of the vehicle. I then paint on several patterns using Vallejo 912 Tan Yellow. In order to make painting on the yellow a bit easier, you can either paint it on top of the Flat Earth, or you can mix a very small amount of Citadel Foundation Iyanden Darksun with the Tan Yellow for the first coat. This tends to interfere very little, if at all, with Tan Yellow’s appearance, and should leave no sign at all after the second coat.
 |
| This tank, having completed the arduous crucible of step 1, is green. |
 |
| Somua S-35 completed up to this point on left, finished one on right. I made lines bigger at first to allow for a bit of leeway to shape the camo, but this is not at all a must. |
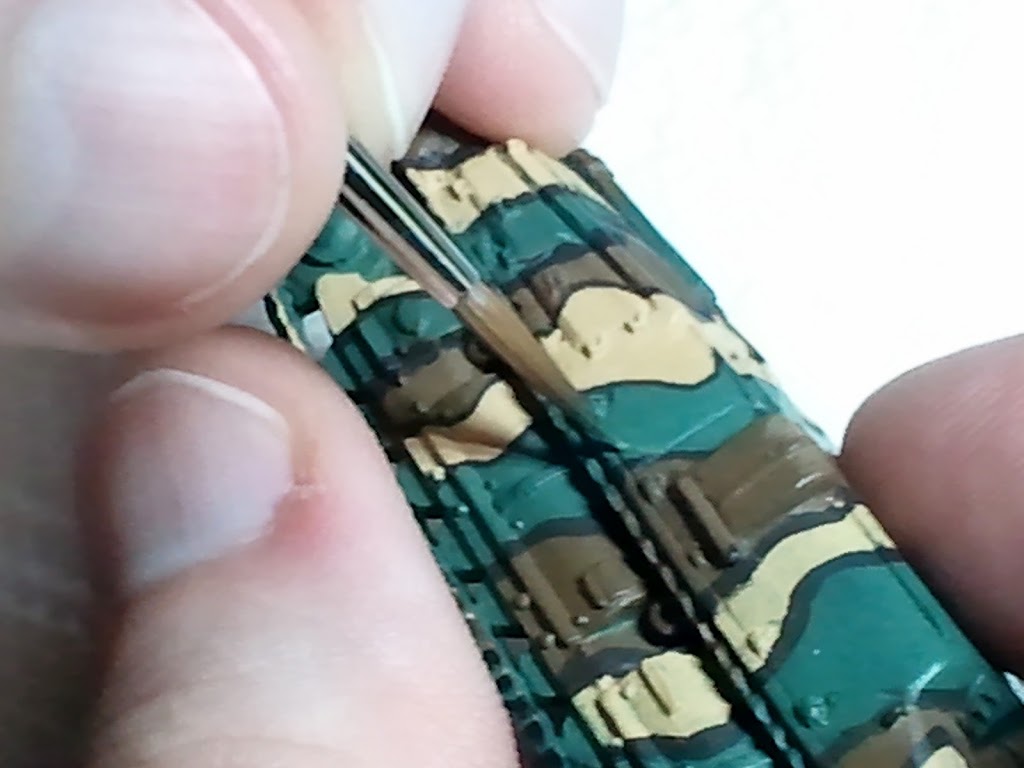
Do not worry about second coats just yet, though. For now you will simply want to get your camo pattern on the tank. Next you will want to paint your lines using Vallejo 822 German Camo Black Brown, making sure to draw a thin line anywhere two different colors meet. This may seem a bit messy at first, but there will be time to neaten it up once you have all of the lines drawn.
Having finished drawing all of my lines, this is where I will begin touching up my initial coat of paint, as well as making sure the lines are the thickness I want them. I generally try to keep them reasonably thin. To do this I cover thicker parts of the lines with the camo colors, rather than trying to make a perfectly thin line with the Black Brown. Carefully paint over the line with your camo colors and you can achieve a surprisingly thin outline.
 |
| I know, I should not be handling my model with bare hands. My terrible secret is out! |
Once that is done, I then use Citadel Badab Black wash in the crevices and deep creases of the model. I do not use it on the flat surfaces at all. In fact, it is more accurate to say that I am blacklining the different areas with the wash rather than shading them, particularly in the Tan Yellow areas. It is simply easier to use a black wash to accomplish this. To be clear, I do not use the wash on the entire model, only on the recesses themselves.
 |
| Using black wash very sparingly |
Once that has dried, I begin the meticulous process of touching up the shaded areas to smooth them out and neaten them up. This takes a bit of practice as well as patience.

Having finished the touch-ups, I begin mixing a small bit of white into each camo color to do some modest highlights on the most prominent parts and surfaces of the model. I try not to make the highlight of any one color more striking than another, as it tends to make the colors with less highlighting appear flatter than those with more. You could do this with limited and careful drybrushing if you are brave enough to risk making a mess.
Now that the camo is done, it is time for the details! Using water transfer decals is an easy way to get the markings you want on your tank, so long as the surface you apply them to is relatively flat. I start by applying a bit of brush-on gloss varnish to the spot where the transfer will be placed. This is not a must, but helps a lot. Next I apply a bit of Micro Sol decal setting solution to soften up the decal and make it a bit more real-looking. Once the decal is set and dry, I apply brush-on matt varnish to the entire decal, making sure I cover the areas where I used the gloss varnish. I may do this several times until I am comfortable that there is no glossiness and that the clear edges of the decal are no longer visible.
 |
| Getting started with some gloss varnish |
 |
| Finishing up with some matte varnish |
I now paint the tracks and other metal parts with some Citadel Boltgun Metal mixed with a bit of Vallejo 995 German Grey, but this is purely my own preference. I also paint the parts I intend to be rusty, such as the exhaust, with Citadel Dark Flesh.
I now spray the model with Testors Dullcote. Once that dries I use a few different pigments on the parts with dark flesh to create rust, as well as using a black pigment to create smoke on the exhaust and barrel. Finally, I use a dust pigment on the tracks and other areas that look like they would get the dirtiest. If you aren’t familiar with pigments, you can simply stipple most of these effects as well, using different browns and oranges for rust and whatever looks right for dirt, assuming you want it. Other weathering techniques that you may like should work just as well here.
A few final things to note about French camouflage: You don’t have to use the black lines between different colors. In fact, many tanks and armored vehicles did not have them. For example, of the Panhard AMD 35s, only the older ones had them. Feel free to use them, not use them, or mix them up. It is also much faster to forego the use of the black outlines if you are in a hurry to get your tanks off the painting table and onto the gaming one. Also, if you look at my army, I use the camouflage scheme on a lot of my artillery, vehicles, etc., but most carriers and artillery were really just green. I use the camo scheme as much as I do only to tie the army together more.
 |
|
| Renault UE carrier painted the same way as the Somua, but without outlines in the camo |
And that’s it! I hope some of this helps you get your tanks looking how you want them to look. Feel free to share any techniques you like to use, as well. None of us knows it all (at least I don’t). I have my first Early War tournament at the end of the month, after which I hope to share some useful lessons learned. To all those seeking victory on the painting table as well as the gaming one: I salute you! To all the trolls who can’t stand that Germany actually has someone to play against in this game: U mad bro?
Author: Mike Travis
Advertisement

