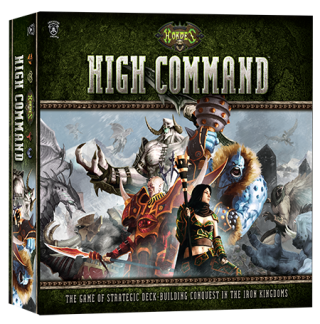
Review: Hordes High Command
6 Minute Read
Feb 19 2014

Advertisement
Not your ordinary deck builder. Privateer Press rolls out something innovative and new – here’s the skinny.
When I was given the opportunity to review the new Privateer Press deck building game recently, I was happy to jump into it. I have been playing Warmachine / Hordes for the last four years and love the setting of the table top game. When I heard High Command was coming out, I was jazzed to give it a go.
Opening the box you are given four packages of cards. One would think that would be one for each faction in the game, Trolls, Legion, Circle, and Skorne, but that was not the case and all cards are intermixed. It took us a few minutes to sort it out but then we were quickly throwing down cards.
I’ll say this – read the rules a few times before you try to play or you will be making mistakes as you go. The rules are easy once you have a couple of games under your belt, but there is so much card interaction that if you don’t read carefully, you will miss out on a lot of things.
The Basics
First you have five Warlock cards of which you will pick only three. In my opinion, Warlock cards are more of a super solo as opposed to the battlefield leader of the tabletop game. The reason I say super solo is because once you rush them to a location after that battle they are gone and you can’t use them again. So they are like a Hail Mary pass to save a fight. Next you have your army cards, which can be warriors, warbeasts, or resource cards. The other two types of cards are Location cards, and Winds of War cards.
First you have five Warlock cards of which you will pick only three. In my opinion, Warlock cards are more of a super solo as opposed to the battlefield leader of the tabletop game. The reason I say super solo is because once you rush them to a location after that battle they are gone and you can’t use them again. So they are like a Hail Mary pass to save a fight. Next you have your army cards, which can be warriors, warbeasts, or resource cards. The other two types of cards are Location cards, and Winds of War cards.
Picking your three Warlock cards determines what detachments you will be choosing from. There are two different colored slashes under the attack stats on the left side of the card – you are able to choose one of the two colors as your detachment. You will end up with three different detachment colors that consist of your army deck.
Each army card is associated with a specific detachment. Not all detachments are the same so after you have a few games under your belt, I would advise going over them all and seeing what you believe will be strong on the table. All cards in your army deck have a purchase price, and the warrior/warbeast cards also have a rush price. The rush price will be much higher than the normal purchase price because when rushing a card, it goes directly from your reserves onto a location instead of into your army deck. You have to decide if you need it out right now or can you wait a turn or two before it shows up in your hand.
Now let’s talk about purchasing the cards. Where do you get the resources to purchase or rush the cards? That comes from basic resource cards, resource cards and warrior and warbeast cards. Yes you can realistically use any card with a WAR or CMD stat in the top left corner as currency to make purchases and rushes. You start the game with nothing but basic resources cards. The resource value of all cards, except Warlock and Winds of War, is located in the top left of each card. This value denotes how much it’s worth if used to purchase or rush any other card. The resources are CMD and WAR. The first cards in your starting hand are nothing but basic resources, as stated earlier. After you draw your six original basic resource cards, you look at your CMD and WAR resource icons and see how much of each you have. Let’s say you want to purchase a Slag Troll from your reserves and add it to your army deck. The purchase cost of that card is four WAR. Then you find the cards in your hand that add up to four WAR. If you have to go over, that’s fine – you just waste the extra amount. Once purchased, that card goes into your army deck. This will be what you draw from for your next hand. One cool thing this game offers is the ability to bank a card – meaning you can hold back a card instead of either spending it on purchases or rushing a card. You must discard all your unused cards but one if you choose to bank at the end of your turn.
The Turn Sequence
Now let’s talk about how the actual turn is laid out. I haven’t talked about the winds of war step, but I’ll go into detail now. These cards are flipped over by the person who went first. Read these cards carefully. I’ll say it again – read these carefullyand remember what they say. Some of the Winds of War cards are just fluff, but most of them grant cheaper purchases of a type of card. I have kicked myself in the butt quite a few times because I forgot about the Winds of War card and spent the full amount when I didn’t have to and could have used that extra to purchase or rush something.
Now let’s talk about how the actual turn is laid out. I haven’t talked about the winds of war step, but I’ll go into detail now. These cards are flipped over by the person who went first. Read these cards carefully. I’ll say it again – read these carefullyand remember what they say. Some of the Winds of War cards are just fluff, but most of them grant cheaper purchases of a type of card. I have kicked myself in the butt quite a few times because I forgot about the Winds of War card and spent the full amount when I didn’t have to and could have used that extra to purchase or rush something.
After the Winds of War card is flipped and read, you go to the capture step. In this step, you are fighting over the location cards. If you have two more cards on a location than anyone else, you capture that location. That location card then goes into your discard pile and gets shuffled back into your army deck as you run out of cards. The warrior/warbeast cards at that captured location go into your occupying forces pile. Those cards are taken out of battle for the remainder of the game unless there is an effect that lets you draw a card from that pile as well. If you don’t have two more cards that anyone else at that location, then you go into your order step. This is where you purchase a card for your army deck or rush or deploy a card to a location. One thing to note – unless you rush a card straight from your reserves, you will pay the purchase cost twice. Once to add it to your army deck and second when it’s in your active hand and you deploy it to a location. So think about if a rush might be cheaper in the long run.
After you have finished your order step, you get to start hacking and slashing – the battle step. Each player adds up the total power and health of all the cards at that location and determines the outcome at that time. Be sure to read the abilities of each card because they will almost always add a bonus to something during the battle step. So say you have three cards at a location, and you have total seven power and five health. Your opponent has two cards at a location with a total of four power and four health. Your total of seven power beats his total health of four so you kill both of his cards. Depending on how the stats break out individually, your opponent may be able to kill one of your cards or none, so look at the total and then the individual stats.
Winning & Final Thoughts
Determining a victor can happen in one of two ways – there is a specific Winds of War card that if drawn, the game immediately ends or if you run out of location cards. You add up all victory points in your army deck, your discard pile, and your occupying forces pile and the player with the highest total wins the game.
Determining a victor can happen in one of two ways – there is a specific Winds of War card that if drawn, the game immediately ends or if you run out of location cards. You add up all victory points in your army deck, your discard pile, and your occupying forces pile and the player with the highest total wins the game.
During my testing, we played a lot of just horde-on-horde action, but we also mixed in some Warmachine decks as well to see how compatible they were. I’m happy to say it worked seamlessly – kudos to Privateer Press for that effortless transition. The first couple games I played, I was thinking to myself that there is no real strategy to the game and it’s just the luck of the draw. But now I admit that thought process was wrong. There are a lot of subtle nuances to this game that come out after you have played for a bit.
I will be playing this when time for the tabletop is not there; I just hope I can talk my wife into playing and not having to always hound my buddies at work!
Author: Guest Columnist
Advertisement


