Hobby: It’s all in the Details – FoW
3 Minute Read
Jul 18 2010

Advertisement
For those getting into Flames of War, 15mm figures can seem a bit daunting. It seems especially so for those of us who started with 28mm figures, but it needs not be.
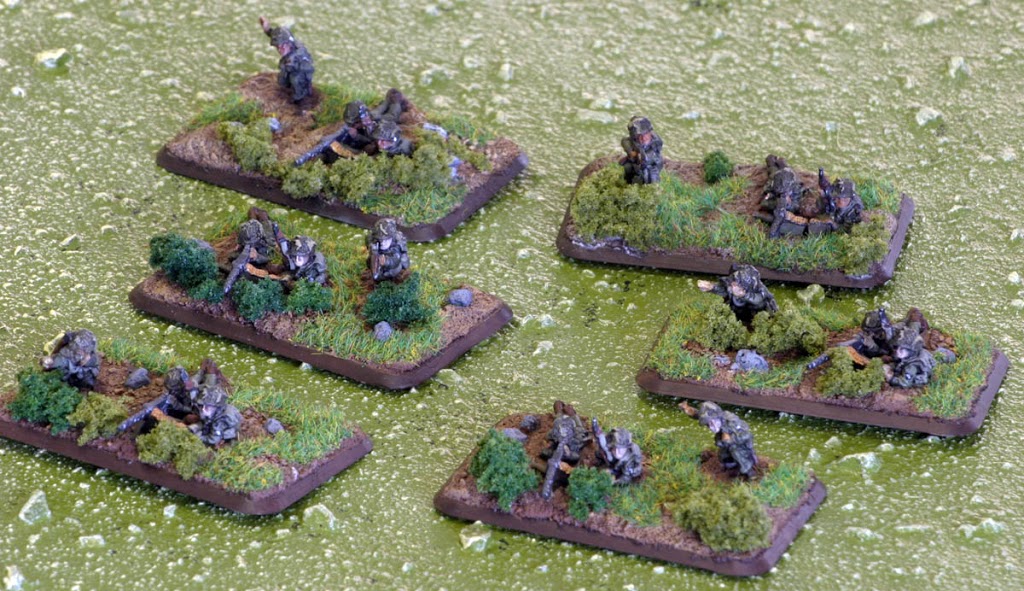
28mm figures have a scale that allows one to paint details and do some amazing artwork. 15mm is small and the level of detail is less; however there are some free hand details one can paint that will really make your infantry stands pop, and that will deliver the same level of hobby satisfaction.
28mm figures have a scale that allows one to paint details and do some amazing artwork. 15mm is small and the level of detail is less; however there are some free hand details one can paint that will really make your infantry stands pop, and that will deliver the same level of hobby satisfaction.
In Flames of War I play 101st Airborne. I make no secret about the fact that my choice is based on the book and miniseries Band of Brothers. I love their story and it makes the game more real for me. I have also done some research beyond Band of Brothers mostly for uniforms and color choices. One item that stood out in many of the photos was how visible the white of the “Screaming Eagle” was. What stood out more was tales of how it was visible at distance. Also when most of the men jumped in Operation Market Garden they bore a full color American flag on their right soldier. I decided that for my infantry painting the Screaming Eagle patch and the American flag would be the details I would paint.
The patches are easier to paint then one would think. The American flag is a bit trickier than the Screaming Eagle but not all that hard to paint. Color selection would seem pretty easy at first but the blue is a bit tricky. On the actual flag the blue is pretty close to Regal Blue. At the scale we’re working at Regal Blue is too dark and will look almost black. This is why you’ll want to go with Ultramarine Blue. Also remember that the US Flag has seven red stripes and six white, which means that you’ll want to paint more red stripes.
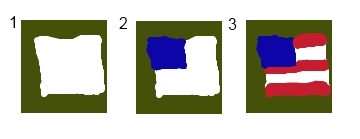
I paint the patches after I have finished the uniforms, and usually it is my last step. I will also note that to get this level of detail I’m using a Windsor Newton Series 7, 3/0 brush, which makes this job easier than using a lower quality brush. The steps are pretty easy for the American flag. 1. Paint a white square on the right shoulder. 2. Paint a smaller blue square in the upper left hand corner of your white square. 3. Paint three red stripes one on the remaining field of white. There should be one on the top, one that goes in the middle (I paint mine from the bottom right hand corner of the blue box) and one across the very bottom. Don’t bother painting the stars on the flag. The lighter blue color will convey they are there without actually painting them.
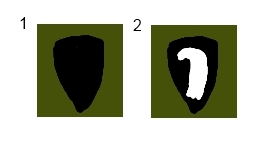
The Screaming Eagle patch is even easier. 1. Paint a basic shield shape on the left shoulder in black. 2. Paint an apostrophe-like shape in the middle of the black shield. Done!
Other details I paint on my paratroopers are white dots on both sides of the helmet that simulate the white painted card suits that were painted on the helmets. I also paint the white command stripe on the back of the helmet. Remember that a vertical stripe was used for officers and a horizontal stripe for noncommissioned officers.
As you see a few basic painted details can really make your infantry stand out and help them emulate what they were in the real world. Next time you paint your Flames of War Figures try painting American flags on your US GI’s or the Waffenfarbe on the epaulettes of your German infantry.
So what details do you paint on your infantry stands? Sound off and let us know what details you paint.
Author: Guest Columnist
Advertisement