HOBBY: On Light and Shadow

Lighting, where miniatures (and most things) are concerned is generally a collection of various properties of light/shadow that we perceive as a whole. Lets take a closer look fellow painters.
I am going to break all of these properties down individually so we can better understand each of their signature effects. Hopefully this will lead to a better understanding of why the various techniques in miniature painting work to create the a successful illusion of reality.
Our perception of these properties is one of the visual cues we use to judge depth, position, shape, texture and size of three dimensional objects in the world around us. Miniatures though, by their very nature, are too small on their own to convey the light/shadow properly at that scale. Therefore we as painters need to exaggerate and/or even fake these properties to fool the eye. So let’s dive in.
 |
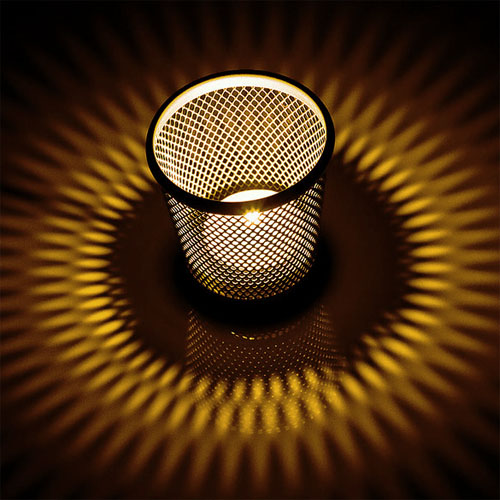
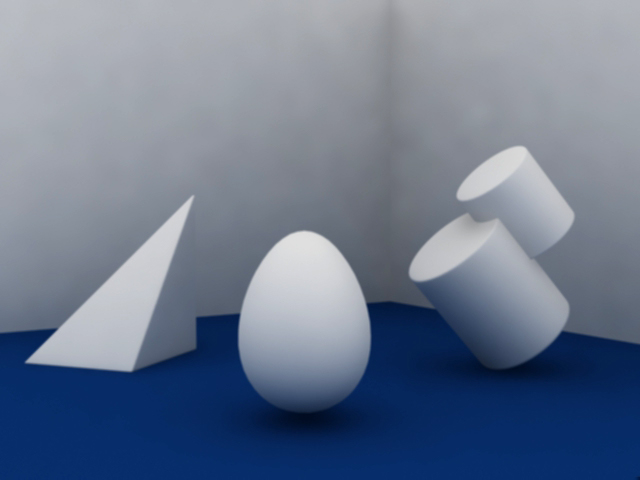
| Here we have a typical lighting scenario that you may encounter as a miniature painter. Though it looks straight forward, there is actually quite a bit going on here. There are several kinds of lighting and shadows at work, each contributing its effects to the scene. With a complex subject such as this mannequin it can be difficult to notice all of the subtleties at work. Following this image there will be a series of images explaining and building on the various lights and shadows the article discuses. They are in order but not necessarily relevant to the definitions preceding or following them. they should be considered separately after you have read through the article. Come back to this picture after you have read through the article and looked through and have a grasp on the other images. |
Lights
-Zenithal (Direct) Light
Most of you are aware that a figure should be painted to emulate being lit from the top by natural lighting as if it were of actual size standing in a real environment, if your plan is to convincingly light a model. This most common approach is zenithal lighting, referring to being lit as by the sun at its zenith – the sun usually being the strongest and primary source of direct light in any scene. The desired aesthetic is that of lighter and/or brighter surfaces facing directly up at this hypothetical sun, with surfaces turning to shadow as they move away from the light. Washes, wet-blending, zenithal undercoating and even dry brushing are some of the ways we try to accomplish this in miniature.
 |
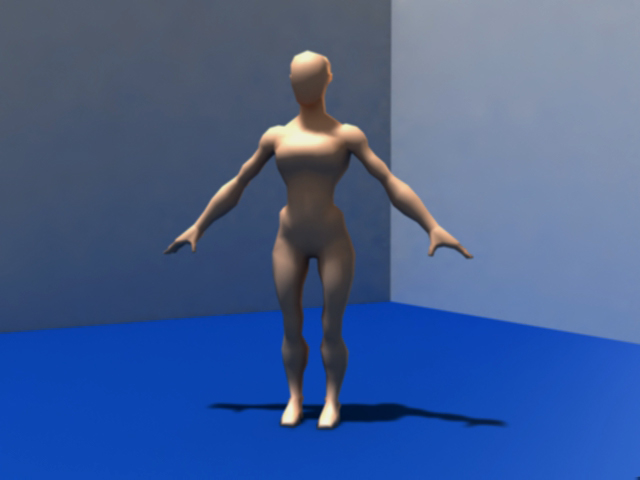
| I have switched to simple shapes in the following images to make it easier to pick out the various light and shadow properties. In this image we have nothing but a single direct light source – not even any cast shadows (more on that later). The objects are simply shaded revealing the most basic information about their shape. However, notice the difficulty in judging their size and location in space. |
-Source (Secondary) Light
Source lighting, also referred to as Object Source Lighting, in general terms is usually an artificial or secondary light other than the expected overhead natural light. It can be as minor as additional illumination from a small dim source or the major, possibly only, source of lighting for a more dramatic effect – such as a dungeon adventurer carrying a torch. It is commonly used to add tension, direct the viewers eye, or to introduce secondary color to a composition. It’s also worth noting that its effects are not usually felt on a surface that is receiving a much stronger dose of direct light and so would only show its effects in dim lighting or shadow.
-Bounce/Reflected Light
When a direct light strikes a reflective or bright surface it usually bounces off and strikes another surface. With each bounce the light is affected by the characteristics of the surface it has just struck. This can cause the light to lose strength by being partially absorbed, to become diffused or scattered by the surfaces texture, and to change color by have various wavelengths of light adsorb while others are allowed to continue on. These new characteristics can become apparent when the bounce light strikes the next surface – more so if that surface is not receiving any direct light such as in a shadow. Standing a figure in front of a light (reflective) wall will bounce light into the shadow at the figures back – this can be used as a rim/back-light (below). Also, if your shadows are not black, you have the opportunity to introduce some color from an adjacent surface into that shadow as if light was bouncing into it.
 |
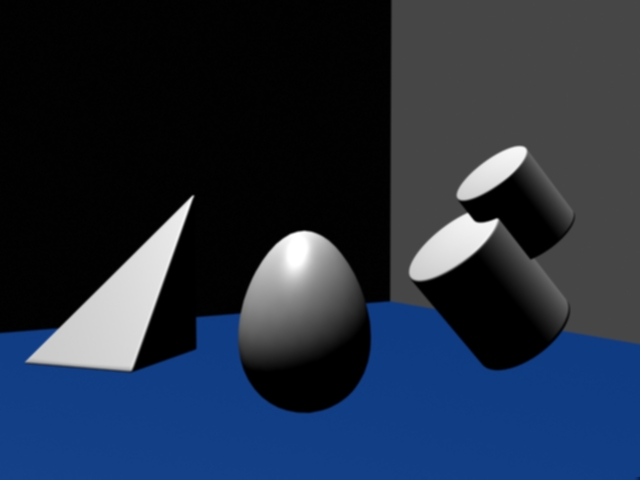
| In this image we have simply added cast shadows and self-shadows – that is shadows cast by the objects on themselves. Notice that we now can see a spatial relationship between the objects and their environment. We have more information about their size and the location of the light source as well as more detail about their shape – as with the pyramid and the cylinders. |
-Rim/Back-Lighting
Rim lighting, or back-lighting, refers to a light used in photography, stage lighting and painting to maintain or further define silhouettes, preventing them from getting lost against the background and/or shadows. It is used in such a way that leave only a small rim or outline of light at the edge of a figure or prop from the observers point of view. It is often colored in a complimentary fashion to the subject as it appears under the primary light. Its important to note that an Object Source Light is a great source for back-lighting a subject.
-Ambient Light
Ambient light is the result of light from all the sources of light in a scene repeatedly bouncing around the scene and diffusing into the environment such that it ceases to have any definable direction or source. The brighter the primary sources of light, and the more reflective the surfaces in the scene, the more ambient light is available and the brighter the overall scene will appear. One of the major effects of ambient light is to reduce the darkness of shadows. A scene lit just by ambient light will have no cast shadows, but will have shadows cased by Ambient Occlusion (below). To create the illusion of ambient light in miniature avoid going all the way to black with your shadows.
 |
| Now lets back up a bit. Here we have removed all of the cast shadows and even the direct light source and instead have lit the room only with ambient light. The result is a fully, if dimly lit, room that gives us no information about a light source, but still gives us plenty of information about shapes and spatial properties. This is due to the property of Ambient Occlusion – which is simply the ambient lights inability to bounce into the recesses of a scene giving us the perception of shadow and reveling the shape of the objects. |
Shadows
-Cast Shadows
Cast shadows are fairly self-explanatory, however there are some important features about them to note. The brighter and less diffused you primary light source the harder and darker cast shadows become. For an example of this you can observe the difference in shadows cast by a room lamp with and without it’s shade taken off. The purpose of the shade is to diffuse/scatter as or reduce harshness of the bulb’s light. Cast shadows from the sun have parallel edges, while shadows cast by a nearer light source gradually become more obtuse. This is because the sun is so far away that it’s light rays are, for all intents and purposes, traveling parallel to themselves. With rays emanating from a light equally in all directions, distance to the subject determines the angle between rays when they strike a surface. Move a light closer to the subject and it’s cast shadow will widen. The more ambient light in the area the lighter the cast shadow will appear. Due to ambient Occlusion (see below) the end of a shadow will seem lighter and softer than the same shadow nearer the subject casting it – this results in a gradient of shadow. Cast shadows are a visual cue as to the location of an object in space and the shape of the environment. For instance, if an object is floating off the ground it’s cast shadow is disconnected from the caster and appears lighter. If the shadow cast on the ground or another subject is rippled or perturbed you can determine the texture of that surface as being rough.
 |
| OK, now back to the fun. We have now added all of the previous effects and included a new property – that of bounced or reflected light. Notice how an object’s self-shadow is being under-lit by the dimmer light bouncing up off the floor, while the cast shadows, slightly brightened by ambient light, are still darker because no reflected light can bounce into them. Also notice that the light bouncing off of the floor is picking up the floor’s color and adding it to the shadows. This effect is particularly noticeable because the objects are white and so they reflect back to our eyes the exact color they are receiving. |
-Self-Shadowing
Self shadowing is a subset of cast shadows. They appear when a subject casts a shadow across itself. Its important to note that self shadowing is a great way to enhance the contour and dimensionality of a subject as the shadows are deformed by the curvature of the subject. Where cast shadow locate an object in space, self-shadows define the subjects volume in space. Keep in mind that they will behave in the same way and exhibit the same characteristics as all cast shadows (above) including indicating the surface texture. Self-shadowing in miniatures is usually indicated by blending a gradient of darker color away from the light source. This effect will occur naturally on the figure, but due to its size and light pollution it must be painted (artificially enhanced) on the miniature itself – usually with blending, washes or glazes. Be mindful of the direction your primary light is coming from at all times or you risk breaking the illusion.
 |
| Now we are getting into subtlty. By adding another light source from behind and to the right (off stage in this case) we have created the effect of rim or back-lighting. This helps to further define our objects. Notice the bright crescent of light at the edge of the egg-shape. Also note that the pyramid is now distinctly separated from the wall behind it by a brightening of its shadow and highlighting of its back edge. |
-Ambient Occlusion
Ambient Occlusion (AO) is a difficult concept to understand as it is almost never observed by itself, but we unconsciously notice its absence. Without it even a scene with light and shadow will lack some depth – indeed, a scene lit by nothing but ambient light (no direct lights) can look very dimensional just because of the Ambient Occlusion effect. AO occurs when diffuse scattered light bouncing around the environment is unable to get into the recesses of objects in the scene. This results in the perception of shadows in those recesses. The narrower and/or deeper these recesses the less light gets in and the darker the shadow appears. This is why a cast shadow darkens the closer to its caster as less ambient light penetrates to the recess between the caster and the surface it sits on. When we wash or black-line a miniature we are attempting to mimic this effect. When scale military modelers use an airbrush to do “color modulation” they are attempting to mimic two effects simultaneously – AO and Gradient illusion (below). Another common way to get this effect is to dry-brush with a lighter color over a shadow colored base.
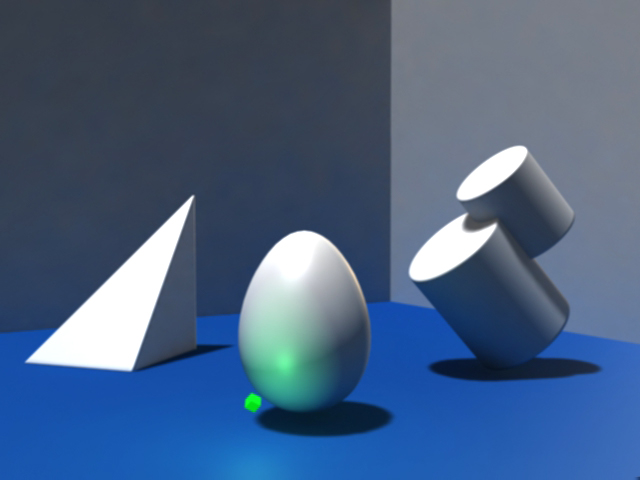 |
| Behold! A Source Object Light. Here we’ve added a small secondary light source to the scene. One of the main properties of these light sources is the rapid decay of their influence. In other words, the effect of their presence is only strongly felt by object nearest to the light and rapidly falls off until it has little of no affect on most of the objects in the scene. We notice only a bright spot on the nearest object and slightly brightened spot on the floor below the glowing object. In both cases the lights color is imparted to those surfaces but to a lesser degree on the colored floor than the white egg. |
-Gradient Illusion
While not strictly a shadow, the Gradient Illusion is the perceived darkening or lightening of a surface as it approaches a bordering lighter or darker value. This trick of the eye can be used to enhance the edges of panels or changes in plane of a surface. further increasing the perception of dimensionality and scale (color modulation). It can also be manipulated to change the perceived sharpness or roundness of a plane change – an abrupt change in value will look like a sharp edge where a blend of the adjacent lighter and darker color will look like a rounded edge. All of this is important because in a miniature, anything but a drastic plane change will look much the same value as it is the same color being hit by the a very similar amount of light. At actual size the top of a tank turret for instance, will be lighter on the top than on the side, with an obvious and easy to perceive plane change – in miniature we would actually paint the top a lighter value of the over all color and paint the side with a slight gradient darkening as it goes up to the edge of the top panel to enhance what is lost at the smaller scale.
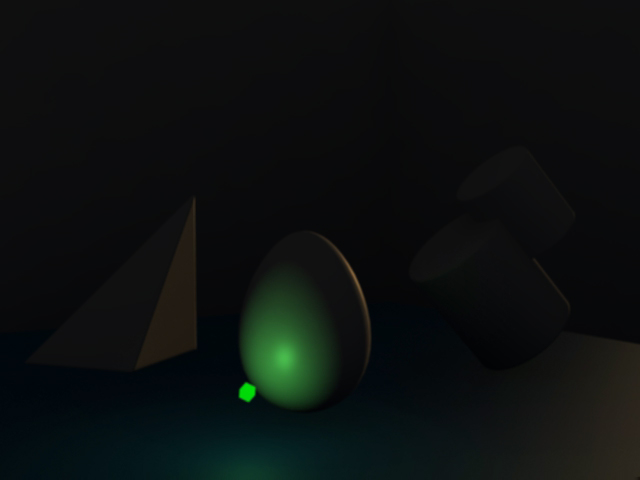 |
| Lastly, we have the same scene illuminated only by the glowing little cube and the rim/back-light. This is immediately more dramatic and tense because more information is suggested than revealed, adding instant mystery to the scene. An important thing to notice is that without the rim/back-light most of this scene would be lost in shadow – the egg would lose its outer edge and we would have to guess at its shape. The glowing cube by itself would simply fail to reach and illuminate the rest of the objects because of the rapid decay of its light. |
Well, there you have it. Thanks for sticking with me through what was arguably an exhausting read for a blog article. I hope that this will serve as an ongoing resource for hobbyists that are interested in understanding the effects of light and shadow and therefore how to use them to advantage in there painting. Good luck to you all.
In the future I would like to do some similar articles on specularity and texture, as well as some color theory. If you have any questions about this or suggestions for any other esoteric art subjects you would like to see covered, don’t hesitate to speak up. Later!
