40k HOBBY: Painting Dark Eldar Skin

Hello once again, readers. iPaint here with another Dark Eldar tutorial, this time for painting skin. I’ve always loved the pale, pasty vibe that Dark Eldar skin gives off, and here I present you with a quick guide on how to acheive a quality tabletop look in only 5 steps.
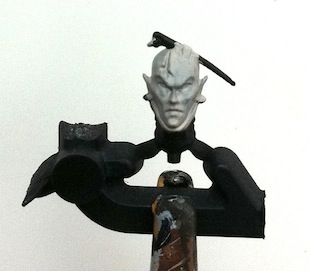
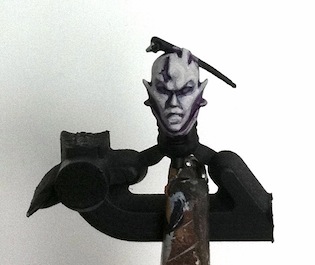
Paints needed for skin: Dheneb Stone, Skull White, and Leviathan Purple wash. A small detail brush will come in handy for controlling your highlights, as well as any details you wish to add later. I am starting from a black primed model, but this guide can easily be applied to a model primed in any other color. A second thinned coat in Step 1 may be necessary depending on your original base color.
Step 1: Apply a thinned basecoat of Dheneb Stone to the entire surface, making sure to clean up anywhere the paint pools in the details.
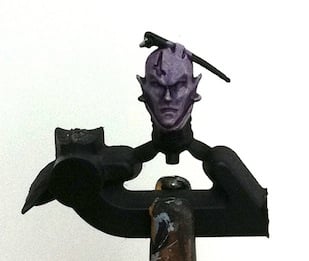
Step 2: Wash the whole area in Leviathan Purple, again watching out for any areas where the wash may be pooling too much, such as in the eyes and around the ears. (I’ve only used Leviathan Purple for my Dark Eldar, but you can easily try Asurmen Blue, Ogryn Flesh, or any combination of washes or inks to create the tone of skin you are looking for.)
Step 3: Apply a coat of thinned Dheneb Stone to the majority of the skin areas, leaving the recesses dark.
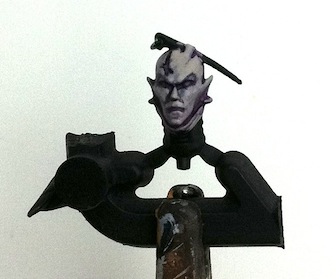
Step 4: Apply a 1:1 mix of Dheneb Stone and Skull White, thinned with a bit of water, to the raised areas of the flesh, focusing in this case on the nose, lips, chin, scalp, eyebrows, tops of the ears, and cheek bones. At this point, consistency in the paint is necessary, so a second coat may be necessary to provide a smooth layer of paint.
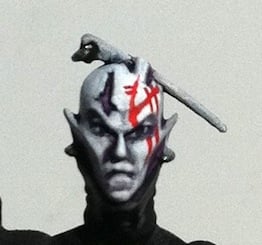
Step 5: Finally, apply a couple thinned coats of pure Skull White to the highest raised areas of the skin. White is easiest to work with when it is watered down to a milky consistency. Too thick, and the paint tends to dry in clumps, and too thinned, the paint runs everywhere without any control. You want the paint to flow off your brush and stay where you place it, but not be too thick.
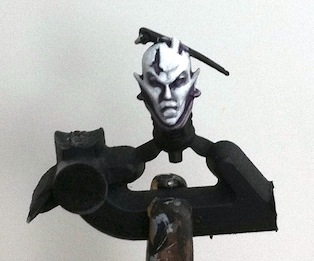
At this point, your Dark Eldar is ready for the tabletop. But, if you want to take it a step further, here’s where you can add some details like eyes, tattoos, and other details.
I used thinned Blood Red for the details with a fine detail brush. The eyes were given a thin line of Skull White, followed by a dot of Chaos Black. Make sure the pupil goes from top to bottom of the eyelid, otherwise the model will have a startled expression on its face. The bone detail was given a coat of Dheneb Stone, followed by a Bleached Bone highlight. The black body suit was cleaned up with Chaos Black and highlighted with Codex Grey. The jewelry was painted with Chainmail.

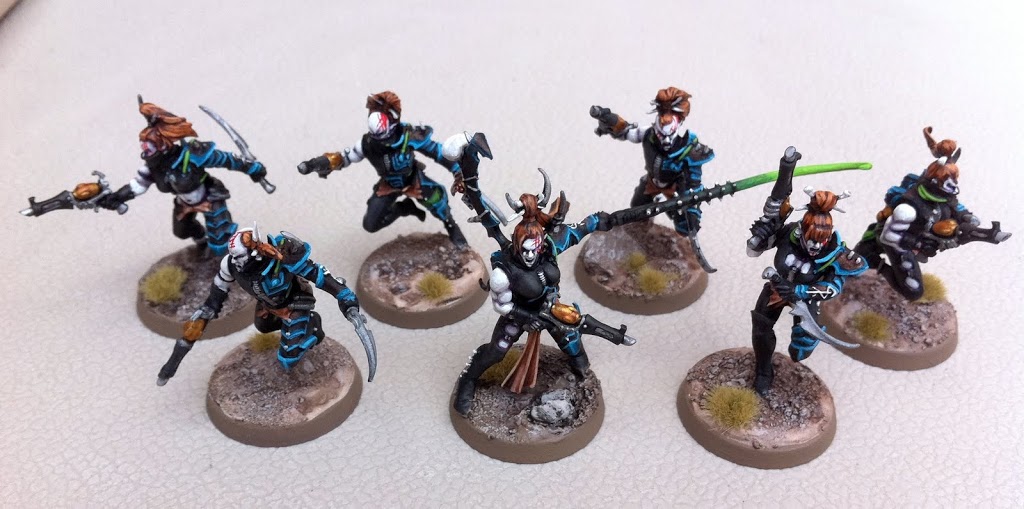
And there we are! Happy painting. I’ll leave you with a shot of some of my Wyches painted using the same technique.
Comments, questions, criticism? Leave a post below!
~iPaint

