40k: Flying Vehicle Flight Routes

Whether you are communicating, keeping up foreign relations, or you know… giving him the bird… here is an intro for some flight routes for your fliers.
Basic Flight Routes
We will take a look at Stormravens for this example but the same concept applies for other vehicle fliers and may not apply to Flying Monstrous Creatures.. The arcs are front (MM), and two side sponsons (Hurricane Bolters, HuB). Note that only the optimal 12″ distances are noted to get the 2D6 melta benefit and the rapid fire bolter benefit. Also, the Assault Cannon (TLAC)is not indicated as it is on a separate turret with 360 degree rotation.
So here is a basic max turn route, the square:
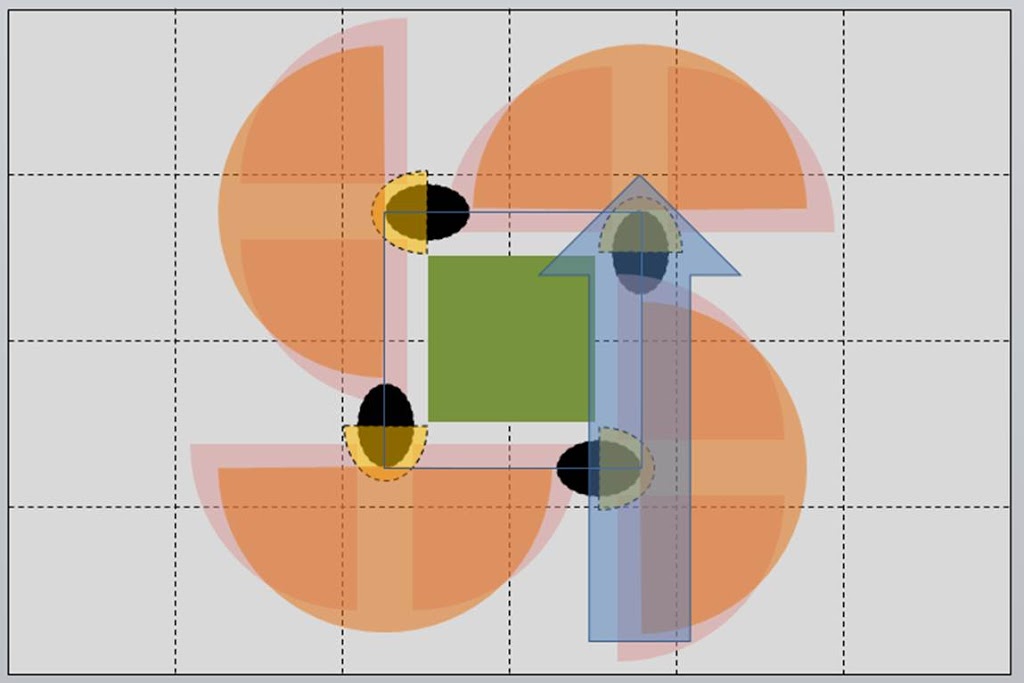
Initially one would think that the square would be best because it utilizes the max turn radius of the flier. But we quickly see that there is a large “safe zone” where the flier can only target with its TLAC. This formation allows for firing on the initial target on turn 2 and turn 6.
The pentagon route looks like this:
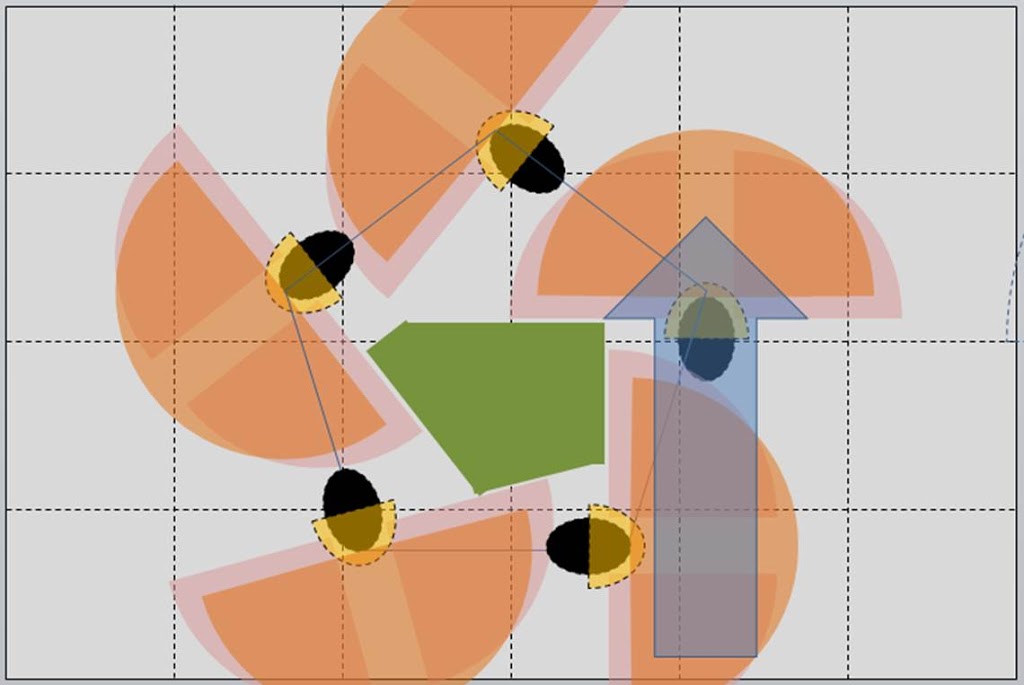
This route also creates a large safe zone but only allows for firing on the initial target on turn 2.
The L-shape route looks like this:

This route allows for two potential shots at a same unit during the straight-double-run. This straight-double-run is the best possibility for deployments on the long table edge and on a short table edge deployment a straight-triple-run is possible.
The All-in route:
This is the best option imho. It allows for 3 passes at the same target during turns 2, 4, and 6. While your flier is off of the table half of the time, you are able to concentrate your fire where it is needed most.
Things to consider
Controlling a flier:
– Target priority is key, but think about how you can get a double pass. To do so the first pass will need to be over 19″ away from the target, so firing outside of 2D6 for melta and rapid fire for HuB. If the All-in route is best then commit to it and hit the high payoff targets to deny your opponent victory!
– Know that sometimes routing your flier off of the table may be the best move. While you miss a shooting step, you are almost guaranteed a shooting step to deal with a threat, and you protect your flier from one round of shooting against it!
– With pre-measuring in, measure two moves ahead with your flier, if your next movement results in leaving the table determine if it would be best to just leave the table now. If you want to keep the flier on the table make sure your orientation allows you a 90 degree pivot and enough table for your base. There should be no reason for an unexpected off-table move.
– Concentrate fire by keeping fliers together. Since fliers have three passes using the All-in route if you keep two fliers together you can optimize these passes to completely annihilate units and focus on something else next turn.
Going against a flier:
– Deployment and movement is key. Be careful to not line your units up and allow a double pass down your formation.
– If you make a mistake then take out possible routes by positioning units in the flight path from 18-inches and longer, this will force him to pass over units (not being able to shoot them except with TLAC) or turn away from your units.
– Corners are safe, center is dangerous. Place fragile units in the corner, this allows only one pass with the potential of leaving the table edge and avoiding a round of shooting.
– After a flier is placed, the safe-zone is to the flier’s rear for three turns before he can target you (unless your opponent goes All-in against your unit). Use this movement zone to safeguard units from the flier.
Any other lessons learned from play-testing with fliers?
– Ender
