Right – deployment. This is perhaps the single most difficult part of 40k to talk about yet along with movement, the most important to get right as they are the areas you have the most control over and thus how you can dictate games without relying on dice. Matt and myself over at 3++ is the New Black have been doing a series of articles to help others with their play against Tau; this may seem counter intuitive as it’s always been one of my main loves but we’re all about improving your average level of play and since people seem to be struggling with Tau lately, we’ve been placing a bit of a strong focus on how to play against the blue fishheads. Onto the deployment stuff…
I keep saying this but the more you remove dice from the game, the more you will win consistently. Now Matt has done an already excellent post about what to think about when deploying against Tau so I’m going to be looking at a few of the principles I look out for as a Tau player to help deploying against Tau (as they are one of the Internet bugaboos currently). This can be applied to any old army but is particularly important here – you just need to extrapolate what is happening and against what type of army you are playing against.
The easiest way for me to address the issue of the complexity of deployment and describing it boils down to this – where do you want your army to be end of Turn 1? End of Turn 2? End of Turn 3? Don’t try and think beyond that until you are able to do those three turns (particularly 1 and 2). Following that, flip it to your opponent’s side – where does your opponent want to be end of Turn 1? Turn 2? and Turn 3? etc.
Example 1 – Deploying the Aegis
STOP DEPLOYING YOUR AEGIS WHERE YOU START. Remember Matt and our Vassal game? Where was the Aegis? Midfield. What did it do – saved an extra 16.67% of wounds on Khorne dogs as he was able to move up to it during the game and consolidate behind it not mention he had Scout.
What we see below is a Tau army deployed on behind an Aegis when it has first turn and Scout moves for Pathfinder squads.
The Aegis needs to be roughly 6-12″ further up; even if the initiative is stolen, you’re still getting the benefits of the Aegis 90% of the time and when it’s not stolen, your army is in a better position game long and importantly, it’s harder to hide elements of your army range wise. Those Pathfinders for example either need to expose themselves outside of 4+ cover to have a more effective threat range or are a static 36″ threat. If they do Scout over the Aegis and you’re seized upon, well now the problem is compounded.
Let’s see my resulting deployment…
And we see I have stayed out of range of his 36″ weapons including the Markerlights and Broadsides. Further to this – my Markerlights are on more mobile platforms which can move and shoot at full BS and therefore my heavy weapons (i.e. Broadsides, Sniper Kroot or if I had other Pathfinders) can snap fire at a normal BS rate. Given this is an objective game and I have two Riptides and three Jetbike units, I haven’t given up board control but have gained first strike by a poor placement of an Aegis line.
Put it where you want to be Turn 1 and more often than not, push it a little bit further up so you’re not limiting your movement Turn 2.
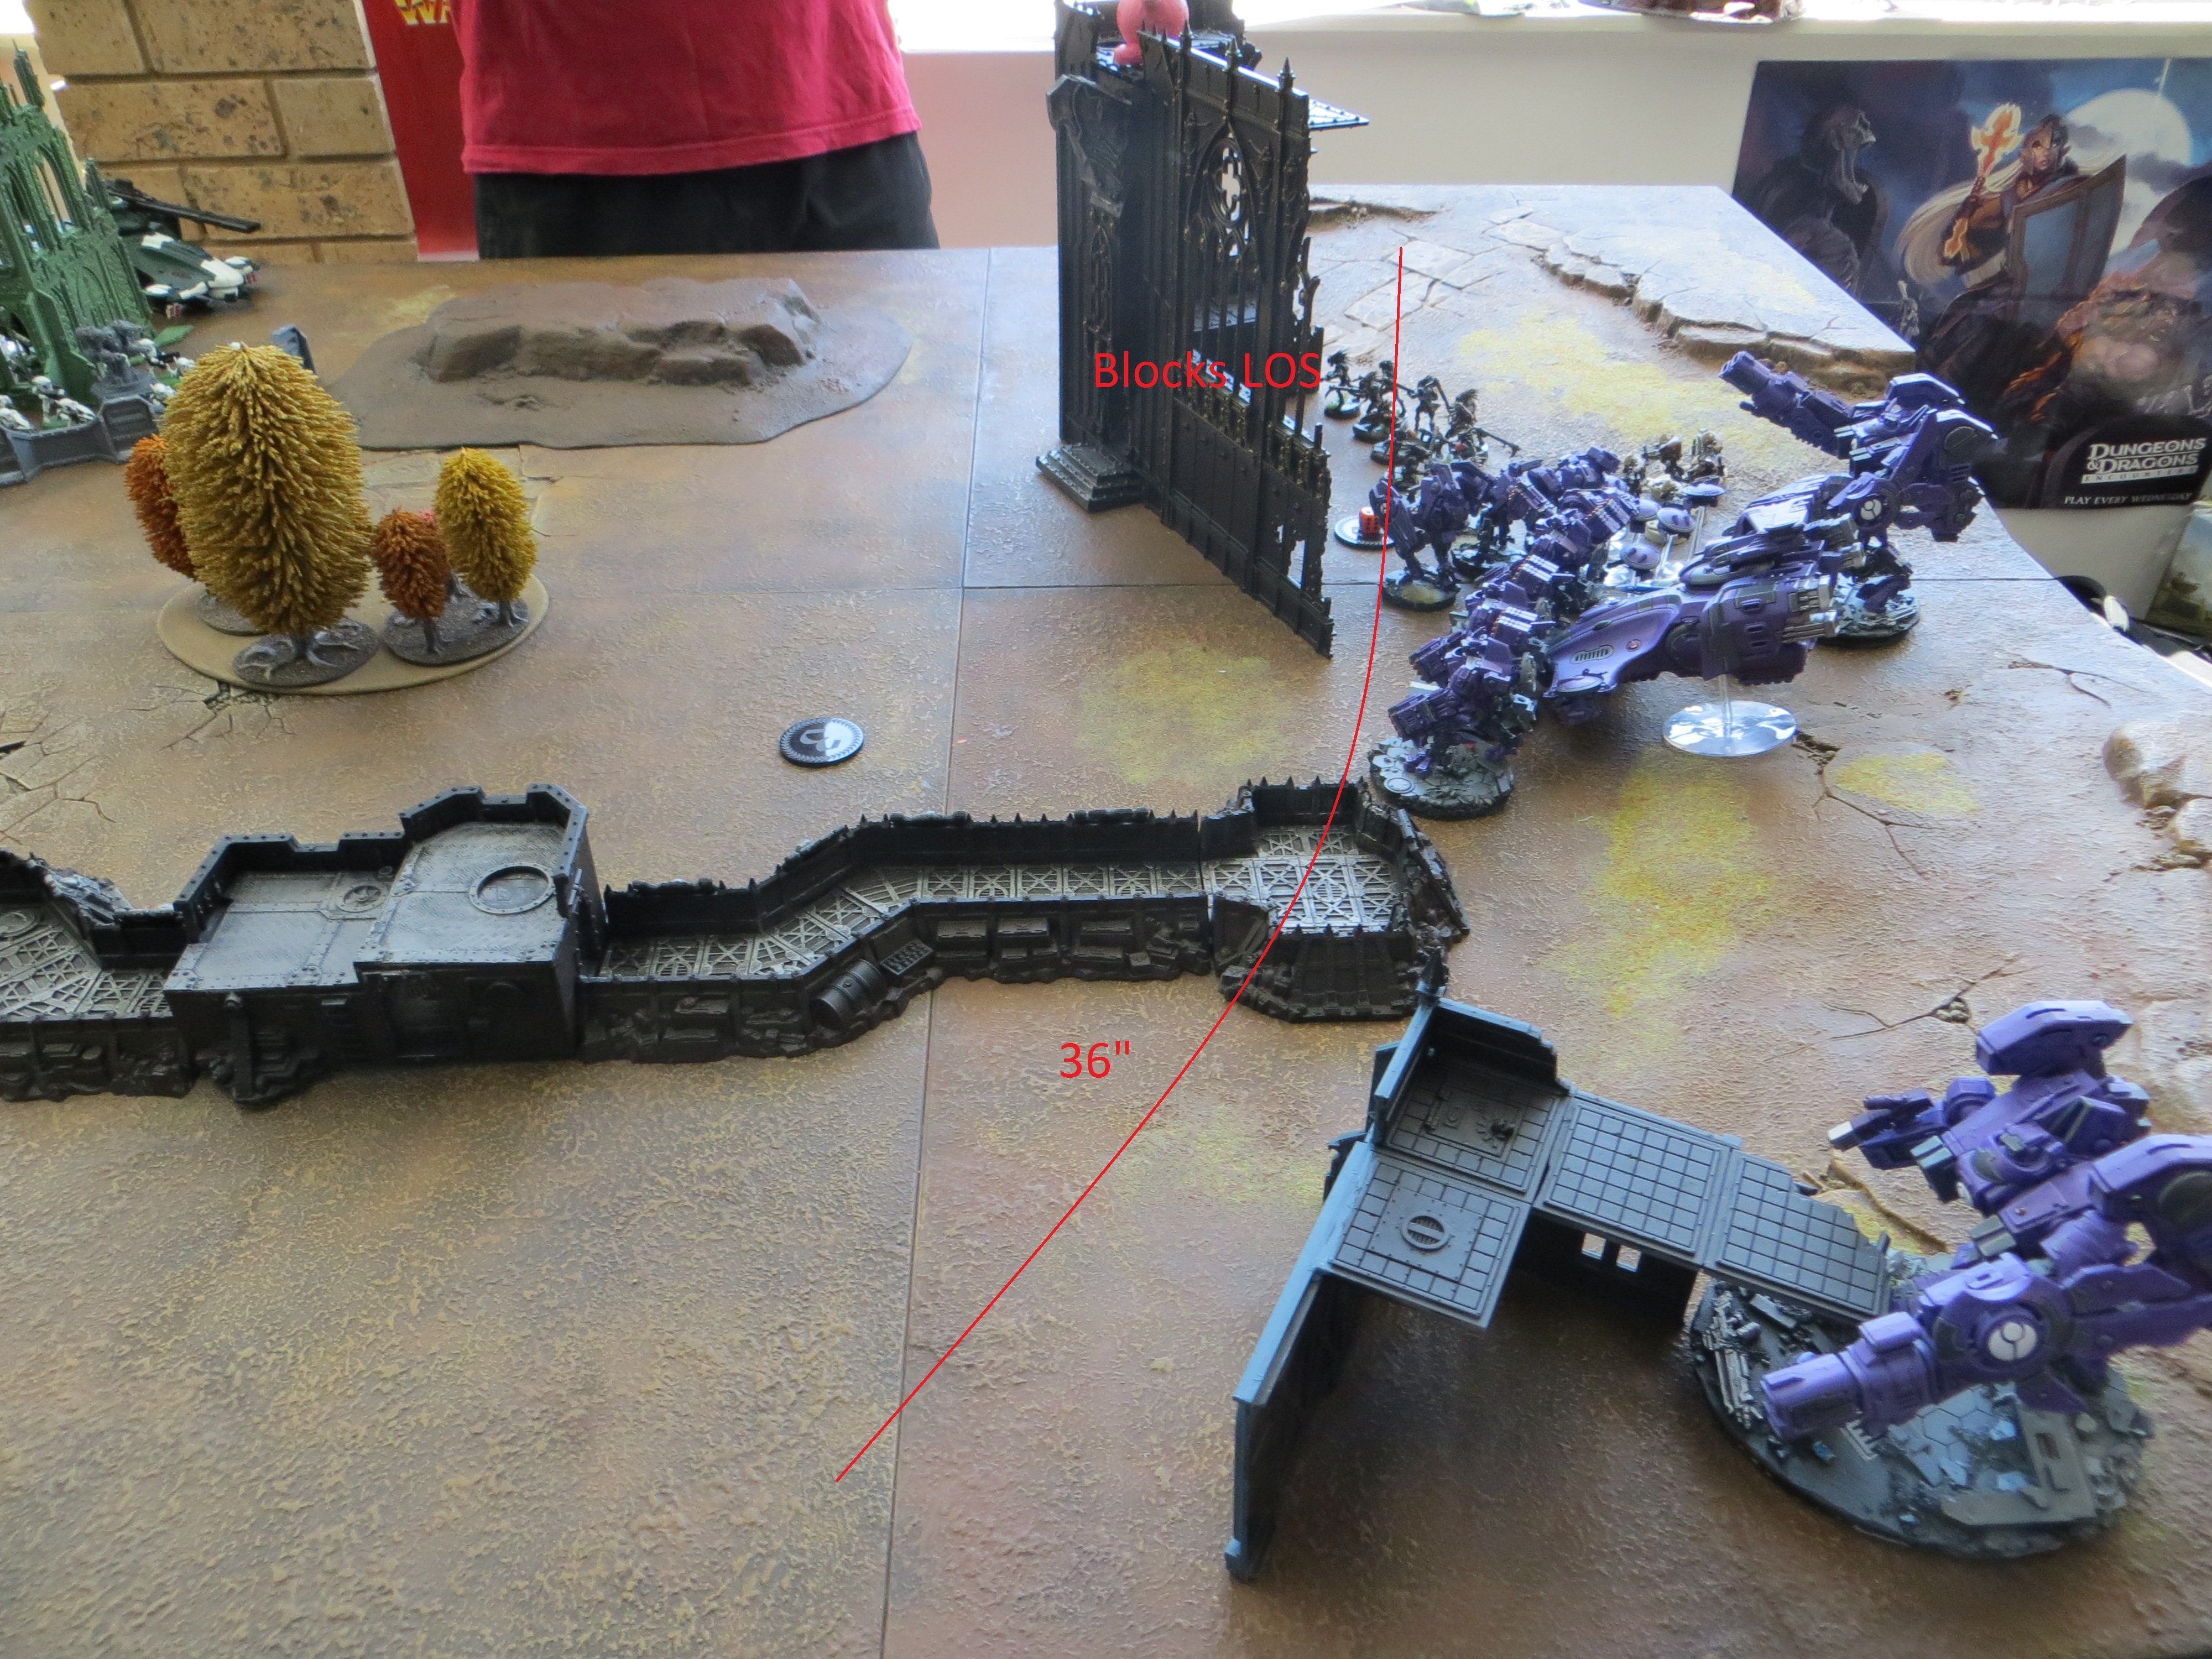
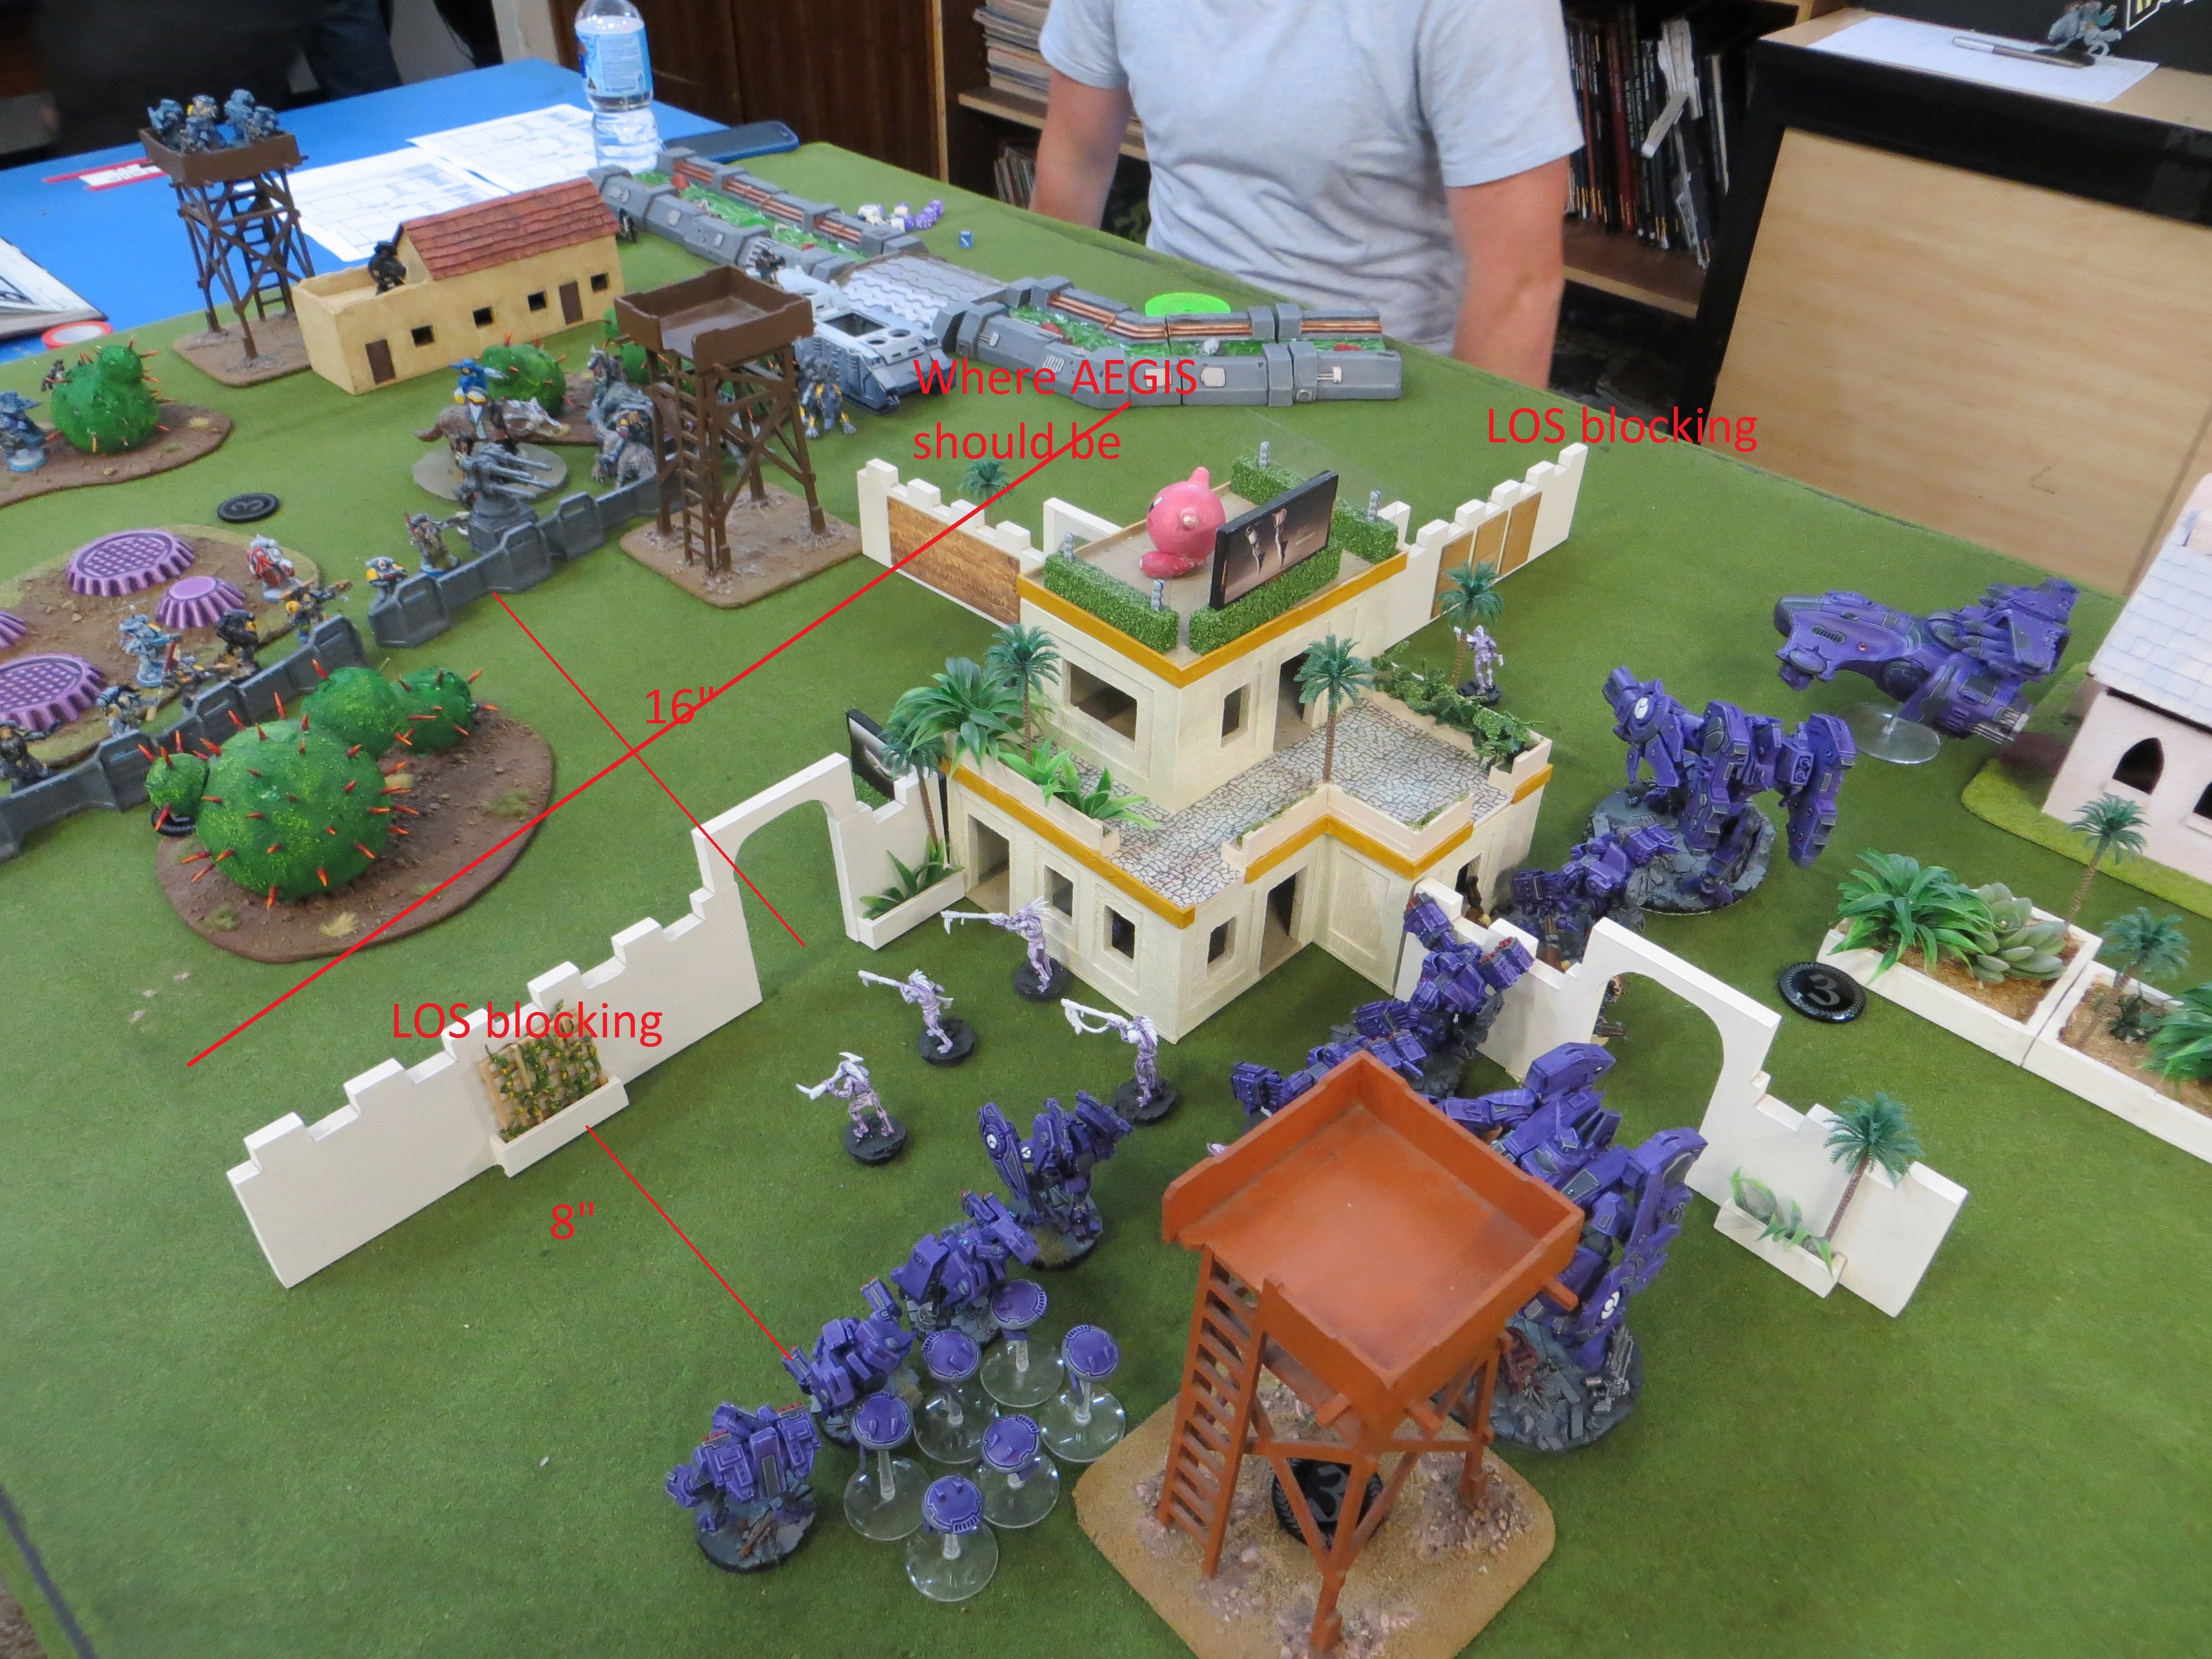
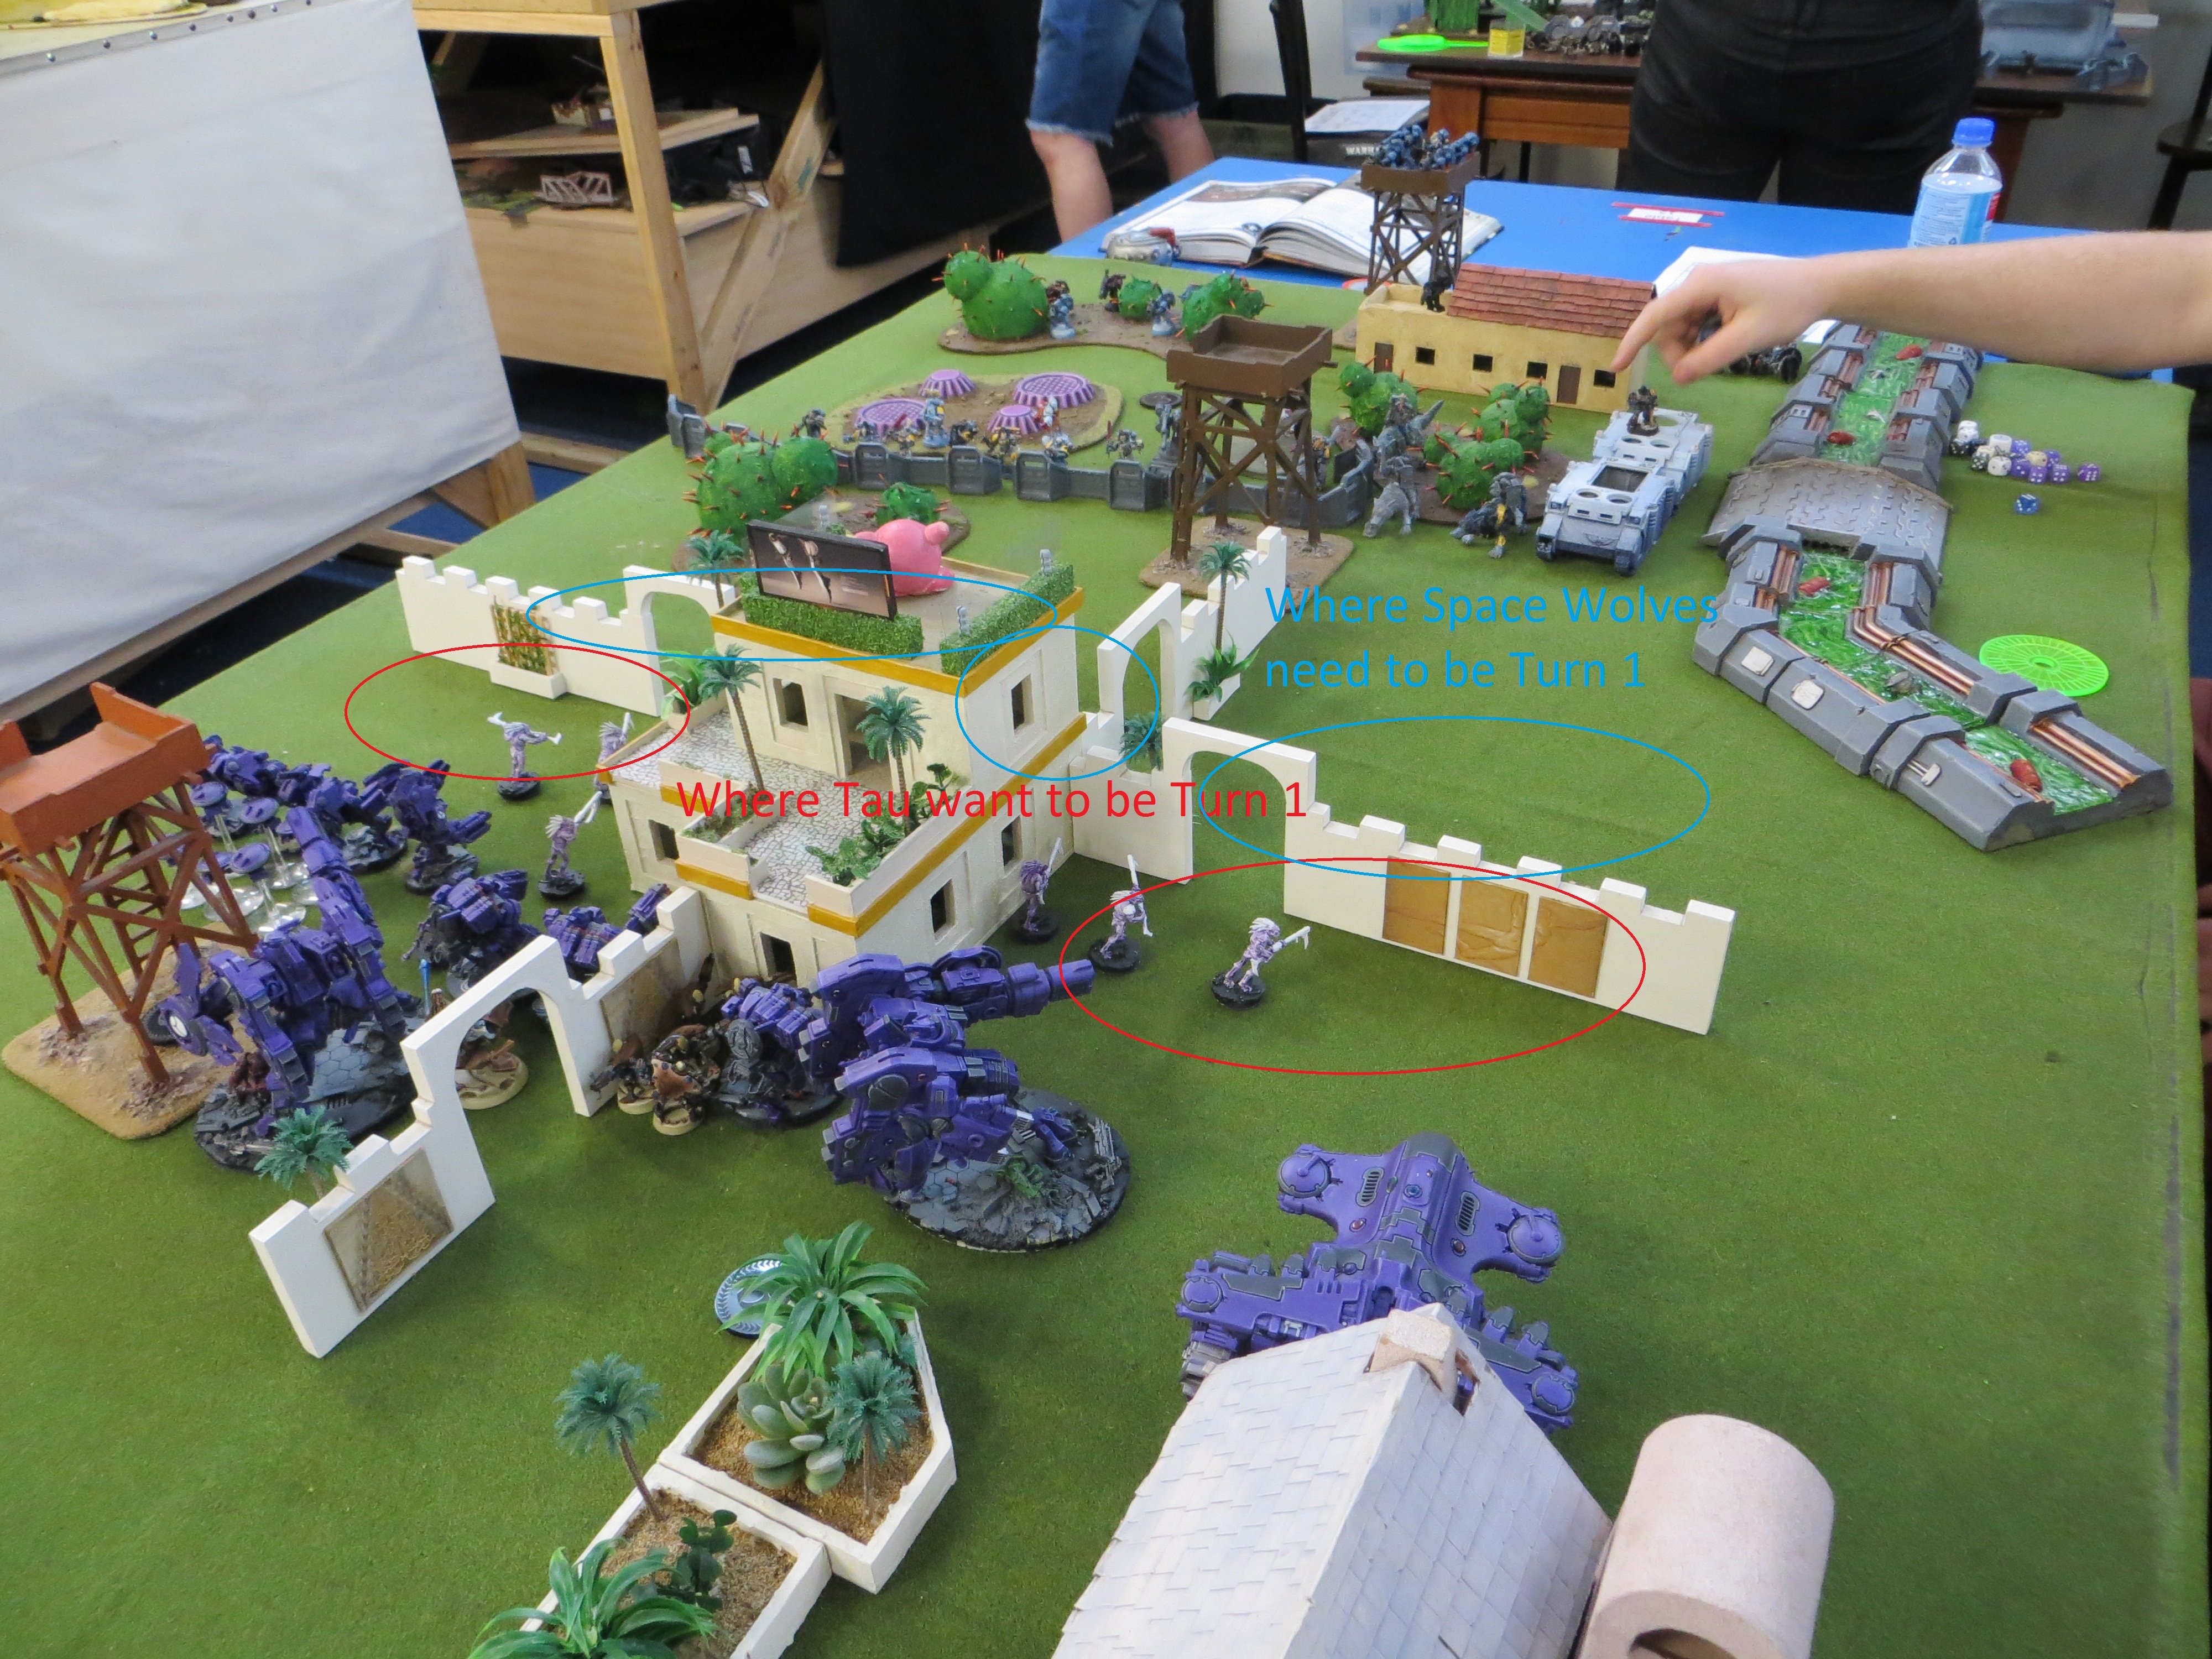
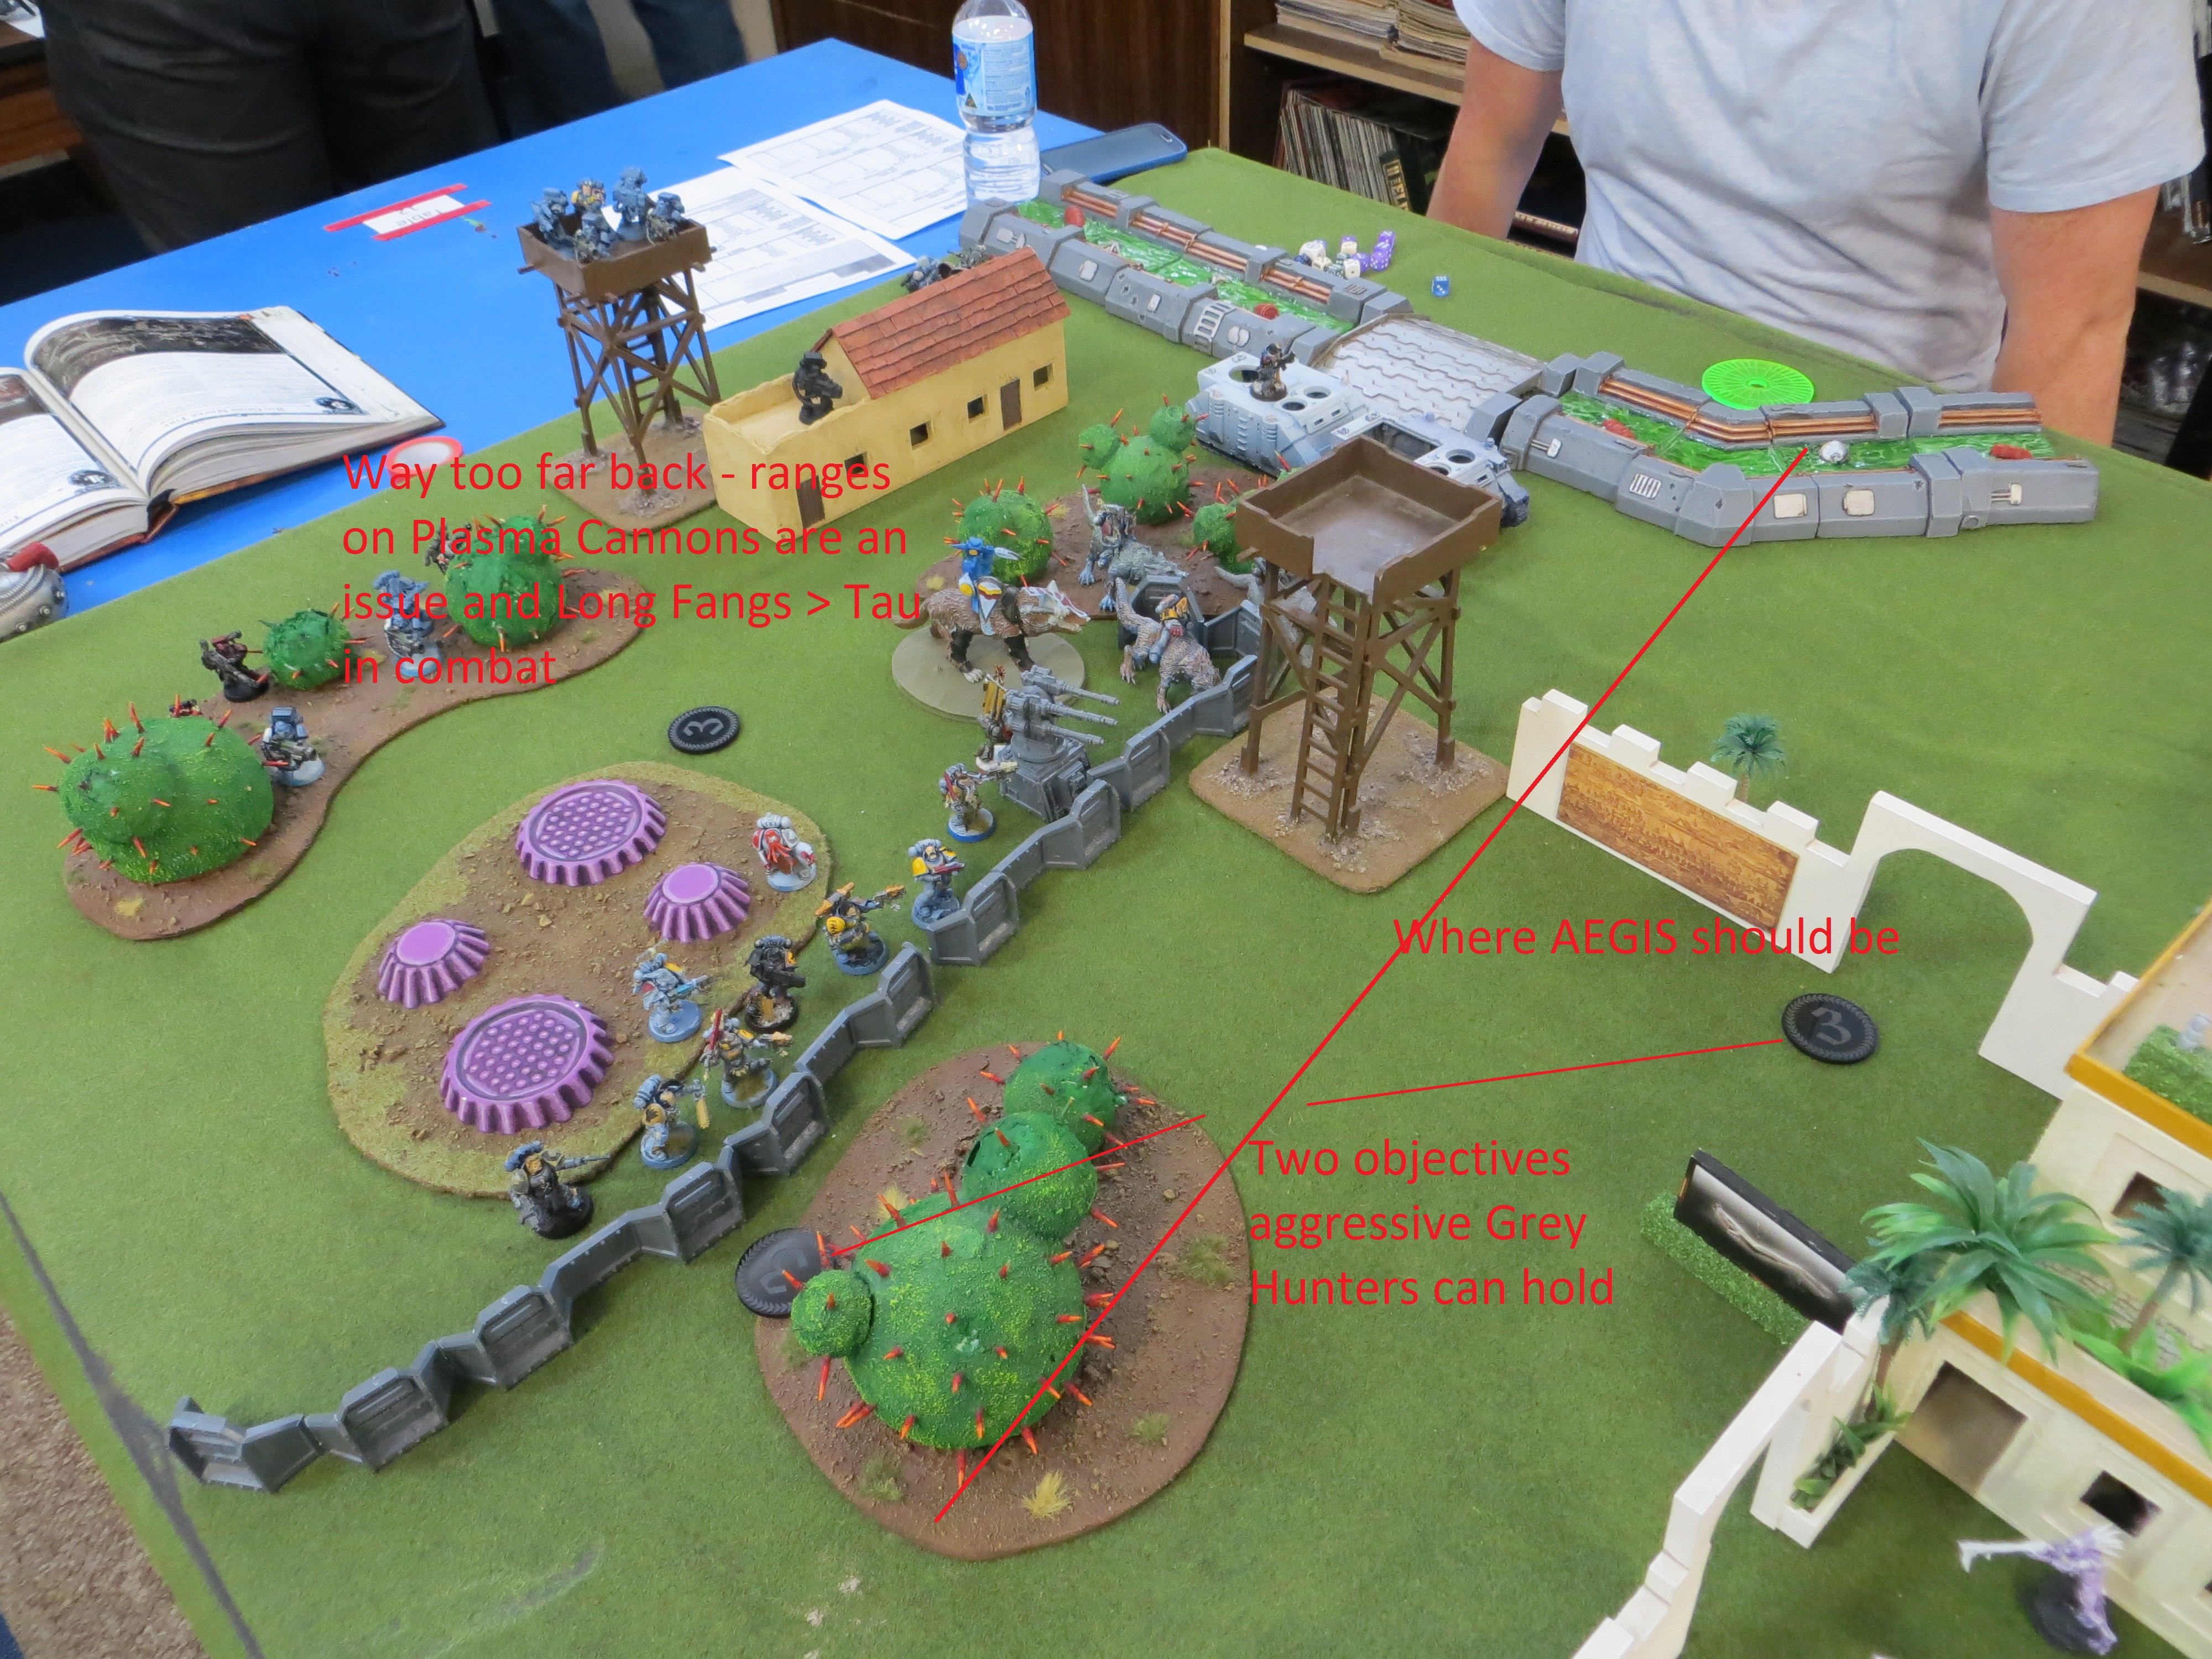
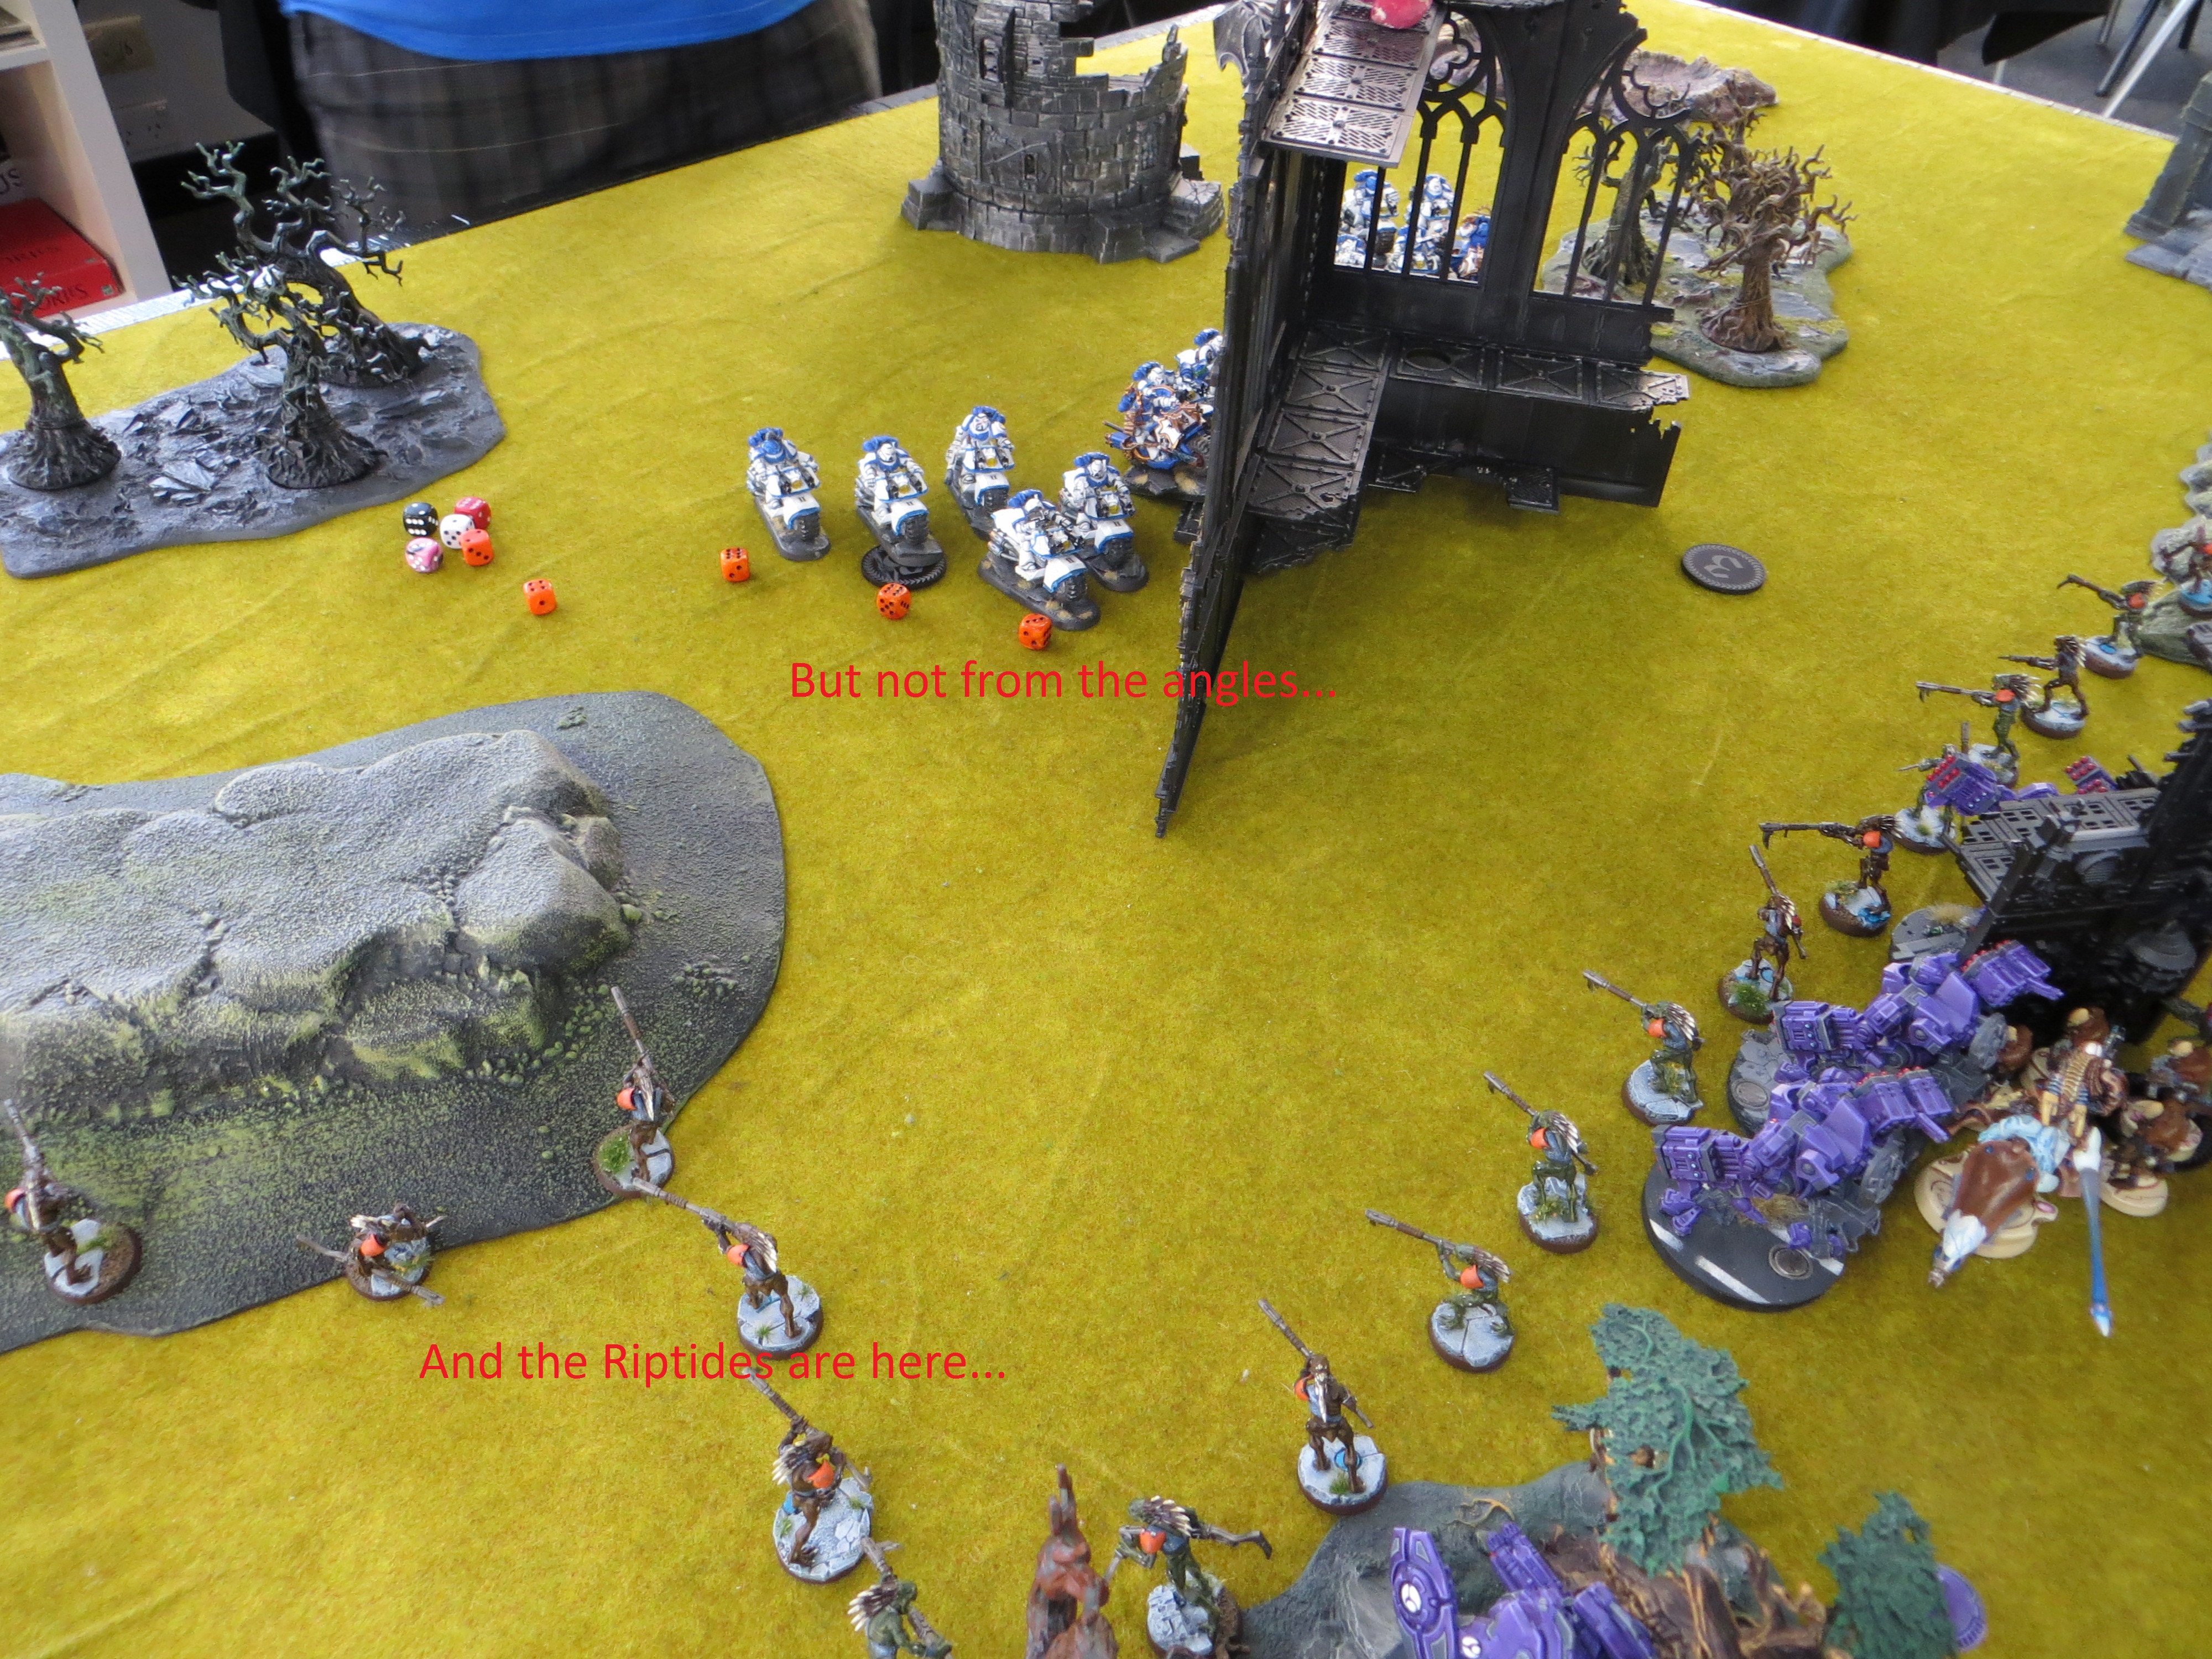
Example 2 – Controlling Where the Battle is Fought
This is from the most recent tournament I attended against a Space Wolves player who was reportedly very good in 5th edition. He won roll off and gave me first turn – normally something I wouldn’t be amiss against except the layout of this terrain meant whoever went first would be able to maximise some very solid LOS blocking walls. I choose table side and picked the side where the walls were easier to access. Whoever controlled these walls, controlled the game. If I did, I could JSJ to my heart’s content around them with little to no regard for the opponent until he get close whilst if he got them, I’d be forced back away where the majority of objectives were and have a harder time to bring all my firepower to bear on the Thunderwolves and Grey Hunters.
Advertisement
By giving me first turn, I was immediately able to take those walls and dictate the game.
Let’s look at the pictures…
Firstly, we have a “you deployed your Aegis wrong” situation but otherwise the Tau army can easily get into play behind that wall and be very safe from shooting and assaults except from specific angles.
This is compounded by going second against Tau – I’m sure the Space Wolves player knows where he wants to go (btw, the building does not block LoS, there are windows in it) but by giving up first turn is going to have a hard time getting to it AND is giving the Tau the opportunity to go where they want to go. If the Space Wolves had gone first and Tau kept the same deployment, they would have been hard pressed as the Rhinos moved up and blocked the doorway on the right, Thunderwolves swung round and the Grey Hunters + Long Fangs on left flank could move behind the Aegis behind the wall and put lots of pressure on me early.
Oh and the Long Fangs at the back should have been placed more forward. 36″ gets you just to the doorway of those walls and they are 15 Marines the Tau don’t really need to deal with right now thus further compounding the issue of Tau controlling those walls.
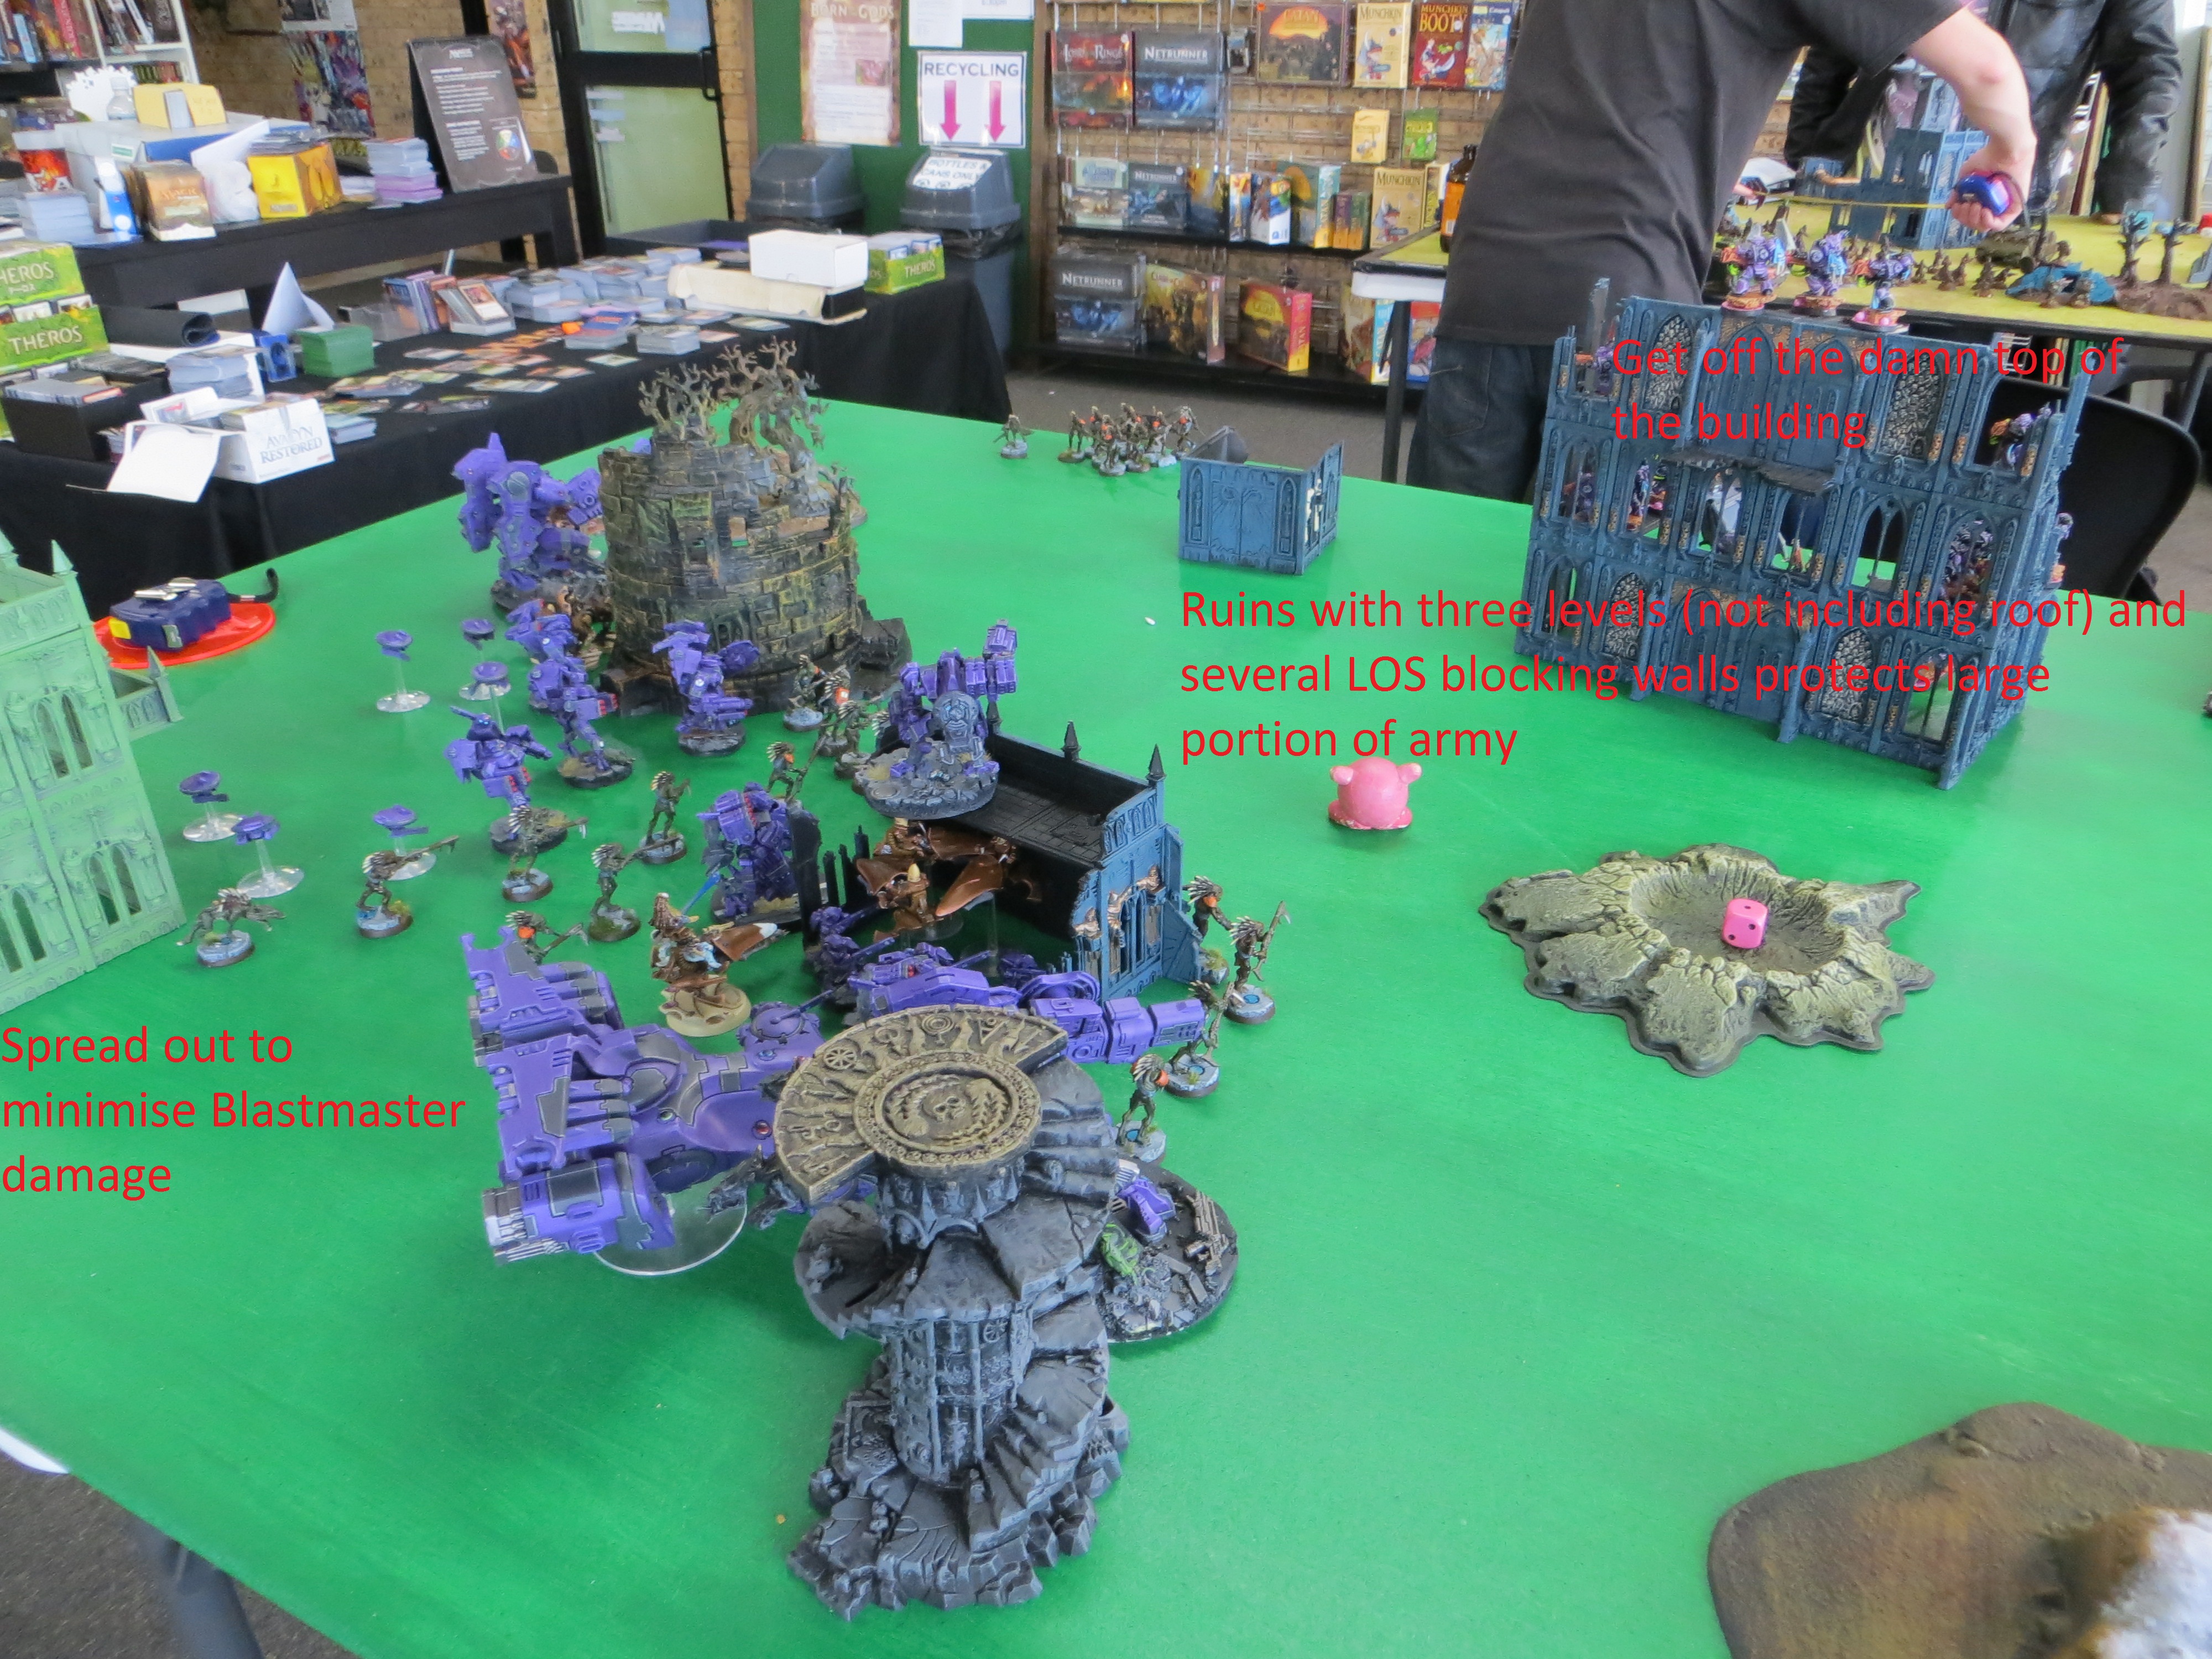
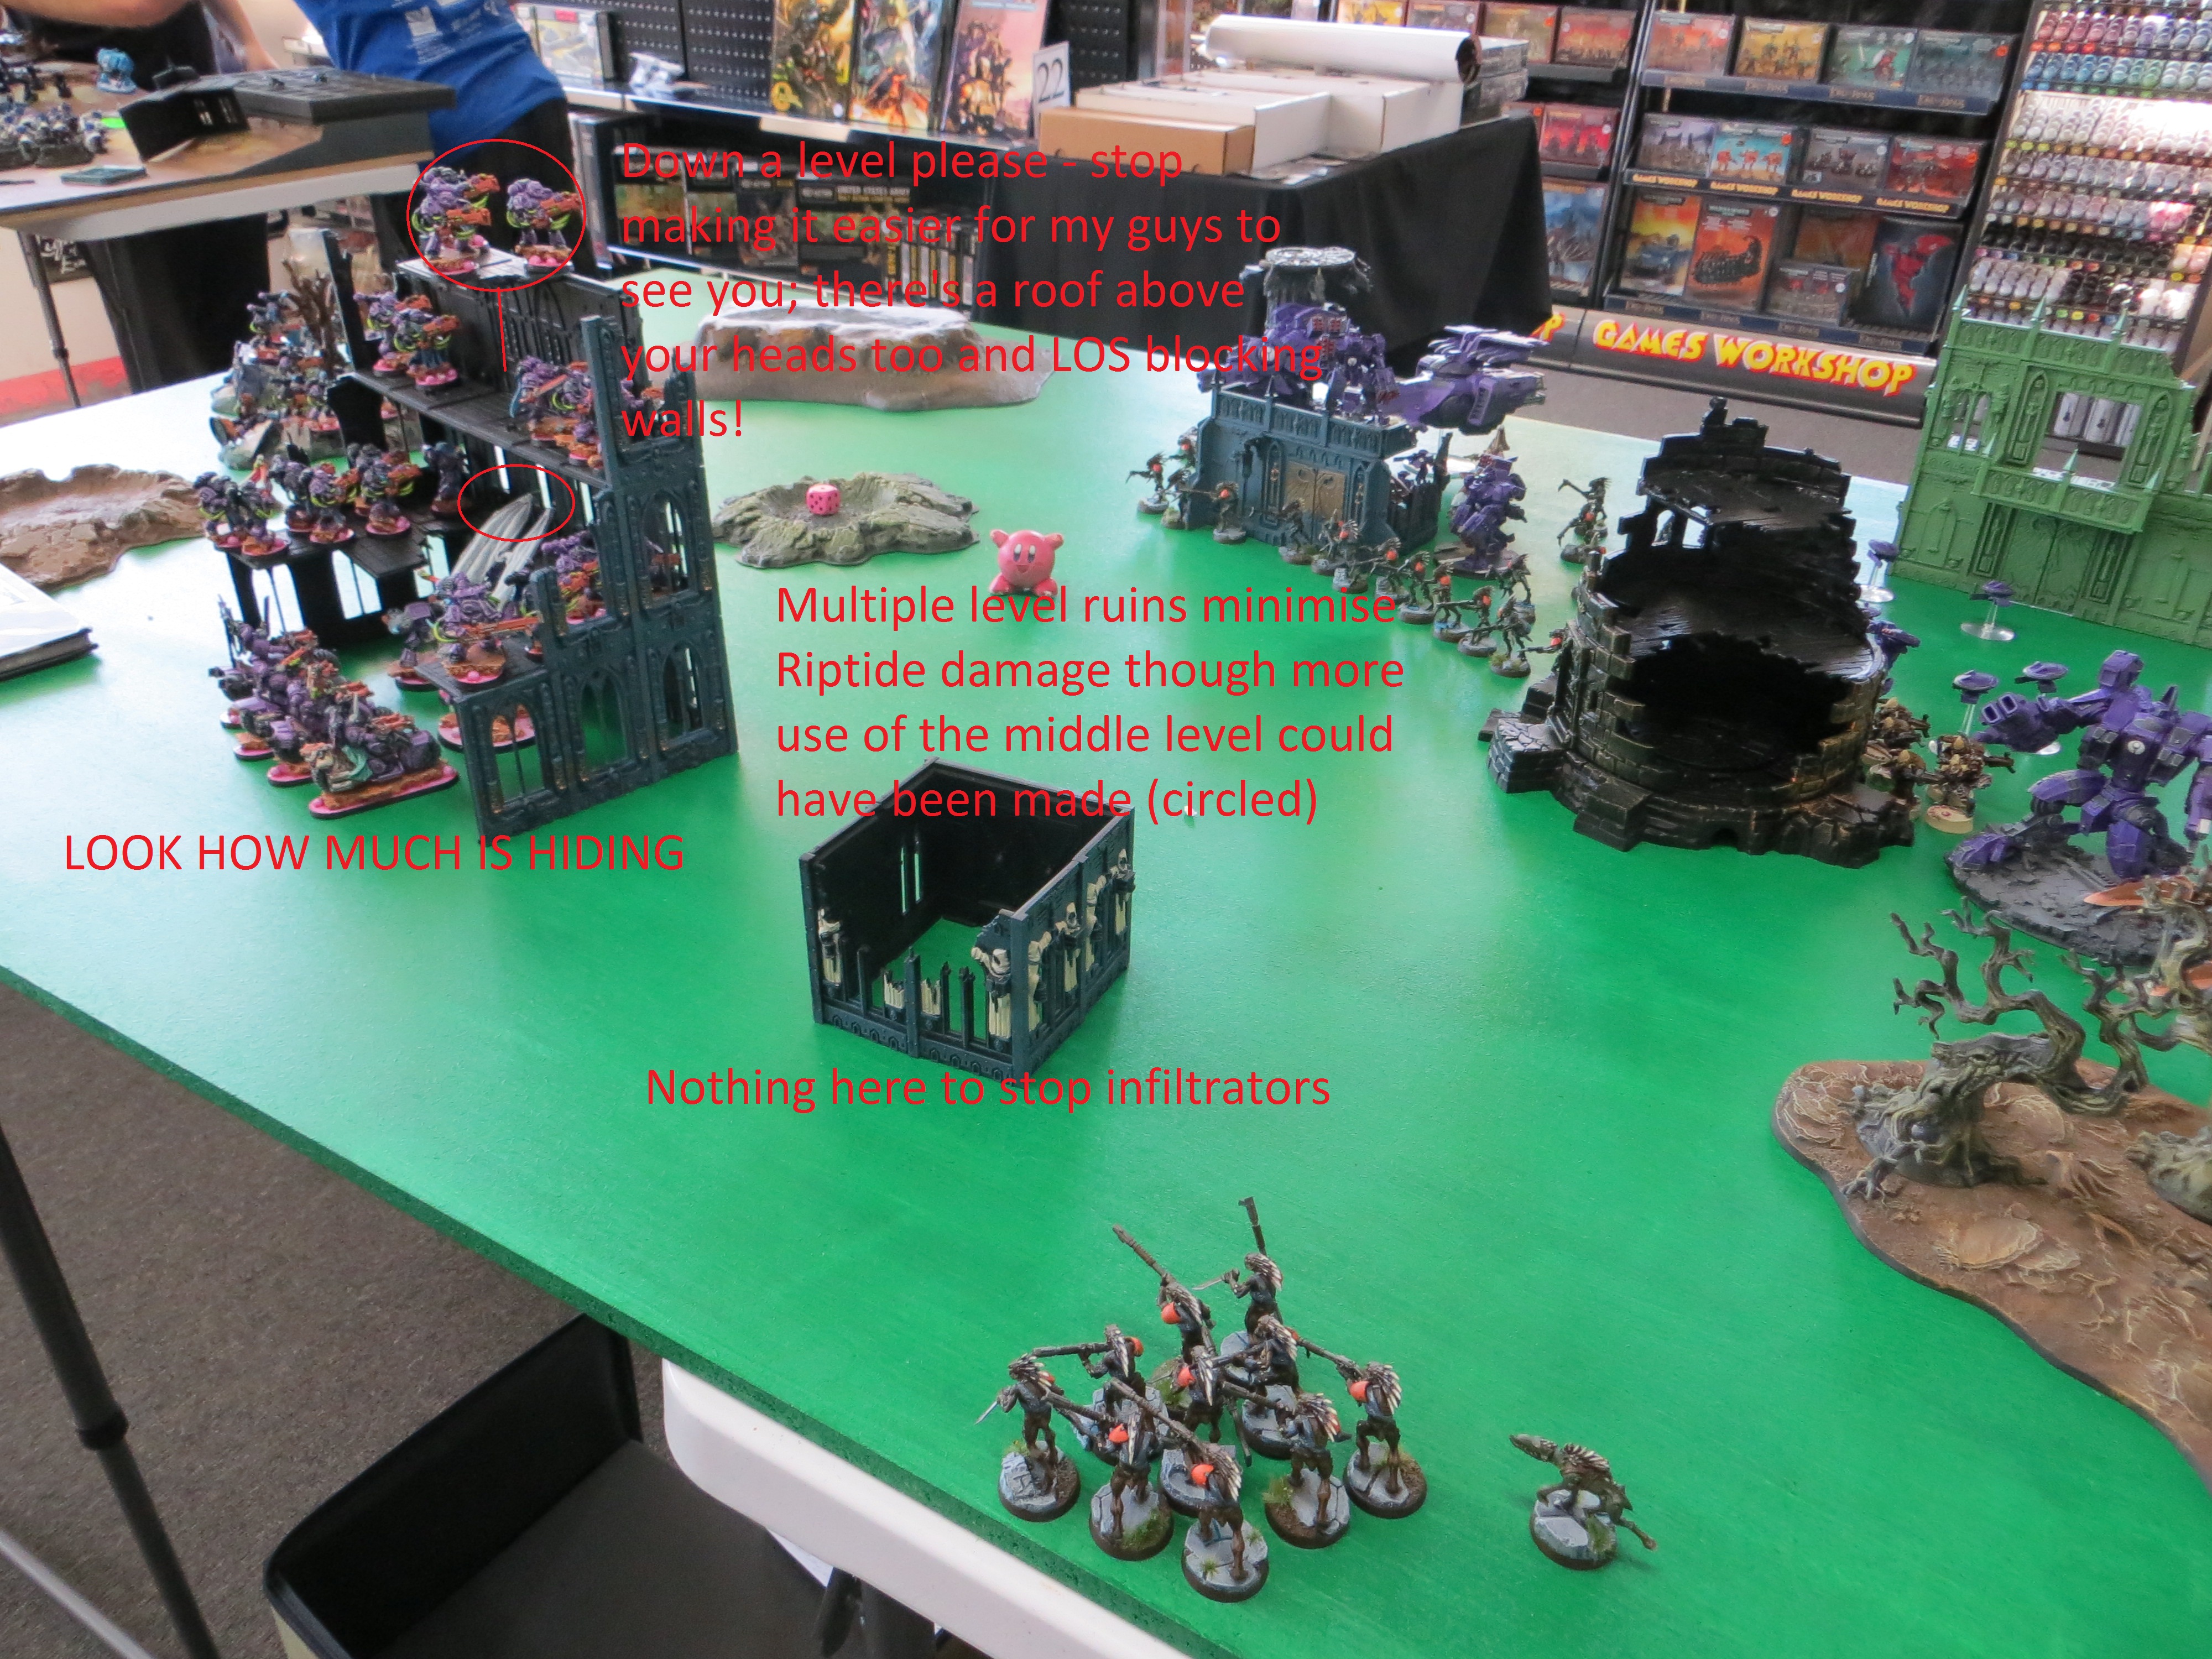
Example 3 – Using Ruins & Spreading Out
Here’s an example of a solid deployment though with a couple of mistakes. Matt mentioned in his previous post to take ruins away from Tau – he’s generally looking to reduce their cover save and avoid opportunities to hide specific models from barrage blasts however, they are also a strong way to protect against Riptides as it limits the number of people which can potentially be hit. Let’s take a look at what this player did well and could have done better…
Rule 1 – guys on top of ruins are a bad idea more often than not, particularly when it’s putting them in vision of units which might not otherwise be able to shoot at all. However, we can see here the ruins are hiding a lot of the army from the Tau (see below for how much) which is great.
Seriously – that’s a ton of army in those ruins I cannot see and cannot land a big pie plate on all of them unlike a normal castled deployment. As mentioned, there are some spaces which aren’t being used on the 2nd and 3rd levels but I cannot access the Oblits, Daemon Prince or Bikes – the three most threatening units.
The Noise Marines here are going to do nothing for most of the game unless they start moving up (this player didn’t move his Noise Marines, ever) and would therefore have been much better off using the ruins near the infiltrated Kroot to stop that and being more able to utilise their normal weapons and put pressure on me. The Kroot would have infiltrated the other side to still try those precision shots but the Noise Marines would have been in a better position. Remember as well, spreading out the full 2″ limits the number of models a Riptide can hit.
Advertisement
Again, some good things here but lots of little things to tweak the deployment would have made it good. Unfortunately in this game the Turn 1 was just terrible as everything just ran straight at the Tau army and faceplanted when everything Overwatched. Deployment + Movement need to be good to win games.
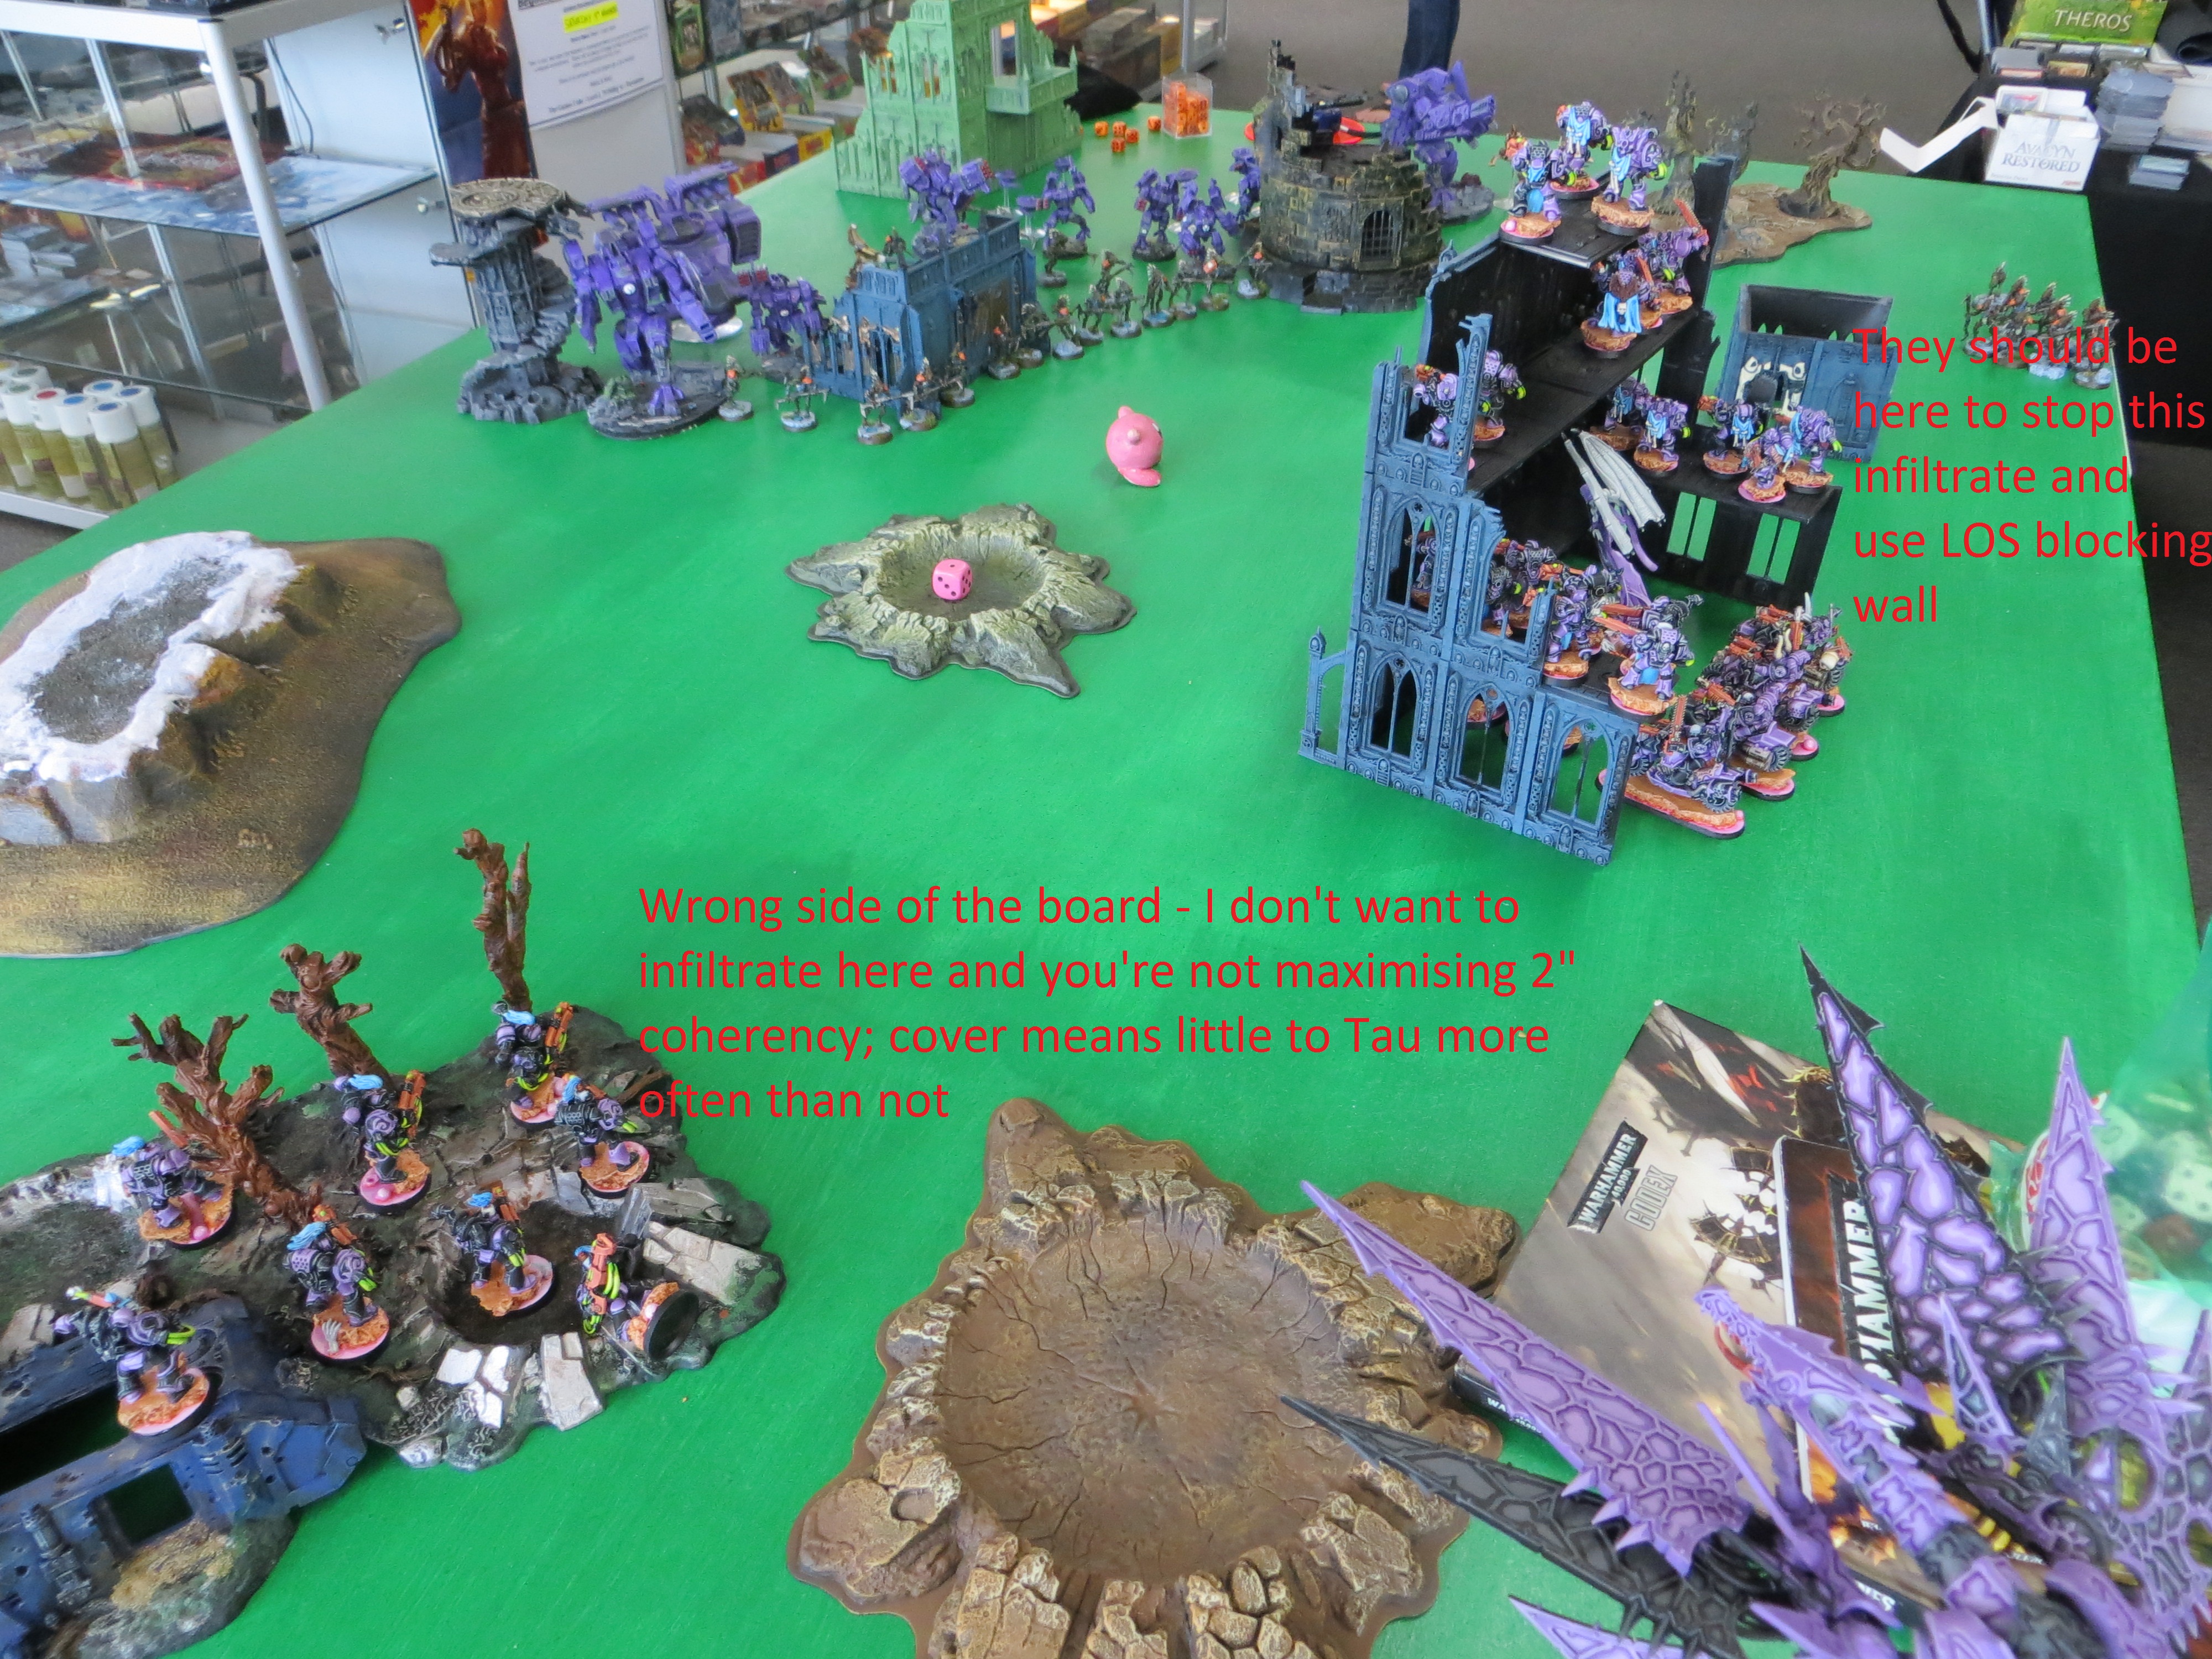
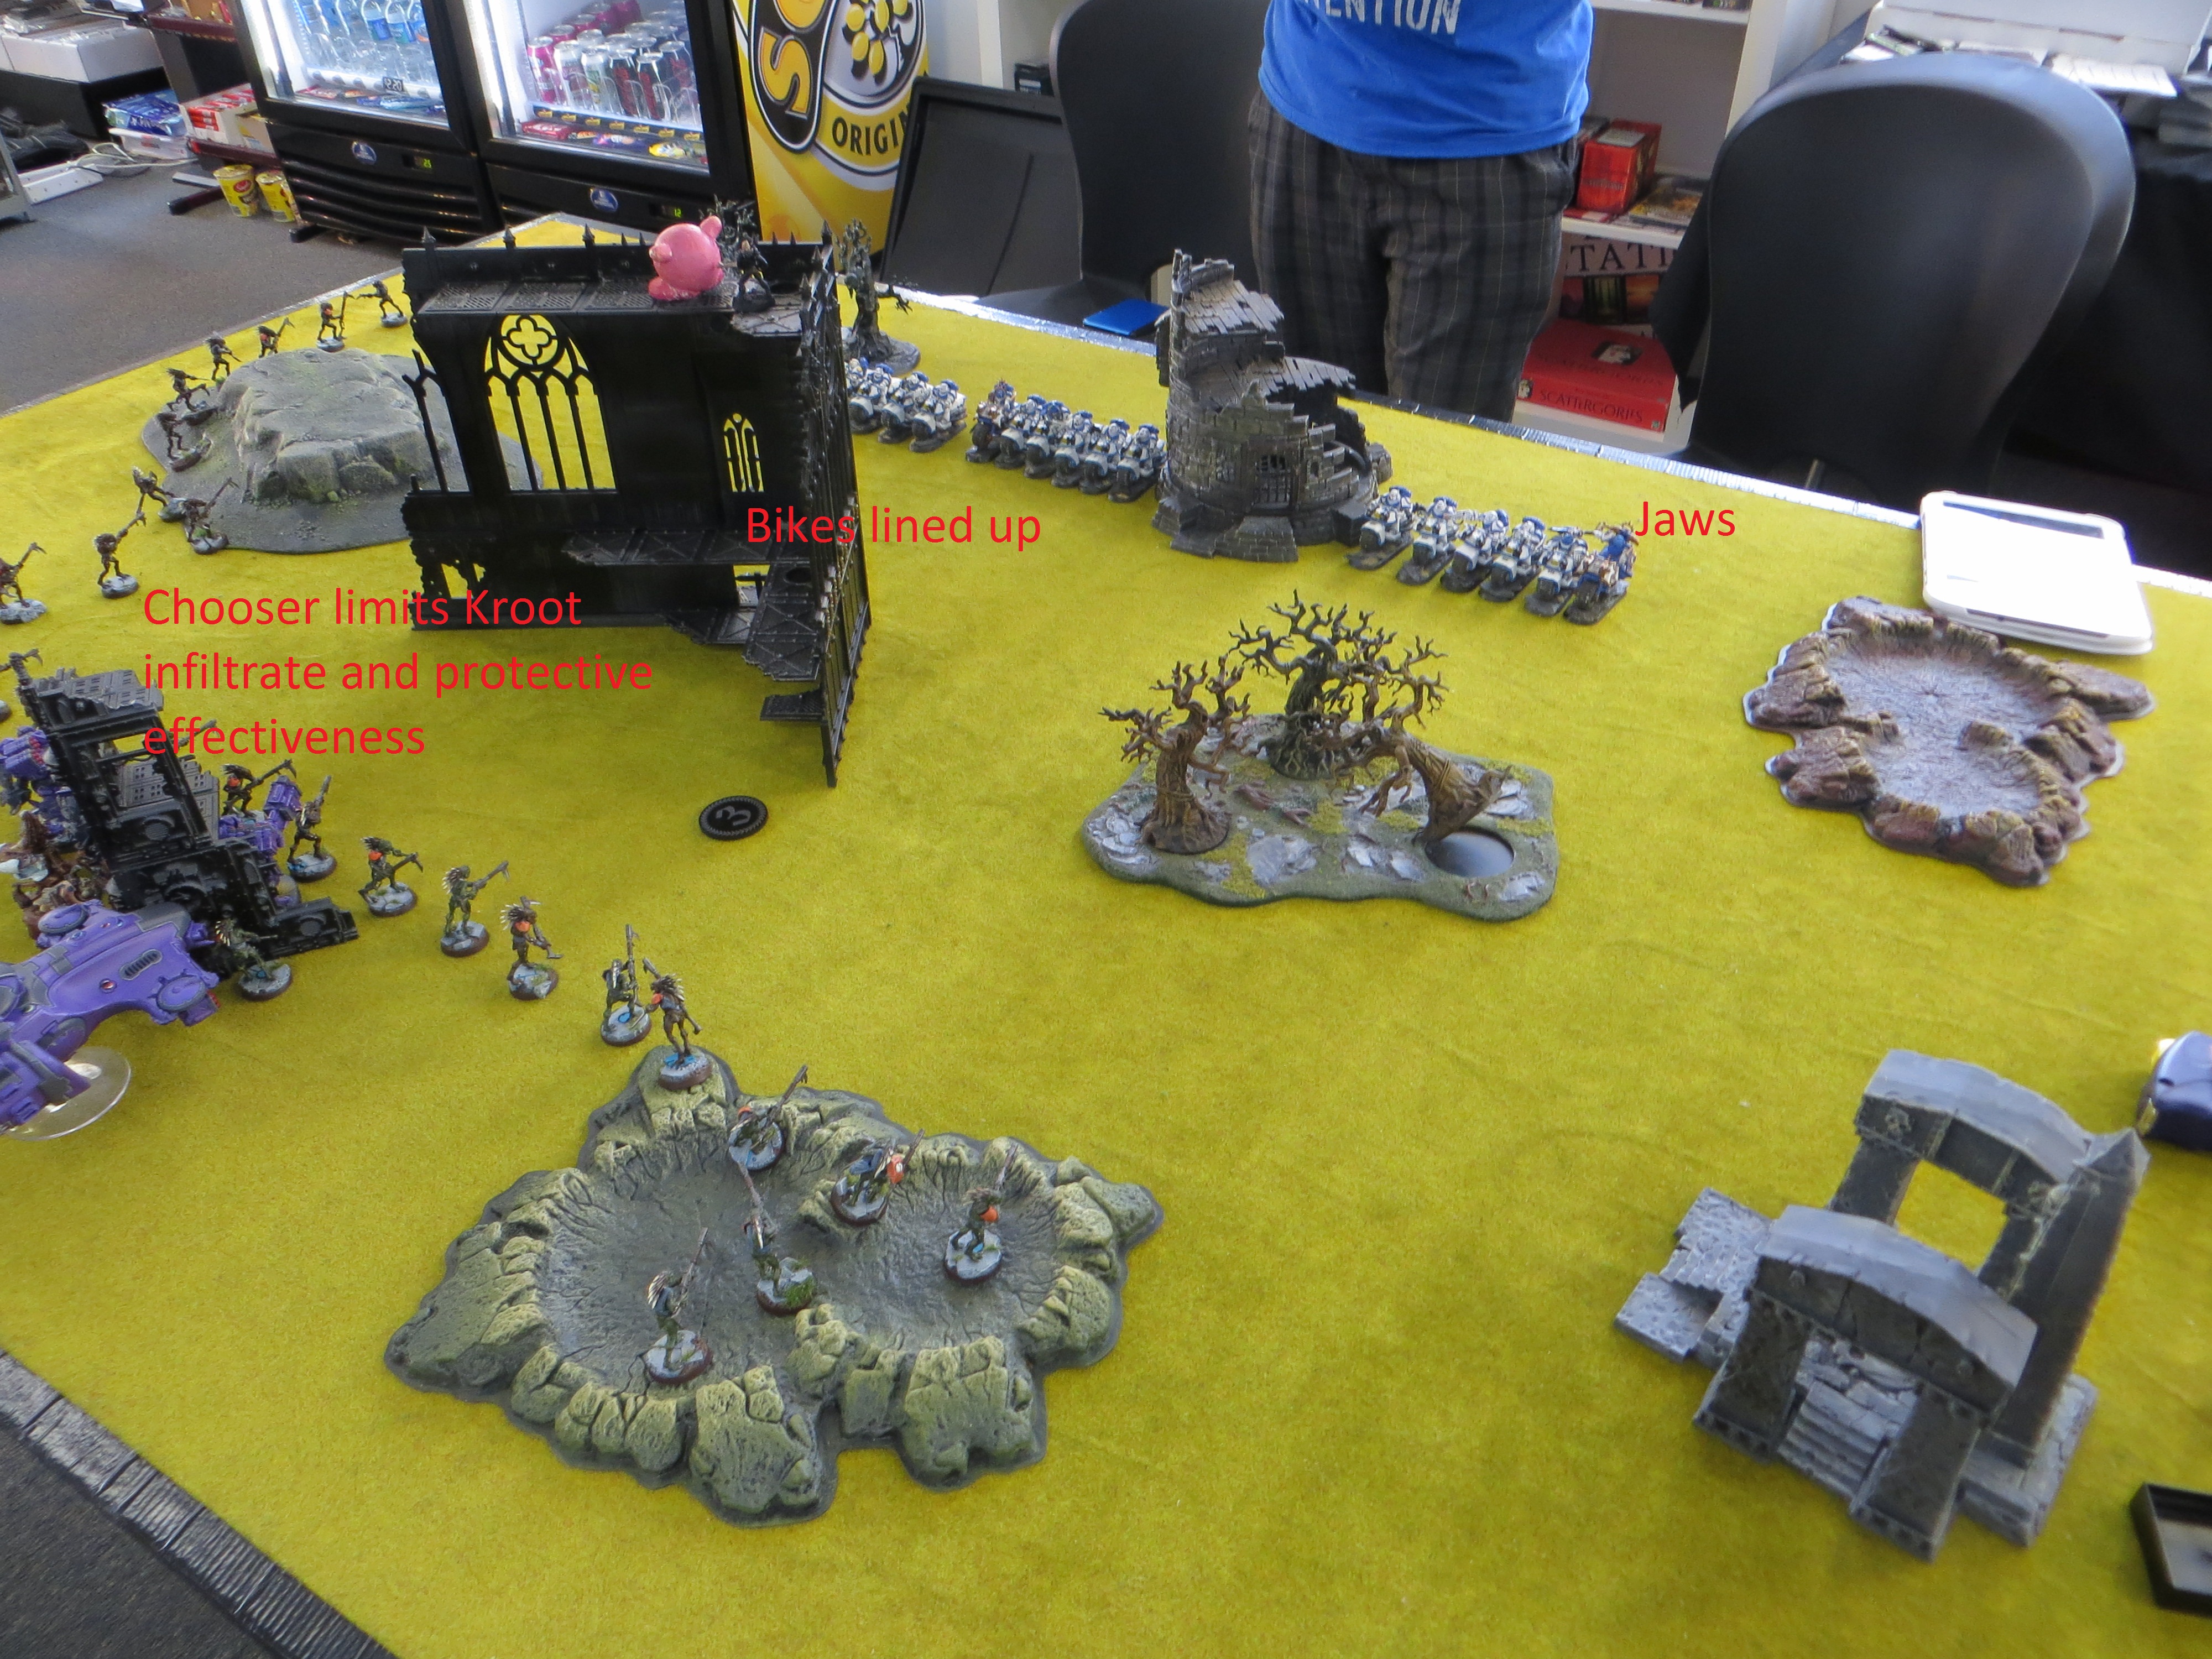
Example 4 – Don’t Play the Odds If You Don’t Have To
This is again a case of choosing sides/going first which the Space Marine player here does wrong. You can see a video version here as well. Scouting Space Marine Bikes with grav weapons scare Tau – they really hurt Broadside units without Drones and Riptides – two of the mainstays of Tau armies and with Scout (along with Drop Pods, Space Wolves, Chooser of the Slain and Jaws of the World Wolf) can be dastardly annoying to deal with so getting those early deployments and movements right early is important. This is pretty simple here – line of Bikes across board to threaten as much as possible then Scout and drop Pods and put lots of pressure early by getting into the Tau grill. However, seizing is an important game balancer here and with the Inquisition codex now out (and therefore more Coteaz’s abound), something more likely to happen, you need to account for it if you can.
In this example of the Space Marine army had chosen the side I deployed on, he would have had the ruins to block LOS minus a single doorway should I have seized and if I wanted to avoid Jaws/mass Gravguns, putting my Riptides near that doorway would not have done so and thus further limited my LOS as I would have been unlikely to do this. This is removing the odds as much as possible – making it so that even if that unusual roll does come up, it’s not drastically affecting things. Sometimes, it cannot be avoided but more often than not, it could have.
Here’s the pictorial examples:
A simple change of sides would have worked very strongly here – it might have made that initial punch a little bit less potent but it certainly would have accounted for all of the Broadsides and quite probably a Riptide. Another thing though was spreading out – don’t give the Riptides lovely fat targets. Think not only how you want to kill the enemy but how they want to kill you.
The point here though is don’t rely on minimal odds to protect you if there’s something else you could do – if I had picked table sides, well then fine but the bikes could have still spread out to minimise the potency of the Riptide blasts, etc.
Conclusion
That should hopefully give you some practical examples of what to think about and how to enact that thinking. I’ll try and do some more articles like this for other armies and mid-game as well to give a better understanding of the thought processes that go into decision making but if the only thing you take away from this is plan for where you want to be Turn 1, that’s a very strong start (i.e. move your Aegis up kids!).
Kirby out!
Subscribe to our newsletter!
Get Tabletop, RPG & Pop Culture news delivered directly to your inbox.
Kirby Enthusiasm is one of the well-known players in the Warhammer tabletop gaming community. He is the man behind the 3++ website, and a Warhammer 40K competitive player. He began writing for BoLS in 2011.