X-Wing: Huge Ship Rules- Activation, Energy, and Actions
8 Minute Read
May 18 2014
Advertisement

HUGE ships in X-wing are about a lot more than big guns. Look at all the other tricks they have up their sleeve!
Part 1 was focused on shooting stuff, because well, I mean, come on- like you weren’t most interested in finding out about how much firepower these Huge ships were going to bring to the party? I was. Maybe that’s my American showing. In any case, there was just way too much to talk about in a single article, so today in Part 2, we’re going to look at this Energy business and also how Actions affect (or don’t- read on!) the Huge ships and when and how they handle the Activation Phase.
In case you missed it the first time, the Huge Ship Rules are available for download on the FFG site here.
Activation
I mentioned this before in the other article, but Huge ships Activate after all of the smaller ships have Activated, regardless of Pilot Skill. Now, that’s not to say that Pilot Skill doesn’t matter with Huge ships- it does matter in regard to Activating multiple Huge ships. If that reads a little funny, dig on the example given in the Huge Ship Rules-

Energy
So this is the big new thing for Huge ships, pun intended. When things were less nailed down, i.e. before the Rules were made available for download, we were all super curious mainly about how one of these ships gains Energy. We finally know, now.
Huge ships gain energy primarily through their chosen maneuver, and secondarily through ship Upgrades and whatnot.
What I mean by that is, if you look at the dials for the Huge ships, it becomes fairly apparent how the see-saw balancing act goes- long story short, the slower you move the ship, the more Energy you have to play with and vice versa.
Factoring into that, however is the Energy rating on the Ship card itself and any of those aforementioned upgrades.
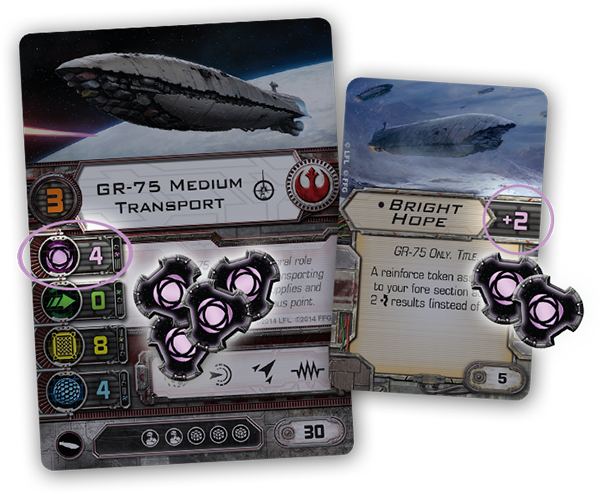
For example, if you pick and then subsequently reveal a 1 Straight for your GR-75’s maneuver, you’ll not only uh, move ahead 1, you’ll also have the opportunity to reach your mitts into your token bag and pull out 3 Energy tokens you can then put on your ship card. The Huge ship rules say these extra Energy steps occur between the “Clean Up” and “Perform Action” steps (which are steps 5 and 6, respectively) of the usual X-Wing Activation Phase and actually consist of three separate steps-
- Gain Energy
- Allocate Energy
- Use Energy
Main thing to keep in mind here is that unlike most of the tokens you’re used to dealing with in X-Wing Miniatures, the unused Energy tokens are not removed at the end of the current round- they stick around until a card effect removes them. That may be something you’re doing, it may be something that gets done to you, but they’re persistent until they’re consumed, kinda like Target Locks.
This isn’t quite as straightforward as it appears at first glance, but it’s not too bad to get your head around either.
So you’ve revealed your maneuver and moved your ship proceeding through the Activation Phase steps and you’ve gained the Energy shown on your Maneuver dial, so you’re in the Allocate Energy phase. What happens now?
First, notice the purple number on the Ship card and any Upgrade cards you have in play. That purple number is the upper limit of how much Energy the card can “store”, which again, since you don’t lose them at the end of the turn, is fairly significant in this context. This is where a lot of your Huge ship strategy is going to come into play- the ships are gigantic to begin with, so not only are you going to be trying to maneuver one without running over stuff you don’t want to run over, but you’ve also got to bear in mind what Actions you need to Perform and what Upgrades you want to use in the future so you don’t end up on the short end of the Energy stick when you most need it.
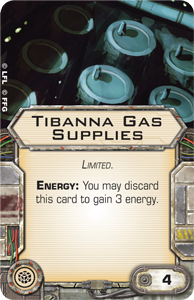
Once your in the Allocation step, you have the option of moving any or all of those Energy tokens from your Ship card to any of your Energy Upgrade cards, so long as you don’t go over their purple number.
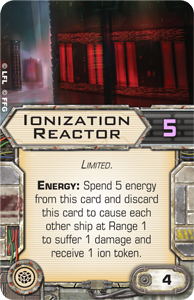
Ionization Reactor is one of those Energy upgrade cards. You can store up to 5 Energy on this card (per the purple number), which is convenient because you’ll need to remove 5 Energy from it to actually trigger it. Again, you move Energy to this card, and any of your other Upgrades from your Ship card in the Allocation Phase. Reason I point this out is you have to do all of your Allocation Phase before you get to the Use Phase, so you kind of have to keep in mind where you’re headed with your strategy before you start rolling dice or whatever.
You don’t have to get all 5 tokens on there in the same round (Energy tokens are persistent, remember), but you’ll need to stick 5 on there before you can use it. And yeah, there are a couple of reasons you might want to “store’ Energy on your Ship card itself, rather than just automatically Allocating all of your Energy to your Upgrades until they’re full.
Lots of other Huge Ship Upgrades are the same way-
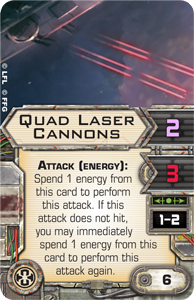
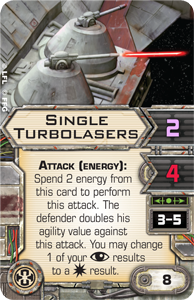
These guns use Energy, but also allow you to store Energy on them, so you can charge them up before you actually need them.
These cards don’t have purple Energy numbers on them though, so you can’t store Energy on them.
Recover is an Action Huge ships can Perform to regain their Shields. If you decide to Recover, you remove all of the Energy tokens on your Ship card and add that many Shield tokens. Simple as. If you have one Energy token when you Recover, you get one Shield. If you have five tokens, you get five Shields. It’s an all or nothing kind of thing. Kind of important for ships that by default have 0 Agility, amirite?
You probably remember that the GR-75 has one ship card while the CR90 actually has a Fore card and an Aft card. Functionally, it works pretty much the same, but I wanted to point something out-
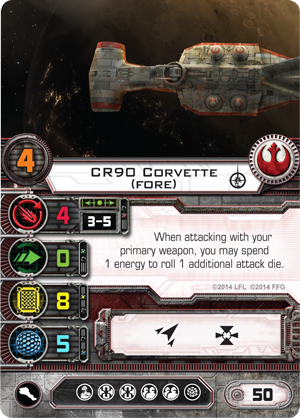
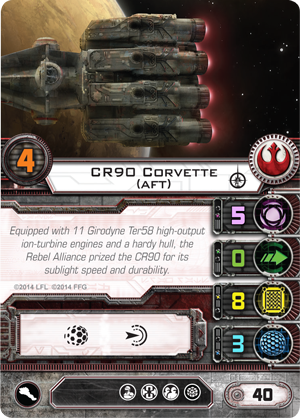
Note that only the Aft Section has an Energy value, so it’s the Section that’s doing the work in this new Energy subset of the Activation Phase.
Last thing I want to touch on about Energy- remember how I was all curious about a laundry list of stuff towards the end of the initial Huge ship reveal article one of which was how they were affected by Ion Weapons? Ok- now we know. Ion Tokens effectively consume Energy Gained that round on a one-for-one basis. This isn’t a choice thing- if you would normally Gain 2 Energy because of the Maneuver you’ve chose and you have 1 Ion Token when you hit the Energy portion of your Huge ship’s Activation Phase, you only Gain 1 Energy and remove the Ion Token.
Actions
As we mentioned before, Huge ships do all of the Energy stuff before they reach the Perform Action step in the Activation Phase. Past that, Huge ship Actions are fairly similar to Actions available to their smaller brethren with the obvious difference that some of their available Actions require Energy.
There are a few new Actions available I wanted to touch on real quickly though-
Reinforce is an Action that lets you add an Evade result to a Defense roll. The thing I want to point out here is the reason FFG didn’t just tell us to stick an Evade token on the ship like a Falcon Title for Huge ships or something- the Reinforce token stays until the end of the round. That is, whether one ship attacks you or 10 ships attack you, you get that extra Evade result each time one of those ships attacks, unlike a standard Evade which is spent and immediately discarded. The only significant limiter on a Reinforce Action is that it is assigned to the Fore or Aft of a Huge ship and therefore only modifies the attacks against that Section.
Jam is a Huge ship Action that lets a huge ship pick a target at Range 1-2 and assign it Stress Tokens until it has two of the buggers. The wording on this card is pretty interesting and I’ve tried to replicate the important parts in that previous sentence. Notice that it doesn’t say to stick two Stress tokens on the target ship- it says assign it Stress tokens until it has two Stress tokens. Long story short- if you’ve got somebody who can eat that targeted ship’s Stress, he’s still going to eat, but the target is still going to end up with two Stress tokens regardless.
Coordinate is the last new Huge ship Action and it allows a friendly at 1-2 to perform a Free Action.
Huge ships that have separate Fore and Aft ship cards are allowed to Perform an Action with each Section, but bear in mind that the Action Performed will only affect the “owning” Section.
Other random bits about Huge ship Actions-
Focus, Evade, and Stress tokens have no effect on Huge ships, so having Dreis pass a GR-75 a Focus doesn’t allow the Transport the ability to Focus a die result. For rules mechanics purposes, note that Huge ships can, in fact, receive these tokens, but they are immediately discarded upon reception.
Similarly, Huge ships cannot perform Free Actions.
If a ship acquires a Target Lock on a Huge ship, it does it by Section. As long as part of the chosen Section is in range, it can be Target Locked and the red TL token is placed alongside the Section.
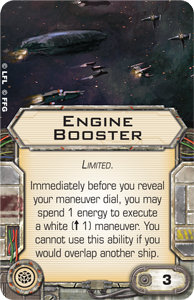
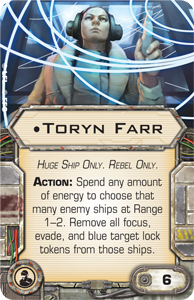
Speaking of Actions, this little beauty was revealed in the FFG article-
Last, and this isn’t really pertaining to Actions per se, but as some Modifications do allow Actions, I thought I’d mention it here- Huge ships can only use Modifications that say, “Huge Ship Only” on them.
Stay tuned for Part 3- Movement and Whatnot coming soon!
If you want to get into X-Wing Miniatures but don’t know your Evades from your Target Locks, by all means, stop on by the hippest pilot bar in the galaxy- TheMetalBikini.com. We serve all kinds (yeah, even droids- they’re the best tippers), and have a whole bunch of articles from breakdown summaries of every single card released so far, to tactics articles, to our Bikini Battle Basics new player guides- all served up with a heapin’ helpin’ of my own personal brand of slang and humor. Can you dig it?
Author: Clint Weisgerber
Advertisement

