SHOWCASE: Stormcast Eternal Liberators


I am really liking the new Age of Sigmar stuff, and Stormcast Eternals in particular. I’ve been working on this unit for a month, and they are finally done.
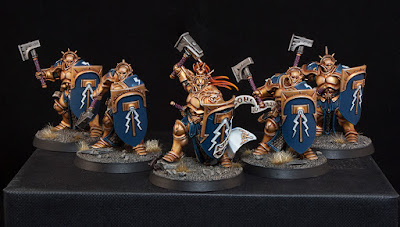
My first entry into my new Stormcast Eternal army, a humble unit of Liberators.
I originally meant to make this army a fairly quick paint job. I didn’t want to spend a ton of time on them, which was part of the reason I picked the studio color scheme. Don’t get me wrong, I also just really like the look of the gold and blue, but giving myself the option of using the Retributor Gold spay paint to speed things up and following the studio paint guide factored into it as well.

Once I got started it quickly became clear to me that I was going to paint them to a fairly high table top standard instead. The gold was a ton of fun to paint, and fairly easy too. I sprayed them all at once and then washed them with Reikland Fleshshade all at the same time. After that step I went one by one to paint all of the gold on the model before moving onto the next one. I did this to avoid burning myself out. I tend to find that if I am painting a color that takes a lot of time across a lot of models I start making mistakes once I have been painting for awhile. Part of this is because I don’t get the same sense of completion I get from painting one model from start to finish.

The gold was a base coat of Retributor Gold, shaded with Reikland Fleshshade. I then layered it with Auric Armor Gold, making sure to leave the previous step showing in the recesses. Auric is a fairly thin color, so you can get some pretty decent blends here just by watering it down a bit and doing several thin layers. Before I started the highlights I used heavily watered down Rhinox Hide to line the armor and pick out all of the rivets. Lining the armor just means defining the separation between the individual plates. The first highlight is Liberator Gold, which was applied to all of the edges as well as some of the larger rounded areas. This color is not as thin, but if you water it down a bit it’s still pretty each to do some blending. I only did this on larger rounded areas like the legs, pectorals, knee pads, and forehead. The final highlight is Runefang Steel which was only used as a line highlight, and used very sparingly.

It took me about an evening a model to paint the gold, give or take. That was about two hours from base coat to final highlight. Once all of the gold was done I moved onto the next major color, the blue. This was base coated with Kantor Blue and shaded with a Kantor Blue/Black mix. After tidying it back up with the Kantor Blue again I highlighted it by mixing in Screaming Skull for two different layers of highlights. This was again done a model at a time, but took less time then the gold. I made sure to paint the shields at the same time here, which were left off as separate pieces while painting.

After the gold and blue were done it felt like I was in the home stretch with only smaller colors left. All of the silver was painted at the same time across all five models. This was just a base coat of Leadbelcher with a wash of Nuln Oil. It then got tidied up a bit and the highlighted with Runefang Steel. I also used a little bit of P3’s Armor Wash to help define some of the recesses a bit more.

All of the leather was painted with Screamer Pink and washed with Nuln Oil across all five models. I then highlighted them two at a time by cleaning them up a bit with the original color again. This was then followed by two highlights by mixing in Screaming Skull.
The parchment was painted with Rakarth Flesh to give a good base coat. I then carefully washed it with Agrax Earthshade, being sure to only get it into the letters and the deeper recesses. Being careful with this step saves me more time on the next. I then layered it with Ushabti Bone and highlighted it with pure White. The Ushabti Bone is pretty thin, so that’s why being careful with the Agrax saves you time. Otherwise you will have to do a few more layers to get a solid coat.

The last step for the normal guys was the white. This was base coated with Ulthuan Grey and carefully washed with Nuln Oil. I then simply layered it with white. On the lightning bolts on the right shoulder pad that just means painting them entirely white, but on the shield you need to to leave some of the Grey and Nuln Oil showing to create some depth. I painted the lightning bolt symbol on the left shoulder by hand since I don’t like using transfers if I can avoid it. I only used white to paint this and just made sure I was looking at the transfer sheet while I did it so I got the shape right.

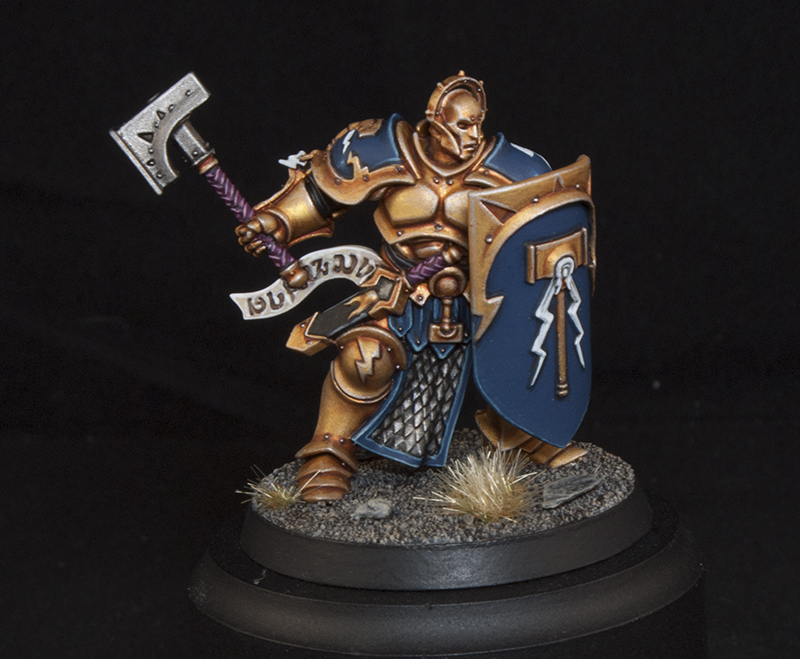
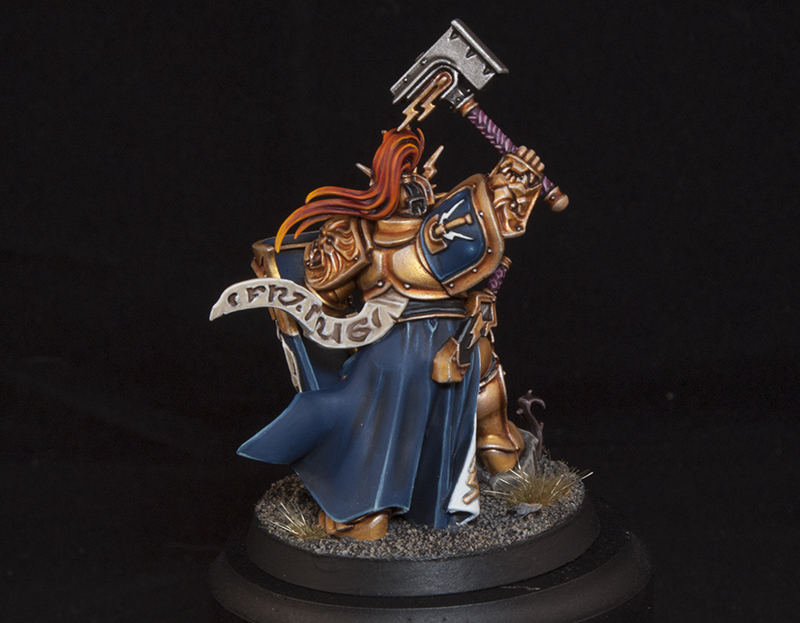
The Liberator-Prime had a few extra details to paint on him such as his skirt, hair plume, and a fancier shield. The blue part of the skirt was painted in the same way as the rest of the blue but with a few extra layers. The interior of it was painted Ulthuan Grey, followed by a 50/50 mix of Ulthuan and White. I then shaded back down in the folds with heavily watered down Ulthuan and highlighted it with pure white. The plume was painted similar to the studio’s color scheme, but I tried to give it a stronger orange tint. My Celestant will be named Orros Firestorm, and since the color of the plume is used to designate which Warrior Chamber they belong to I wanted something fiery. I may make this more orange at some point, but for now I am happy with it. It started with a Mechanicum Red base, washed with Nuln Oil. I then layered it with Fire Dragon Bright, and highlighted by mixing in Golden Yellow. The parchment on the shield was painted the same way as on the rest of the models.
The bases were painted with a base of Eshin Grey with Dawnstone Grey mottled on to give it a more natural appearance. This was then washed with Nuln Oil and drybrushed with Dawnstone Grey, followed by Karak Stone. After I was done I decided the sand was too bright, so I toned it back down by doing a thin wash of Nuln Oil and patches of Agrax Earthshade. I left the stones untouched though, so they would be slightly brighter. I then finished it with patch of Middenland Tufts.

I really enjoyed painting these guys and I’m pretty excited to paint the rest of my force. Right now I have a few other projects to knock out before I swing back around to them, but I think up next for me on the Stormcast front will either by my Retributors or Prosecutors. I need to break up all of the Liberators since they are the same poses besides the Prime.
Be sure to watch the video below for a 360 degree video of the whole group. The music is once again provided by Adam Harvey, you can follow him on his Facebook page and listen to some more of his music on his Youtube channel. Enjoy!
As always be sure to vote for them on Cool Mini or Not here.
If you have any questions on how I painted them let me know in the comments below.
Tyler is a life long painter and hobbyist and took home his first Golden Demon award at the 2012 Chicago Games Day with a follow up at the 2013 North American Games Day. More of his work can be found at his blog, Mengel Miniatures.