40K HOBBY: Pimp My Monolith!

What emerging Necron Lord doesn’t love a bit of bling bling on his Monolith?
At the time of this writing, Necrons are projected to be right around the corner for 5th edition 40K. Time will tell if the new codex helps the Necrontyr shake off the malaise that has otherwise plagued them since the end of the 4th edition. Rumors are starting to leak all over the internet describing changes to the current state of affairs, the removal of some units and the addition of others. And while some units and models will undoubtedly change (or even disappear —C’tan?),I think (hope) we can all agree that the Monolith, that colossal centerpiece of many a Necron army, will still see the tabletop for many years to come. So why not spruce it up a bit?
This tutorial will help a Monolith model builder add an electronic element that is sure to bring a lot of attention onto your Necron army. You will need some decent model making skills, but nothing above and beyond the normal skills you’d need when converting an average GW model. Rudimentary electronics skills will help to, but if you’re expecting me to put up circuit diagrams etc, you’re not going to find that here. (We’re going to keep things simple.)
So how do we start changing a cool model into a centerpiece of pulsing electronic greatness?
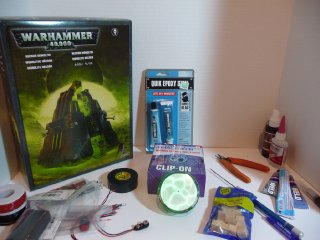
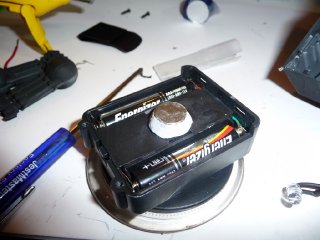
1. Gather your resources. You’ll need your normal model assembling supplies, clippers, files, super glue, accelerant, and a hobby saw. In addition to these, you will need:
-some electrical tape
-some kind of putty that will harden over time (plumber’s putty, green stuff, or some variation thereof)
-a pushbutton on/off switch
-at least seven super-bright green LEDs (or the color of your choice)
-some 1/4″or 1/2″wooden spacing cubes (get these from a craft shop like Michael’s or Hobby Lobby)
-some rare-earth magnets (1/4″flat discs work well, but you can vary them to taste)
-two pocket plasma discs (you can find these in various shops around the internet and they come in a variety of colors).
A quick note about the LEDs, if you don’t feel like wiring them up yourself (adding the proper resistors etc…),you can find pre-wired LEDs on eBay for decent prices and usually in packs of twenty or more. In order to keep things simple, this is what I recommend. This can save you a lot of work and gives you a few extra to work with. Also, while this tutorial shows how to make the plasma disc version of the monolith, you can easily substitute the plasma discs with additional LEDs. While the effect may not be as striking, it will still look very cool.
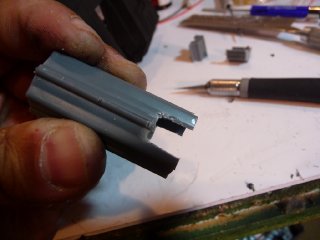
2. Now that you have your supplies assembled, the first thing we need to do is get the top of the monolith ready for the top plasma disc. Using a hobby saw, cut the bottom out of the Monolith’s top. This should leave a hole that will let the plasma disc show through. Test fit and trim accordingly.
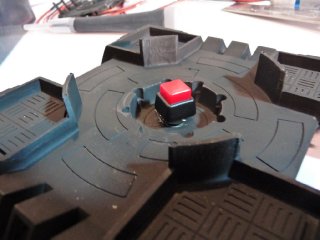
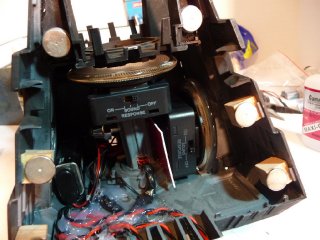
3. Next we’re going to get the base of the Monolith ready for the On/Off pushbutton switch that will control the activation of the LEDs. Using a drill bit that matches the diameter of your pushbutton of choice, drill a hole in the Monolith’s base, and mount the switch in the hole.
4. Next we need to fit the Plasma discs into the Monolith. Sadly, they don’t fit right in. First, we will alter the Monolith’s base to accommodate the plasma disc that will sit behind the Monolith’s portal. Test fit the disc so it is directly behind the Portal and mark where the disk is going to fit. You only need to worry about the actual disc’s diameter here. When we finally mount it, a small part of the disc will fit into the slot we will make.
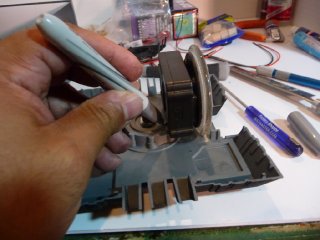
Next, use a hobby knife to score the plastic where you’ve traced out the contours of the plasma disc. Using a sturdier knife, like a box cutter, cut out the slot for the plasma disc. It goes without saying that you should be careful not to cut yourself in this stage. Use a hobby saw to cut out the plastic for the back of the plasma disc.
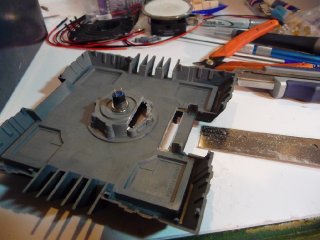
The base of the Monolith should look something like this at the end of this stage.
5. Now we need to fit in the top plasma disc, but to adequately fit it in position, we’re going to need to partially assemble the model itself. Mount the back and the front of the monolith and place the top in position. Use more glue than you would normally or otherwise reinforce these parts, because, for our build, they will be the primary load bearing structures. I used both plastic cement and super glue to hold my parts together.
6. Test fit the back of the top disc against the center column that goes into the middle of the Monolith. We’re going to cut the bottom of the column off so we can fit the top disc in place. Also, cut some slots into the bottom of the column so we can pass the LED wiring through to the sides. You may also want to drill a hole in the column to correspond with the LED that will shine out of the hole in the back of the Monolith.
7. Now we need to wire up the LEDs. The easiest way to do this would be to wire them up in series connecting one LED to the switch and then daisy-chaining them together like Christmas lights. The down side to doing it this way, is that if one LED doesn’t work, or the connection is bad, then none of them will work and it can be a royal pain to figure out which one isn’t working.
What I recommend is to wire them up in parallel. Here I put an additional wire looped to the ON/OFF pushbutton switch. Then I stripped portions of that wire and attached one wire of the LEDs to that. Close the loop by connecting it to the power supply (in our case,a nine-volt battery).
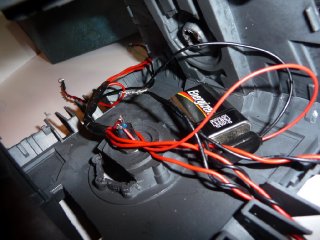
There’s no need to solder these connections. I just twined the wire together and held it together with electrical tape. You can also get conductive glue to do the same thing.
Once I had everything in place (and tested),I fixed the wires in place with some hot glue. You don’t need to use as much as I did in the picture (that was kind of an accident) but you want the wires to be fixed in place and not move around. You can also mount the LEDs in one side of the monolith, don’t mount the other side yet though, we’ll have more work to do there.
If you want, you can glue the Monolith side where you’ve mounted the LEDs in place at this time. Leave the other side off however, we will have a different way of attaching that side.
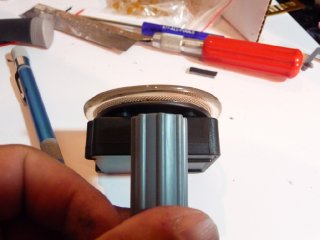
8. Next we need to get the top plasma disc ready to mount. It won’t quite fit on with the back on, so in this case we will remove the backing. There is a little bump on the back but it won’t hold the magnet by itself. So, using plumber’s putty (or your putty of choice),I built up the nub so that it would hold my rare-earth magnet of choice. The companion magnet will go on the top of the column to hold the plasma disc in place.
9. Now we need to mount the other Monolith side. This is probably the most time consuming part of the assembly (other than wiring up the LEDs) since the side needs to fit perfectly if you do it right. But if you do it right then the side will be magnetized, removable, and will fit so well that it will look glued on to the naked eye.
Mount six rare-earth disk magnets onto the Monolith’s side. Corresponding magnets need to be fitted onto the inside of the monolith. They will be attached to the wooden cubes and the cubes will be glued to the inside walls of the monolith.
When you’re fitting the cubes to the inside wall, it helps to put both rare-earth magnets on and make sure the magnets are flush with the plane that the side wall of the monolith with occupy when fitted in. For the top magnets, the wooden cubes are a little too big, so I made small columns to hold the magnets out of plumber’s putty.

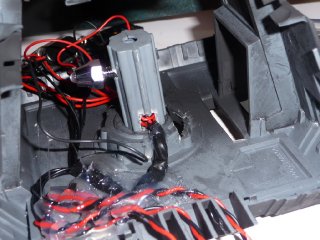
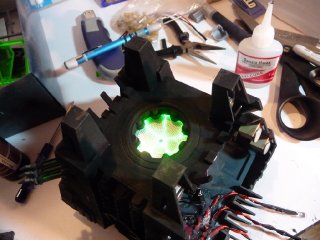
10. Now all you need to do is mount the LEDs into the magnetized side of the monolith and then mount the plasma discs and you’re ready to go. Things are going to get cramped pretty quickly.
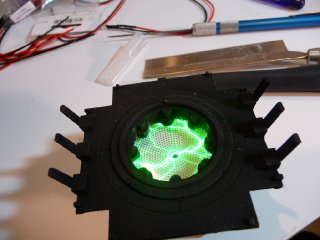
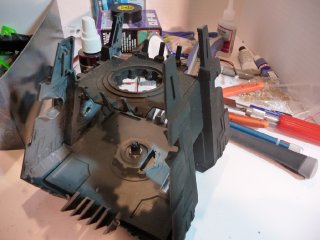
Here’s what the inside should look like when complete.
Here I’ve installed a piece of plasticard with two rare-earth magnets to hold the portal plasma disc in place.
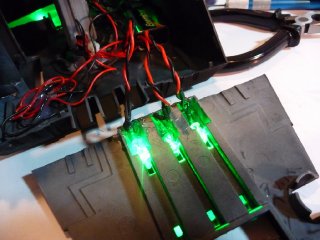
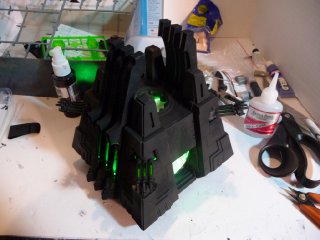
Then we can turn on the discs and the LEDs and it should look spectacular.

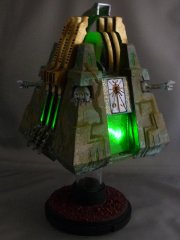
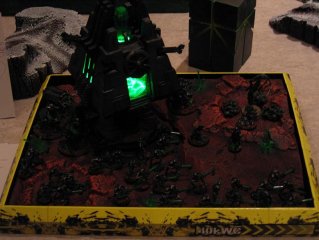
Here is a completed monolith all lit up.
And with an army on a display board.
One nice side benefit of the plasma discs is that they have two modes of operation. They can be turned straight on, which will play a pattern of plasma across the discs’ surfaces or they can be sound activated which actually looks a lot better. Normally it is too loud in a gaming environment for the sound activation to work correctly, they will essentially always be “on” instead of only going off with sound, but still the effect looks stronger than simply turning them to the ‘On’ position. Plus, if you’re in a quiet room, you can do impressive stuff like this:
~For the full unabridged construction instructions, head to Rogue428’s blog here. Have at it gang!


