40K TACTICS: Deploy for the Mission


Hi all, Jwolf here. In reading the various blogs out there, it is easy to find a lot of advice on building lists. Today I want to talk about the deployment of armies, and the considerations and calculations that go into how to best to play a mission and gain advantage before any shots are fired.
To illustrate this today, I have chosen to use the Adepticon Primer Missions (Mission 2). The deploying army will be Jawaballs‘ Mechanicon-winning Blood Angels Army, and the opposing force is Brent’s Daemon Army that he took to DaBoyz GT. Jawaballs’ army is deploying because Daemons rather universally prefer to go second (depriving their enemy of a turn of shooting), so we can expect Jawaballs to get to choose his deployment zone if Brent wins the roll. Jawaballs might elect to go second, but let us, for the moment, assume that he chooses to pick deployment zones instead.
Here are the 1850 point lists:
Blood Angels
HQ: Librarian, Unleash Rage and Sanguine Sword
EL: Chaplain, Infernus Pistol
EL: Sanguinary Priest, Terminator Armor
EL: 5 Assault Terminators, 1 TH/SS, 4 LC
Land Raider Crusader, Extra Armor and Multimelta
TR: 5 Assault Marines, Sarge with PW, Las/Plas Razorback
TR: 5 Assault Marines, Meltagun, Sarge with PW, L/Plas Razorback
TR: 6 Assault Marines, Sarge with PW, Las/Plas Razorback
TR: 6 Assault Marines, Meltagun, Sarge with PW, Heavy Flamer Razorback
HS: Predator with Autocannon and Lascannon Sponsons
HS: Predator with Autocannon and Lascannon Sponsons
HS: Predator with Autocannon and Lascannon Sponsons
Daemons
HQ: Herald of Tzeentch, Chariot, Bolt, Gaze, Breath, Master of Sorcery
HQ: Herald of Tzeentch, Chariot, Bolt, Gaze, Breath, Master of Sorcery
EL: 6 Fiends of Slaanesh, Unholy Might
EL: 6 Fiends of Slaanesh, Unholy Might
EL: 6 Fiends of Slaanesh, Unholy Might
TR: 10 Plaguebearers, Icon
TR: 5 Plaguebearers
TR: 10 Pink Horrors, Icon and Changeling
TR: 5 Pink Horrors, Bolt
TR: 5 Pink Horrors, Bolt
HS: Daemon Prince of Tzeentch, Bolt, Breath, Gaze
HS: Daemon Prince of Tzeentch, Bolt, Breath, Gaze
Here is the battlefield:
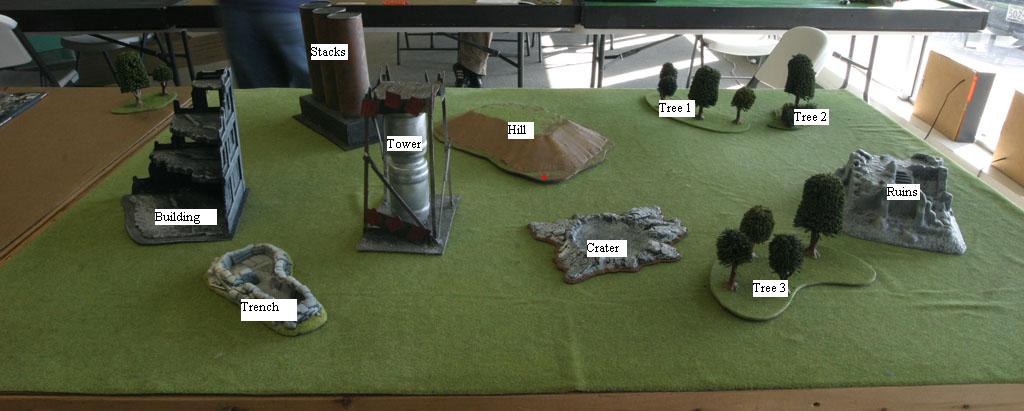
The Deployment is Spearhead.
The Objectives are: 1) Kill points from Non-Troop Units. 2) Control Table Quarters. 3) Be the only player with an HQ model within 3” of the center of the board at the end of the game.
So let’s consider where Jawaballs should choose to deploy:
First, Jawa is outnumbered, and his opponent will be appearing anywhere on the board.
Second, Jawa knows that his opponent has 5 troop units to his 4, and that Brent’s troops are not expected to do any killing (so they can drop away from Jawa without costing Brent much effectiveness).
Third, Jawa knows that those Heralds of Tzeentch are very hard to shoot to death and very capable of killing vehicles and units.
Fourth, Jawa knows that Brent’s Fiends are the best killing unit he has, so neutralizing them is important. Noting that the Fiends are Initiative 5, Jawaballs sees that getting the Furious Charge off with his Terminators is a pretty reliable way to kill one unit completely, and likely have enough Terminators left to kill another. (12 attacks hitting 9 and wounding 8 times, plus 5 wounds from the Chaplain and Librarian yields 13 wounds. Fiends save 4, leaving the remaining Fiends to take 2 hits from the Thunderhammer and die to No Retreat. The fiends hit back, 25 attacks @ S5 and 5 attacks @ S6. 12.5 hits at S5 and 2.5 at S6. This yields 2 Rends against the squad and 1 Rend against a character. The 5 other wounds to the squad are enough to allow the Squad’s rends to go against the Storm Shield, and may kill a single Terminator. The 2 other wounds against characters are unlikely to kill the character attacked, though the Librarian might be killed if he is unlucky. Keeping the Librarian in the Land Raider is the more conservative play, and probably better – the wound or two he adds to the assault isn’t as important as being able to gain the third objective.
A quick calculation shows that Jawaballs has 8 Kill points and Brent has 7 for Objective 1. Brent has the edge in scoring units, with 5 to Jawa’s 4, and the edge in HQ choices, with 2 choices to Jawa’s single HQ. Jawaballs has 4 transports that are completely expendable in this scenario – they do not provide kill points at all, so they are ultimately targets Jawaballs wants Brent to be forced to kill (instead of killing something else).
Taking all these factors into account, Jawaballs should elect to take the lower left corner of the board, with the building and tower in it. Fiends are Beasts, and cannot enter the second floor of buildings, so placing an assault squad there means that other units will have to deal with it if Brent wants the quarter. Further, placing the squad so that there are only 2 members on the second and third floors, and a single other member on the fourth means that Breath of Chaos isn’t going to get the job done, and assaulting into terrain will be required.
That gives us one unit in place; now what to do with the rest of the army? Heavy use of reserves is really out of the question; Jawaballs needs to be shooting Daemons as soon as possible if he’s going to thin out the scoring units and be able to earn the Kill Points from the other units as well, and his firepower is all in vehicles.
Jawaballs can either castle in the corner, which means that he is blocking himself from a lot of potential firing lanes, or circle the wagons near the center and have maximum shooting opportunities. Since the whole point of deploying is being able to shoot, he chooses to create a vehicle parking lot between the trench and the crater, positioning the Predators to have the best arc of fire and be on the back board edge. Since the Heavy Flamer Razorback is the best unit for killing Horrors, it should be in the center of the formation, and placed so that as many angles as possible yield 3+ cover saves.
And yes, he will pop smoke on almost everything on turn 1.
Since the Land Raider and its cargo of Terminators are a counter-punching unit (and also loaded with 5 of Jawaballs’ 8 Kill Points in this mission), Jawaballs holds them in Reserve. Additionally, one Assault Squad is held off the board, to be brought in on the far right in hopes of securing that quarter of the board, or adjusted and sent into the “home” quarter for back-up or jumping on an aggressively deployed Herald.
The alternative deployment of the Land Raider in the center of the vehicle park is also a viable tactic. Bolt of Tzeentch needs a 6 to glance it, and Breath won’t be able to target it right away. Additionally, the Razorbacks can be nestled against the flanks of it, thereby giving the Marines inside them access to the Priest’s bubble of Feel No Pain. Normally, this would be a superior tactic to holding the Land Raider in Reserve. In this mission, however, the vast majority of the Kill Points Brent wants to get are in the Land Raider, making preservation of them more valuable, and Feel No Pain is less valuable outside of assault because most of the important wounds thrown onto the Assault Squads will be from Bolt and Breath, neither of which allows FnP saves. It is critical that the Priest and Terminators enter play intact and at a location that allows them to assault a unit of Fiends; thus Reserving the Land Raider is the best choice. The Priest will put his Terminator Armor in Lounge Chair mode; he isn’t getting out of the Land Raider. The Chaplian and Librarian are both worth risking to add more S5 attacks to the assaults against Fiends.
The Assault Squads themselves can either be held in their vehicles or deployed on the flanks to protect the vehicles. Considering that the main threat to the vehicles is Bolt of Tzeentch with a 24″ range, putting the Assault Squads on the table (and making them targets) doesn’t seem like a good choice. While spreading a squad across the left side of the vehicles might reduce the threat of shots against the side armor of the Predators, it definitely sets up those Marines for Warpfire and Gaze wounds, and Jawaballs already has a small enough number of scoring models that throwing more away doesn’t seem worthwhile. (The guys in the building are already going to die; they just want to die slowly and alone.
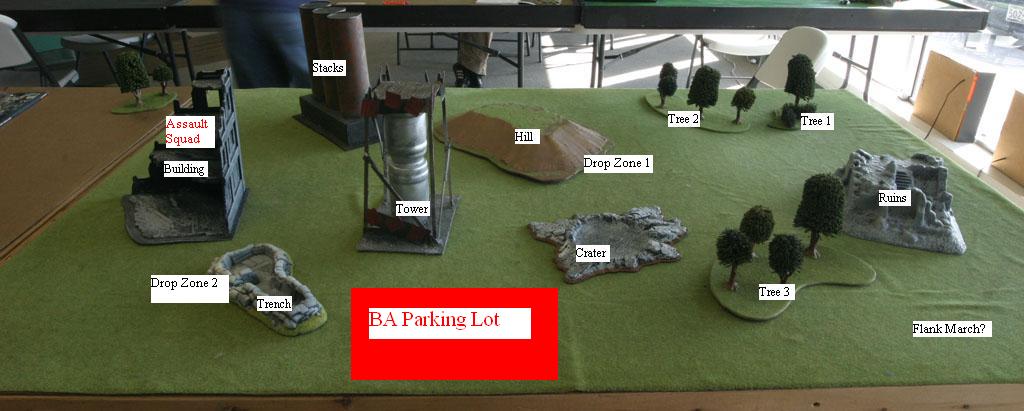
Brent’s Deployment
This deployment leaves Brent with two real drop zones (see above pic). Drop Zone 1 is the less aggressive and probably better play; there is no chance for mishaps and his forces will be in play on turn 2 (maybe a couple of Bolts will get out on turn 1). Drop Zone 2 is more aggressive, and gives the chance of getting some Bolts and possible Breaths in; a couple of good Breaths across multiple vehicles would make turn 2 a lot more fun for Brent. Brent could elect to enter in the Flank March area, but that yields him fewer good scatter results and generates less threat to Jawaballs’ position, while retaining all the disadvantages of dropping near the opposing board edge.
Brent cannot realistically drop anything big on the far side of the building; scattering into the building would result in Mishap, as would scattering onto the Stacks. Similarly, dropping right in from of the BA Parking Lot brings the Tower into play, which is a Mishap hazard (assuming the players agree that the central portion of the Tower is Impassable).
If Brent goes with Zone 2, there is a 50/50 chance that he will get hit by the Terminators coming in from Reserve; not only will the Terminators be able to pretty thoroughly crush any single unit they charge in assault (and possibly 2, if there is a convenient Herald nearby), their Crusader has the guns to burn down a Herald or most of a unit of Horrors – not a good trade for the Daemons. This means that the only solid option for Brent is dropping in Zone 1, right where Jawaballs wants him to be.
But does that mean Jawaballs is going to win? No. There are dice in the game, and Brent’s army is designed to take that initial outpouring of enemy firepower and still get the job done. But by picking a good location and using Deployment and Reserves effectively, the Blood Angels have forced the opposition to dance to their tune – which often is enough to turn the tide in your favor.
Thanks for listening and getting some insight into the types of things that go through my mind during deployment. Look for more of these in the days ahead. Have at it folks.


