How To Play: The Warhammer 40K Turn Sequence
Take a look at how to play 40K 10th Edition. We will take you on a deep dive into the Warhammer 40K Turn Sequence, or Battle Round.
The brand new rules for Warhammer 40,000 10th Edition are out in the wild. With a new edition comes new challenges. New players have a brand new and exciting game to get into. Veteran players have to relearn a game they thought they knew. Luckily you’ve got us here at BoLS to help you along on this journey. So today we take a look at the new Warhammer 40K turn sequence and start to learn how to play 10th Edition.
Getting Started
Warhammer 40,000 is much more than just a game, it’s a hobby. As such, your journey to playing the game starts well before the first battle round. Before you can even start thinking about a game you will need to acquire an army. There are plenty of ways to do this, but the most common is buying models and then building and painting them. Owning the army isn’t simply enough, and you’ll also have to arrange it into a specific detachment to use in a game. The rules for doing this are summarized below.
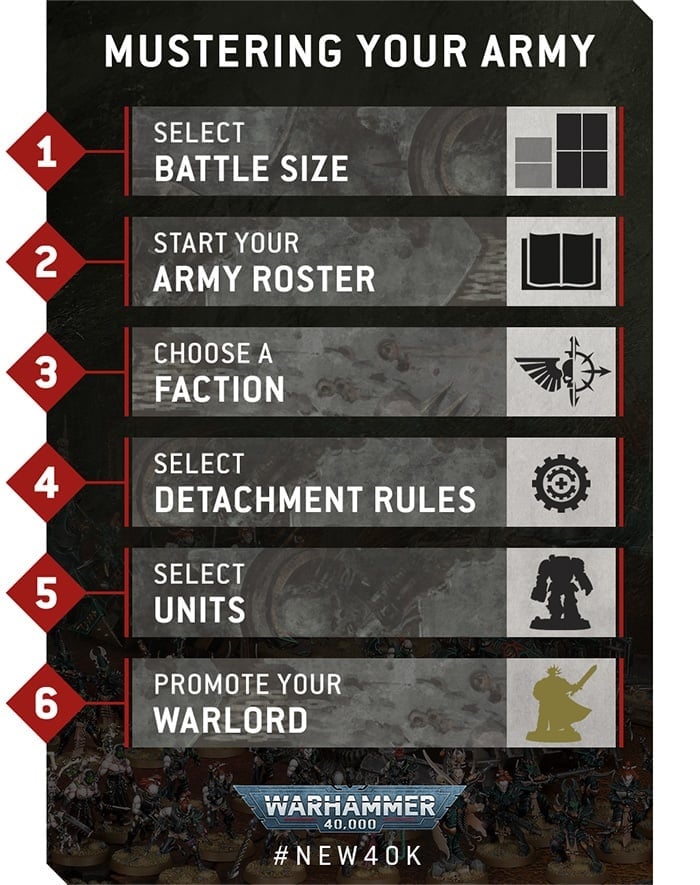
Once you’ve got an army its time to move onto the most important part of setting up a game: finding an opponent. You’ll then pick a mission, set up the battlefield and deploy your armies. Once you’ve got your units on the tabletop it’s time to play!
Units
The single most important concept to understand in Warhammer 40,000 is that of the unit. Each player’s army is made up of a number of units. Units themselves are made up of between one and more models. All models are in a unit, even if it’s just made up of themselves.
Units act together. They move, shoot, and generally act as one. Any unit with more than one model must always be in coherency. This means that all of its models are within 5″ vertically and 2″ horizontally of at least one other model in the same unit. If the unit has 7 or more models, then they must be within this range of two or more models from the same unit.
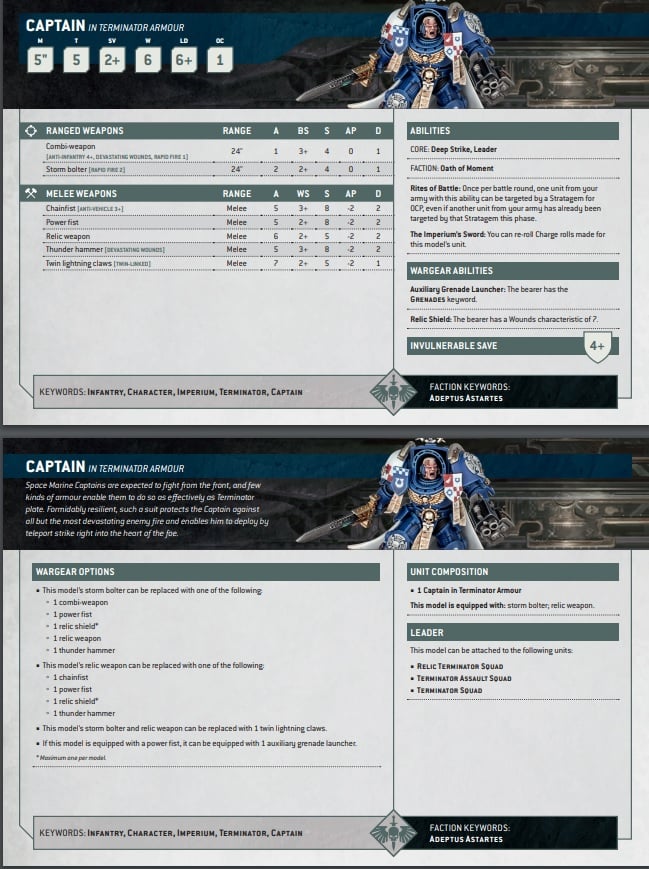
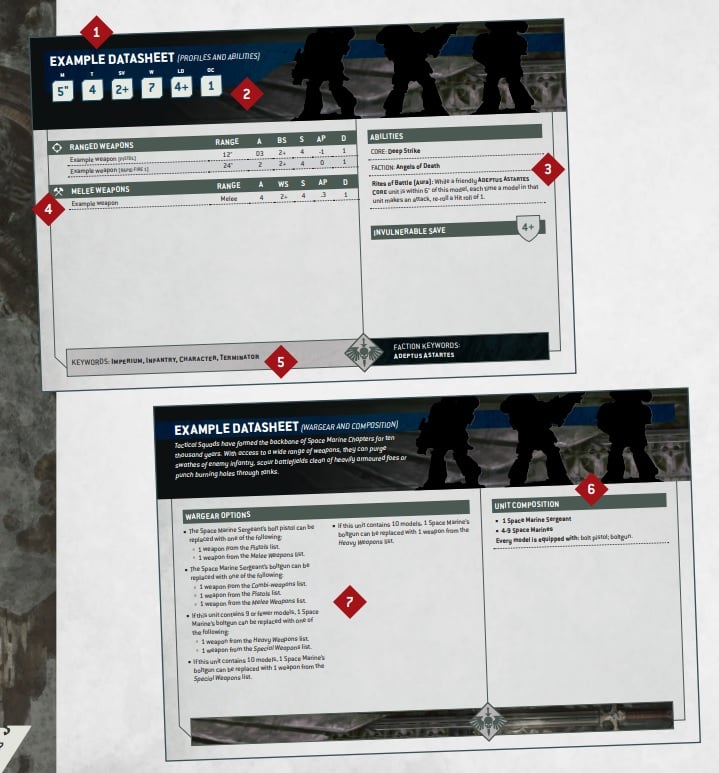
Each unit has its own datasheet. This tells you how many and which models are in the unit. It also gives you the stats for those models and what weapons and rules they are equipped with. In some cases, multiple datasheets can be combined into one unit. This normally happens when a character is chosen as a leader for another unit.
Warhammer 40K Turn – The Battle Round
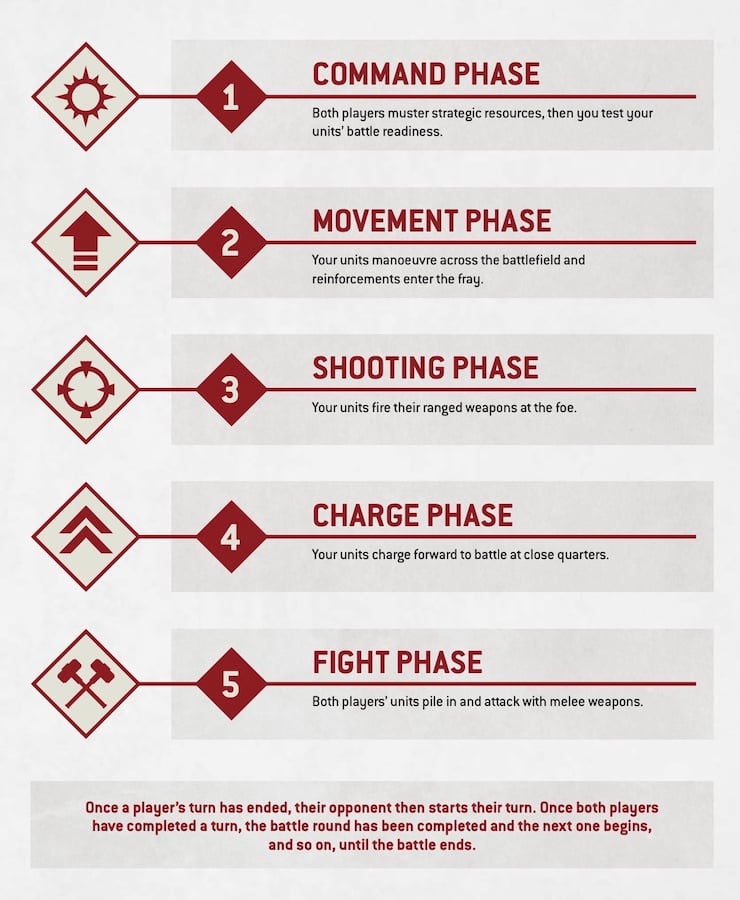
A standard game of Warhammer 40,000 10th Edition lasts for five battle rounds. During a battle round, each player takes one turn. Once both players have taken their turn the battle round ends and the next one starts. Each Warhammer 40K turn is divided into five phases, these are:
- The Command Phase
- The Movement Phase
- The Shooting Phase
- The Charge Phase
- The Fight Phase
Each phase is played sequentially and once a player’s Fight Phase has ended their turn is over, and the next player’s turn begins.
Depending on how you’ve built your army player will have more or less to do in each phase. It’s possible that, on some turns, you will have nothing to do in a given phase, but that’s OK. However generally speaking each phase is important to winning a game, so let’s take a look at each one now.
Warhammer 40K Turn – Command Phase
The first phase, in any Warhammer 40K turn, is the Command Phase. It is split into two steps. The first step is the Command Step. During this step at the very start of the phase the player whose turn it is gains one Command Point (CP). By default, this is the only thing that happens during this step. However, many units and armies have rules that resolve during the Command Phase. Any of those rules are resolved at this point with the player whose turn it is deciding the order they relieve.
The second step is the Battle-Shock step, something that will normally become more important as the game progresses. During this step, each unit owned by the player whose turn it is must take a battle-shock test if the unit is Below Half-strength. A unit is considered to be Below Half-strength if it contains less than half of its starting models. If the unit started with only one model, then it is Below Half-strength if it has less than half of its starting wounds.
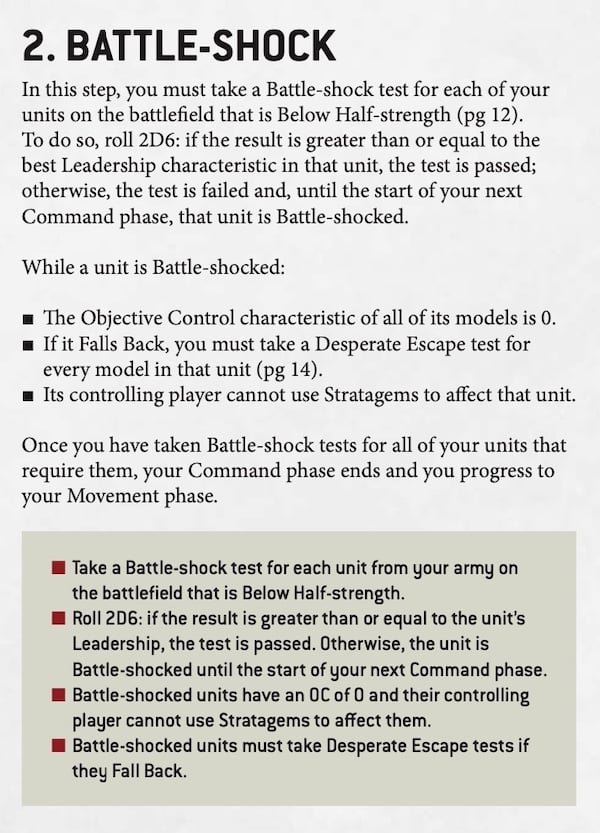
To take a Battle-shock test you roll 2d6 and compare that number to the units Leadership characteristic, found on the datasheet. If a unit has more than one Leadership characteristic, use the best, i.e. lowest. If the result of your dice roll is greater than or equal to the unit’s Leadership the test is passed and there are no effects. However if the result is lower, the test is failed and the unit is Battle-Shocked until the start of your next Command Phase. Battle-shocked units suffer a number of effects because of this.
It’s important to remember that even if a unit passes a Battle-shock test, they will likely have to take it again on the next round. Once you’ve resolved all the needed tests the Command Phase Ends.
Warhammer 40K Turn – Movement Phase
The next phase in your Warhammer 40K turn is the movement phase. It is also divided into two steps, the Move Units Step and the Reinforcement Step.
The first step is the Move Units Step. In this step, a player picks units from their army and moves them about the table. Units can choose to make a Normal Move, Advance Move, or Fall Back Move. Any unit that does not do one of these Remains Stationary.
If a unit Remains Stationary, none of its models may move at all. It can do this even while in Engagement Range of enemy models (see below). While this normally has no additional effect, some rules will give you benefits, or downsides, for Remaining Stationary.
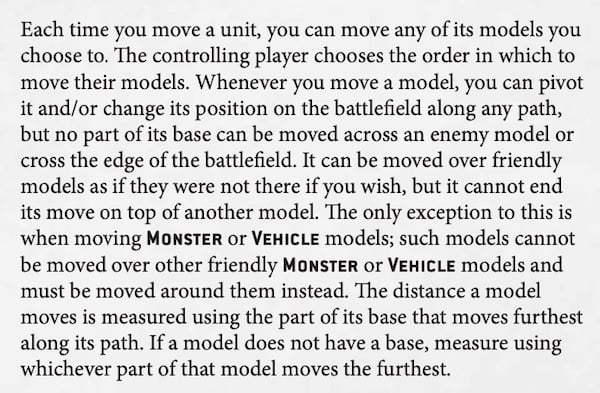
If a unit chose to make a Normal Move then each model in the unit may move up to its Move (the M stat on its Datasheet) in inches. No model can move more than its M stat, nor can a model move within the Engagement Range of Enemy models. The unit must end its move with all models in coherency. While moving you can move through and over friendly models at will. The only exception is that Monster and Vehicle units cannot move through Monster or Vehicle models
If a unit chooses to Advance, it rolls one D6 and adds the result to its Move stat. The unit then moves using this new number, but in all other ways, just like a Normal Move. A unit that advances cannot normally shoot or declare a charge for the rest of the turn.
Lastly, you have the option to make a Fall Back Move this move can only be chosen by a unit that starts the phase in Engagement Range of an enemy model. While a model is within 1″ horizontally and 5″ vertically of an enemy model, those models, and the units they are a part of, are said to be in Engagement Range of each other. Some players will also call this being “locked in combat.”
If a unit starts the Movement Phase within Engagement Range of an enemy unit, their only options are to Remain Stationary or make a Fall Back Move. A Fall Back move is made using the same rules as a normal move, however, you can move models within the Engagement Range of enemy models while making this move. At the end of the move, all models in the unit must end outside of Engagement Range. A unit that makes a Fall Back move cannot shoot or charge that turn.
If a unit is Battle-shocked and wants to make a Fall Back move it must first take Desperate Escape tests for each model in the unit. To do so, roll one die for each model for each roll of a 1-2, you must choose one model from that unit to be destroyed.
After you have moved all your units, the Move Units step of the phase ends.
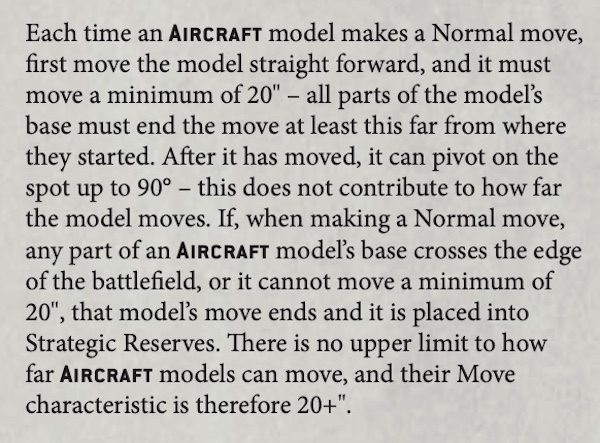
The second step of of the Movement Phase is the Reinforcements Step. If you have units in Reserves, they maybe be brought unto the battlefield one at a time. Rules for how this is down can either be found in the mission rules or in the unit rules on their datasheets. Units that come in from Reserves count as having made a normal move and cannot move again that phase, but may act normally otherwise.
Warhammer 40K Turn – Shooting Phase
Once you have completed bringing units in from Reserves it’s time to move onto the Shooting phase. In a players shooting phase they may select any number of eligible units to shoot. Each unit will complete the full shooting process before you select the next unit.
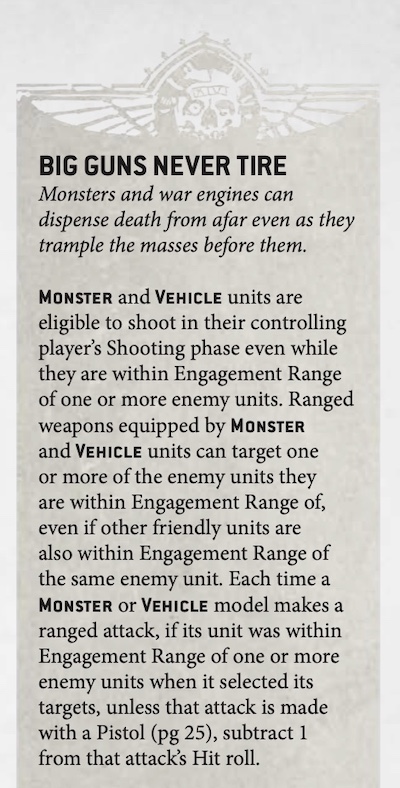
A unit is eligible to shoot if it did not Advance or Fall Back that turn. In addition, it must also have a shooting weapon whit which to fire. In general, units that are in the Engagement Range of enemy units can also not be selected to shoot, however, Vehicle, Monster, and units with Pistol type weapons are exceptions to do. For more details see the Big Guns Never Tire and Pistol rules in the rulebook.
Before making any attacks, you must declare targets for all the weapons that the unit is shooting with. In general each model in a unit may shoot, and may fire with all the ranged weapons they are equipped with (pistols are one major exception to this). Each model can choose different targets for each weapon they are armed with, but all the attacks from one weapon must target the same unit.
To be an eligible target, the enemy unit must be in the range of the shooting model, the range of the weapon shown on the unit’s datasheet, and within Line of Sight. To determine Line of Sight you must be able to physically see the enemy models with yours. In essence, this means you can draw a straight line from any part of your model to any part of the enemy model. If you can shoot any model in an enemy unit, you can shoot the whole unit. If Line of Sight is partially blocked, other rules, such as cover, may apply.
Normally unit that is within Engagement Range of one of your units cannot be selected as a target. Vehicles and Monsters are, again, exceptions to this. You also cannot target your own units.
Once you have chosen your targets, you must make your ranged attacks. We will discuss the rules for making attacks later. Once you have completed a unit’s ranged attacks, you then repeat the process for the next eligible unit. When you have no more units to attack with the Shooting Phase ends.
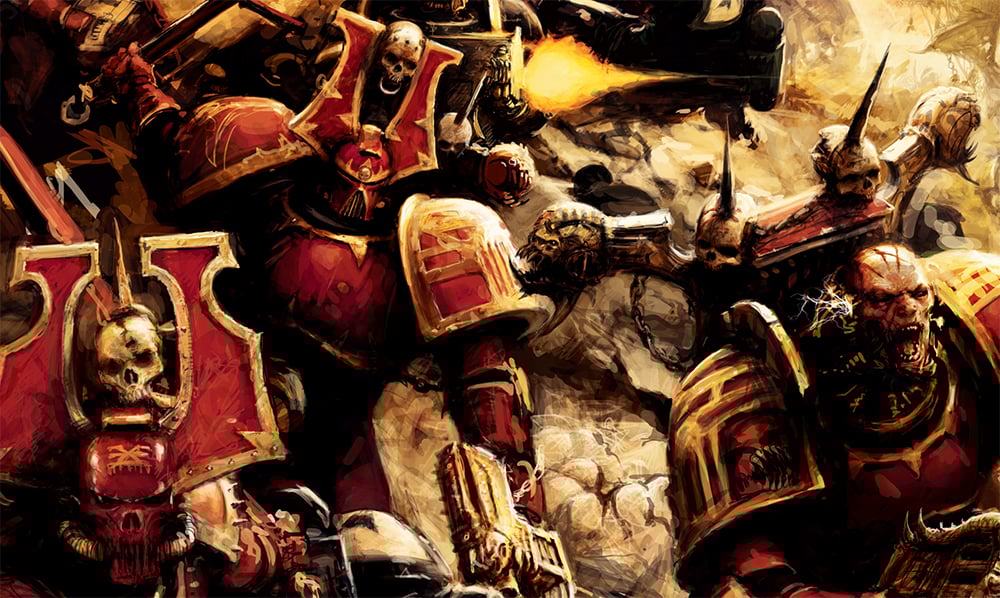
Warhammer 40K Turn – Charge Phase
Next, it’s time to move onto the Charge Phase. In this phase, you move your units into close combat with enemy units. This is generally the only time in the game when you can move units into Engagement Range and end there.
The Charge Phase follows a similar process to the Shooting Phase in that you select eligible units to charge and resolve their charges, before moving onto the next unit. In order to be eligible to charge, a unit must be:
- Within 12″ of at least one enemy unit.
- It must not have made an Advance of Fall Back move.
- It cannot already be within Engagement Range of any enemy units
In addition, Aircraft are normally prevented from making changes.
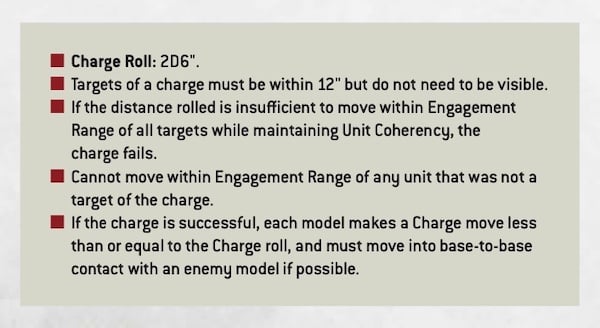
Once you have picked your unit to charge, you must then pick target units. You must pick one or more enemy units that are within 12″ of your unit as a target. You may pick units that you cannot see. You then roll 2d6 to determine your Charge roll. This is the number of inches your models can move when making their charge.
To complete a charge, this roll must be enough so that your unit can end the charge within Engagement Range of all the units you targeted. You also cannot move within Engagement Range of units you did not target. Finally, you must also end in Unit Coherency. If you cannot meet all of these conditions, the charge fails, and the charging unit does not move. While attempting to charge multiple weak enemy units at once may seem like a good idea, it greatly increases your chance of failing to charge all together.
If your charge is a success, you can then move the unit. Each of the models must end its move closer to one of the targeted units than it started. In addition, if a model can move into base-to-base contact with a targeted model, it must. At the same time, all the above rules of a successful charge must still be obeyed. Units that successfully charge gain the Fights First rule until the end of the Warhammer 40K turn.
Once you have completed your charge with one unit, you and may select another eligible unit to charge. You do not have to make any charges if you do not wish to. When you have completed all the charges you wish to make, the Charge Phase ends.
Warhammer 40K Turn – Fight Phase
The final phase of the turn is the Fight Phase. During this phase, both players can select units to make attacks in close combat. This can often be the bloodiest phase of a Warhammer 40K turn.
The Fight Phase is split into two steps, the Fights First Step and the Remaining Combats step. In the Fights First step, all eligible units in both armies with the Fights First rule can attack. Starting with the player whose turn it is not, the players alternate picking units to fight in combat. As all charging units gain the Fights First rule, the player whose turn it is will normally have more units with this rule.
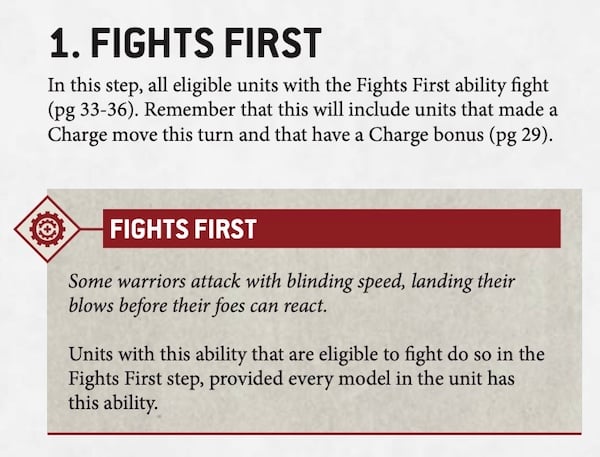
A player must select a unit to fight if they have any that are eligible to attack in that step, and you cannot skip or pass. If one player has no more remaining eligible units to fight, then the other player can fight will all their remaining units one at a time.
In order to be eligible to fight, one or both of the following must be true for the unit: It is within Engagement Range of enemy units, or it made a huge move this turn. Once all units with the Fight First rule have fought, you move to the Remaining Combats step. Using the same process as before, you may pick any remaining eligible units to fight. A unit cannot fight more than once in the same Fight Phase.
Fighting
When selected to fight, a unit follows the following process. They can first make a Pile-in move. Any model that is not within base-to-base contact with an enemy model can move up to 3″. They must end closer to an enemy model, in Engagement Range and in base to base if possible.
Next, you much selected which models in the unit will fight and with what. A model can fight if it is either in Engagement Range of an enemy model or in base-to-base contact with a friendly model that is in base-to-base contact with an enemy model. Each model that can fight must then pick one of the melee weapons it’s armed with to fight with.
The unit must then declare the targets of all of its attacks. Models may target any enemy unit they are in Engagement Range of, or that is in base-to-base contact with a friendly unit that the attacking model is also in base-to-base contact with. Units and models can divide their attacks however they wish between all eligible targets.

Making Attacks
It’s now time to take a look at how you make attacks. The process is the same whether the attack is a range or close combat attack. Each weapon will tell you how many attacks it can make each time you use it. This is listed under the Attacks or A stat on the weapon profile. Normally each individual attack is rolled for and resolved on its own, and we will look at how this process works in that manner. However in reality, this would take far too long and most games use the rules for Fast Dice Rolling which you can find in the rulebook.
The thing to do when making an attack is to make a hit roll. This is done by rolling one D6. If the result of the rolls is equal to or greater than either your Ballistic Skill (BS) for a ranged attack or your Weapon Skill (WS) for melee attacks the roll is a success, and one hit is scored. For instance, if a weapon has a BS of 3+ then a roll of a 4 would be a success and score one hit. WS and BS are found on each weapon’s profile.
In addition a natural roll of a 6 is considered a Critical Hit and is always a success. Some abilities may modify your roll, however, it can never be modified by more than +1 or -1.
For each successful hit roll you must then roll to wound the target. To do so, you must compared the Strength (S) of the attacking weapon and the Toughness (T) of the target and reference the below chart.
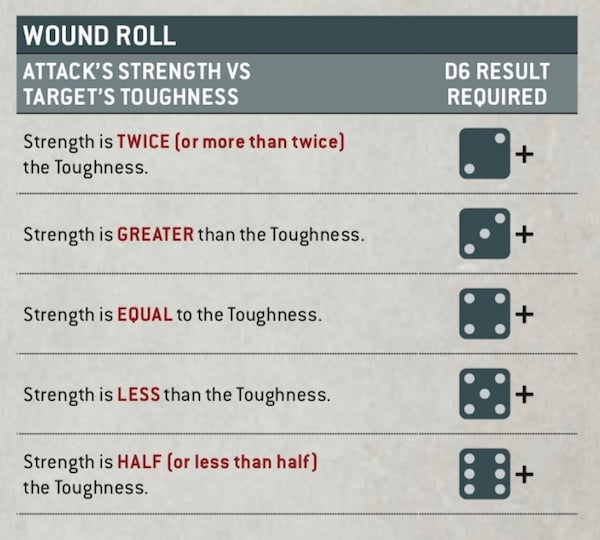
You then roll a D6 and compare the result to the chart. An unmodified wound roll of a 6 is a Critical Wound and always succeeds. Like hitting, you can never have a greater than +1 or -1 modifier to this roll.
If the wound is a success, the player whose unit was targeted must then allocate that attack to a model of their choice in the unit. Once done, they must make a saving throw. This is down by again rolling and D6. The result of this roll is modified by the AP of the attacking weapon, and unlike other rolls, is not capped in the negative modifier it can receive, though you can never add more than +1 to the throw. If the roll is greater than or equal to the Save value of the model the attack fails, and the sequence ends. If the result is less than the Save value, the attack is a success. A saving throw of a 1 always fails, however, a 6 is not an auto pass
If a save is failed, the attack now does damage to its target. The attack inflicts a number of wounds to the target equal to its Damage (D) characteristic. If a model’s wounds are reduced to 0 or less, it is destroyed, and the model is removed from the game. If the attack leaves the model with wounds remaining then it survives, though its wounds are now permanently reduced (barring any ability to heal). Any excess damage past what it might take to reduce a model to 0 wounds is lost.
Once you have dealt damage and removed any needed models, that attack is over, and you may repeat the process for each attack the model and unit can make. It’s important to note that weapons may have a large number of special rules that modify have they work. Some of these are described in the main rule book, and others are on the unit’s datasheet.
Fight Phase Continued
Now let us return to the Fight Phase. Once a unit has completed making all its attacks, and any destroyed enemy models and units are removed, it may consolidate. The rules for consolidating are similar to those of the Pile In Move. Models not in base-to-base with the enemy may move up to 3″ and must end closer to the enemy and in base-to-base if possible. If a unit cannot end a Consolidate move in Engagement Range of an enemy unit, it can instead move 3″ towards the nearest objective marker, but only if that move would bring it within range of the marker.
After you have Consolidated with a unit, their fight sequence ends, and another unit may be chosen to fight. Again this is done by alternating between players. Once all eligible units have fought, the Fight Phase, and the Warhammer 40K turn ends.
Final Thoughts- A World Of Exceptions
Once a player’s turn has finished, the next player takes theirs. Once both players have completed a turn, the Battle Round ends, and a new one starts. In normal Warhammer 40K games once five Battle Rounds have been completed, the game ends.
We’ve described only the bare basics needed to play a game of Warhammer 40,000 10th Edition. If there is one rule to keep in mind, it’s that every rule we’ve described above has one or more exceptions. There are a lot of detailed and complicated rules in the game. We did not touch on things like terrain, transports, leaders, stratagems, and much more. These are important rules, but not technically needed to play a game.
In addition, the game has more than 1000 units, spread across dozens of armies, each with its own datasheet and rules that can affect how the game is played. To attempt to cover them here would be a fool’s errand. Hopefully this basic how-to play guide gives you a useful overview of the main phases of the game and how to play in them. Stay on the lookout for additional Warhammer guides digging into the remaining aspects of the game.
Download the Warhammer 40,000 10th Edition Core Rules (PDF)
![]()