Age of Sigmar: Painting Rockgut Troggoths – A Step By Step Guide
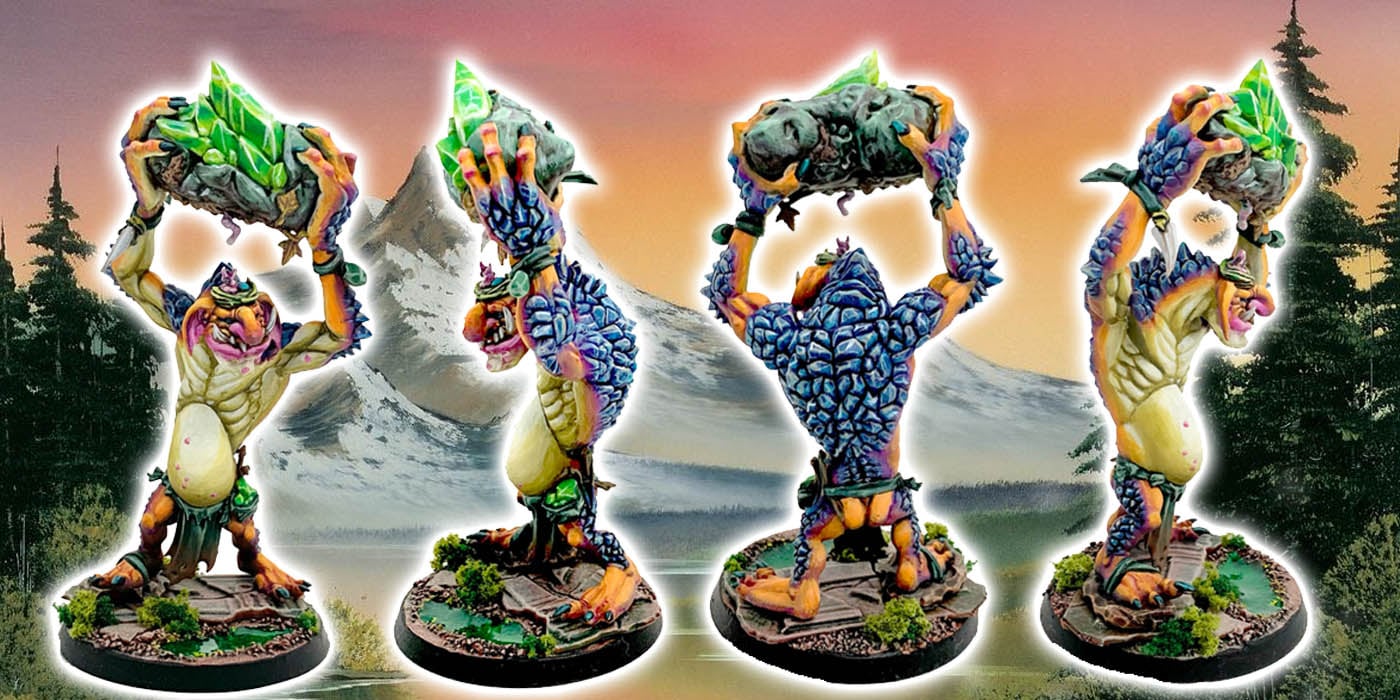
Ben is back with a breakdown of how he’s painting his Rockgut Troggoths.
Starting to get my Troggherd ready for the table – here’s a step by step for the Rockguts.
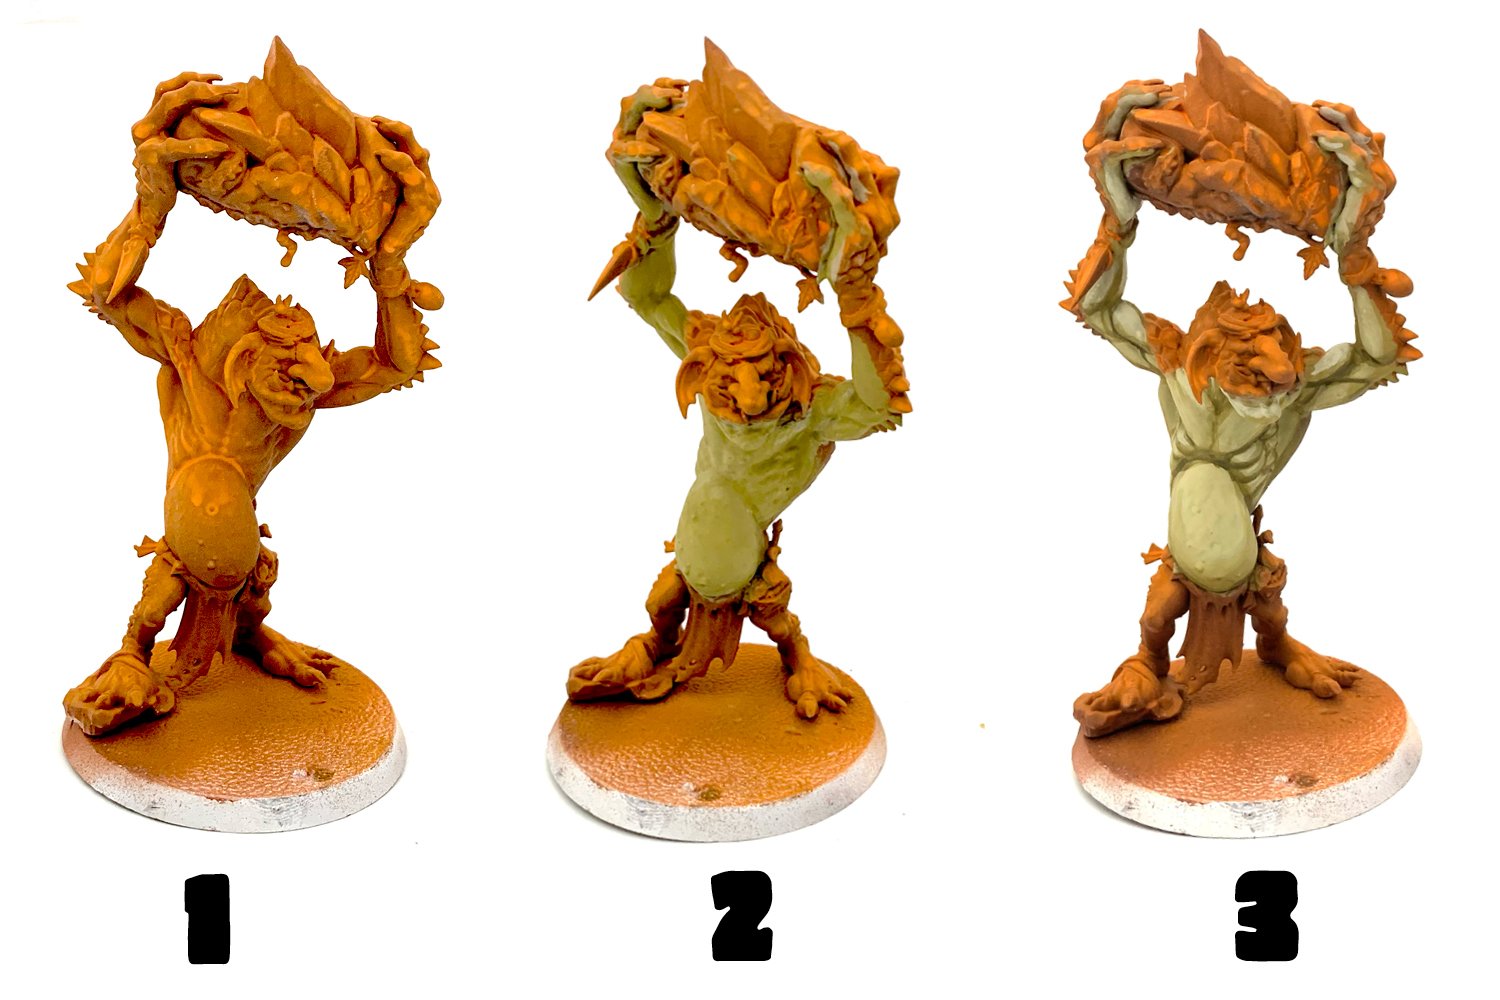
1- I started off by airbrushing on an orange basecoat. I started with Vallejo Cavalry Brown, then sprayed on a highlight layer of AK Light Rust. Unfortunately this was the last project I did before replacing that airbrush. The threads around the nozzle had become somewhat stripped over time and it was leaking too much air to get a decent mist going. While that did mean the orange basecoat isn’t as clean as it should be, it still works as a basecoat.
2- I started the pale underbelly with a basecoat of AK Middle Stone.
3- The basecoat was highlighted by blending AK Dark Sand in with the basecoat, then blending some AK Ivory into that to make it even lighter. AK Camouflage was used to shade the recesses. 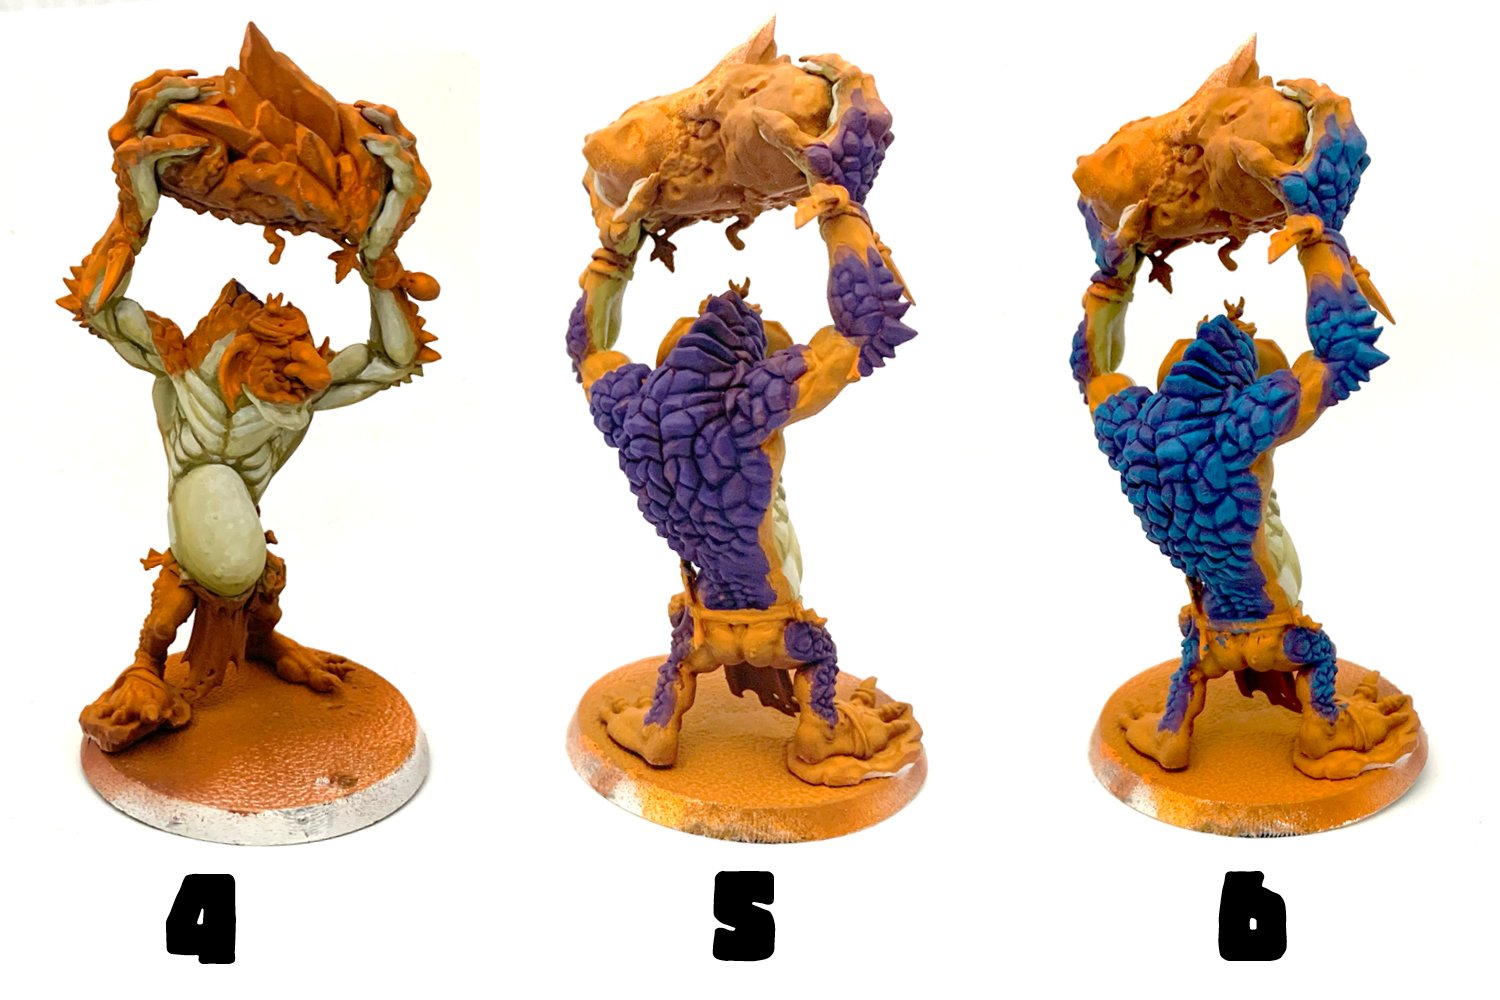
4- I continued adding more layers to the belly to try to get the blending to look cleaner. I found it really difficult to get an even blend with these light colors, and you may notice that the belly begins to look cleaner in later images as I painted over it more and more to smooth it out.
5- I did the rocky “scales” next, starting them with a basecoat of AK Amethyst Blue. Usually it’s better to paint the darker colors last since it’s easier to cover a lighter color with a darker one than vice versa. In this case though I planned to drybrush the stony back for easier highlighting. I’m planning to paint a total of 18 of these things, and I just didn’t really feel like shading each facet of these rocky shapes by hand. Drybrushing is sloppy, no matter how careful you are, so it’s better to do it first before you do any manual highlighting and shading. It’s much more time-consuming to touch up the latter. I thought it was safe to do the belly first since its not directly contiguous to the blue parts, but I still had to touch up the white a bit before the end.
6- And finally, here is that drybrushing. I used Formula P3 Arcane Blue over the basecoat. It’s kind of a light turquoise color, but ended up looking a lot more like a pure blue when drybrushed over the purplish Amethyst Blue.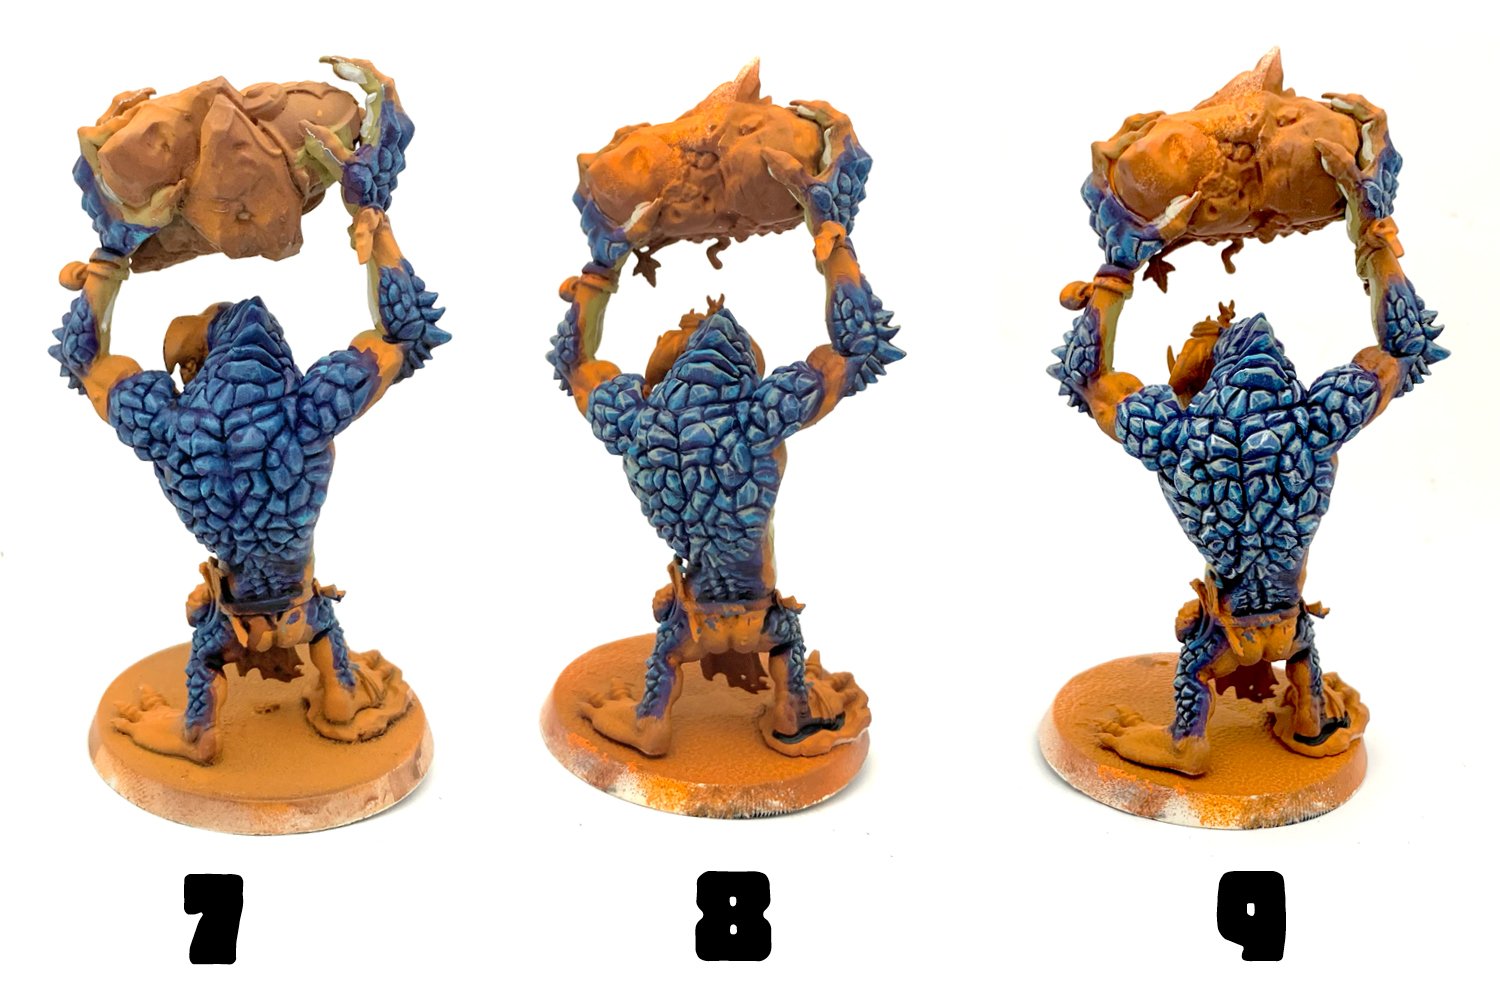
7- I drybrushed on another layer of highlights using a mix of Arcane Blue and AK Snow Blue before giving the area a wash with Druchii Violet. It evened out the rough appearance of the drybrushing a bit, but left the area a lot less purple than I had expected.
8- Next I added edge highlights to the “scales” with Vallejo Stone Grey.
9- Then I added a few more thin highlights with Snow Blue. At this point they’d started to take on an almost crystal appearance and I decided to just run with it. 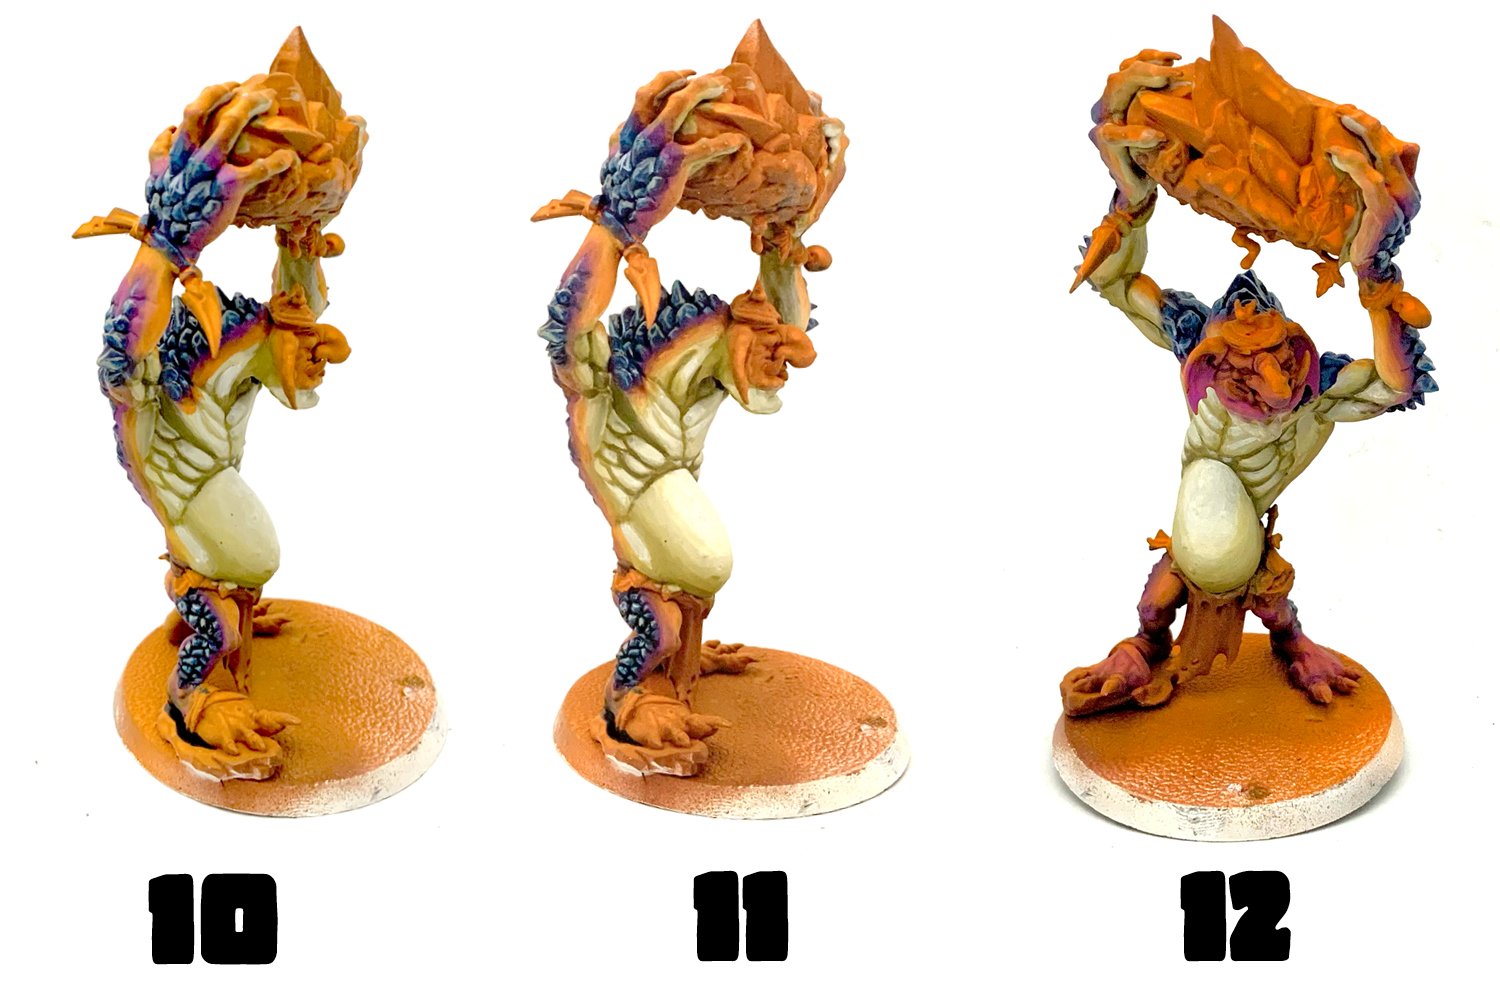
10- With the gem scales complete I wanted a clean transition between them and the orange skin. I found AK Deep Purple was a good transition color. Applied in a few thin coats over the blue and orange it smoothed out the obvious line between them.
11- Then I needed to do something similar with the line between the orange skin and pale underbelly. Sunny Skin was a good transition color here.
12- Before I began highlighting the orange skin I painted AK Magenta on some of the softer areas on the face like the nostrils and ears.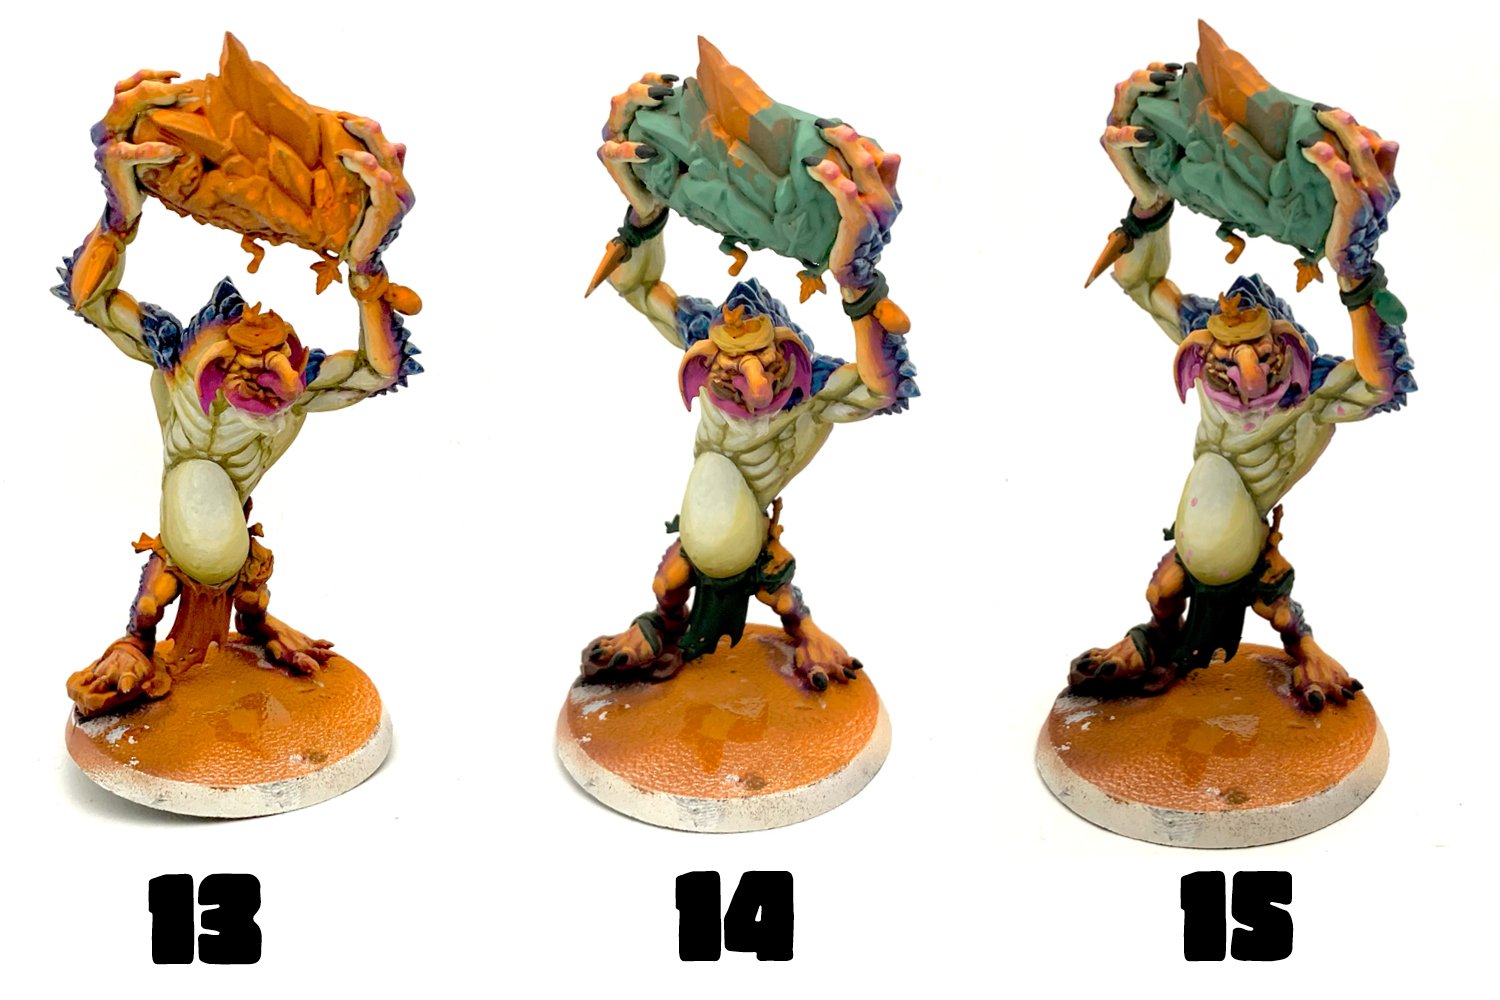
13- I highlighted the orange skin with AK Sunny Skintone and the shaded the deepest recesses with AK Deep Purple.
14- As I got closer to the end I wanted to see how it would look further along so I started blocking out more areas with their base colors. The giant boulder was painted with a mix of AK Camoulflage, AK Turquoise, and AK Snow Blue. All the cloth was painted with AK Black Green. The bird nest was painted with AK Ochre. The tusks and various bones were painted with AK Burnt Umber. Each finger and toenail was painted AK black. I also decided to add some AK Magenta to the knuckles since I like the way those look with a pink to match the soft parts on the face.
15- It was finally time to revisit those pink areas from earlier and I highlighted them with a mix of AK Magenta and AK Salmon. I used the same color on the various sores all over the troll’s body. I also did some edge highlights of P3 Arcane Blue to the cracks around the scales in the purple areas of the skin.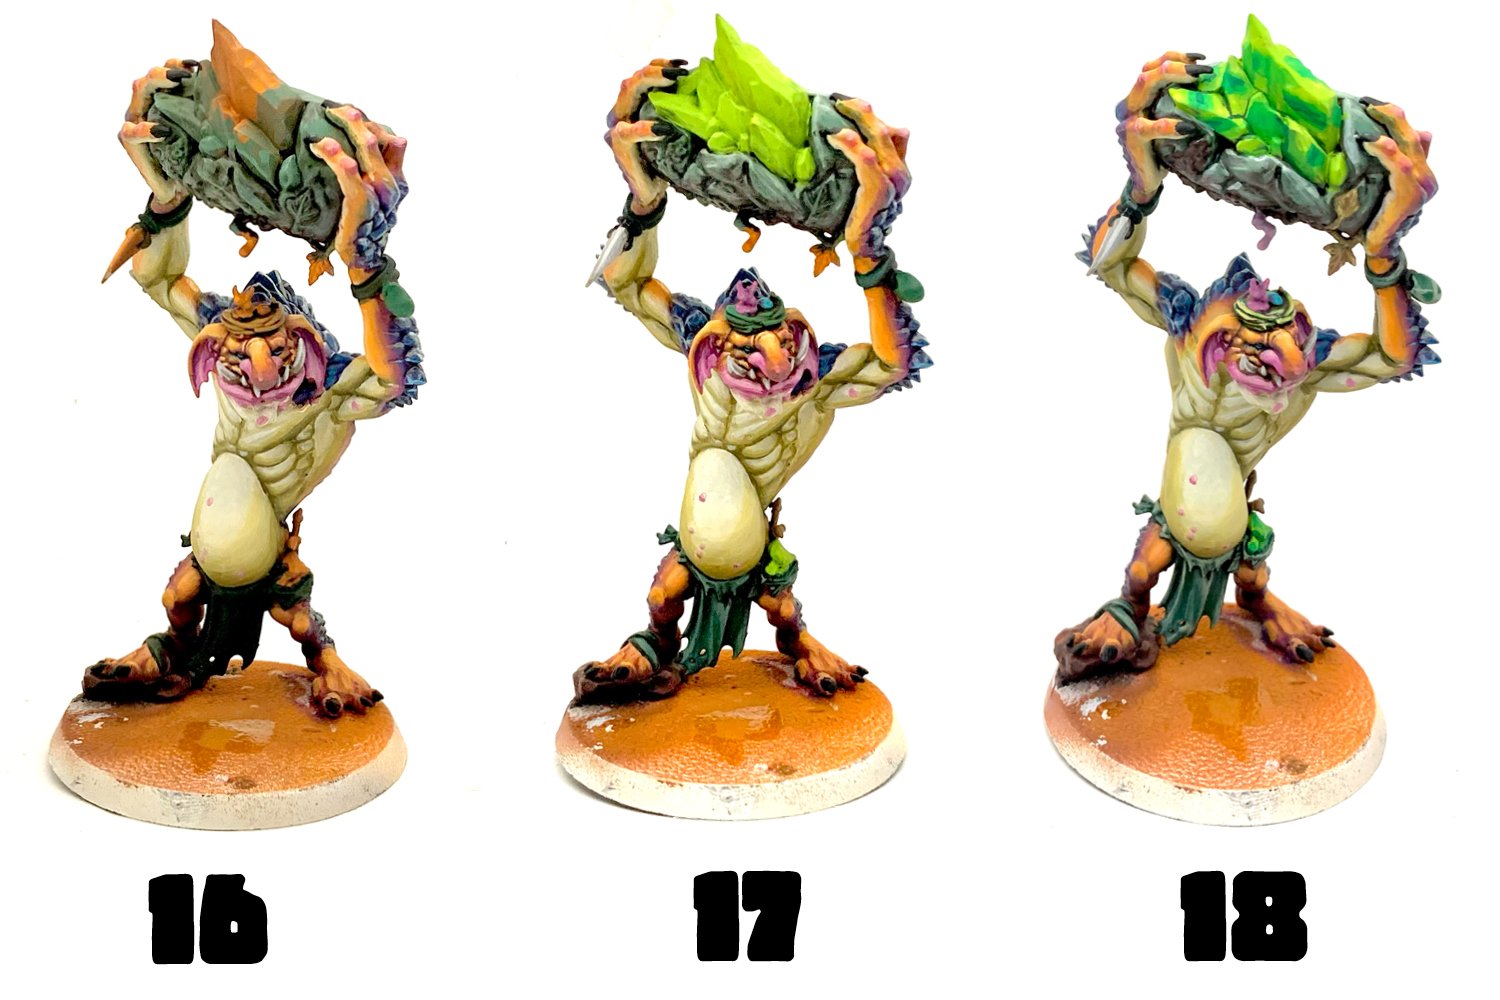
16- I continued adding highlights to the pink areas, this time using pure salmon. The tusks and other bone areas were highlighted with AK Snow Blue. Normally I like big gross yellow teeth and bones, but I thought the Snow Blue would contrast better as its a cooler color, and I think it makes these areas pop nicely against the yellowish belly. I also added some of the final highlights to the orange skin using a mix of Sunny Skintone and Ivory. Then I give the boulder a wash of Agrax Earthshade with a little Reaper Red Brick stippled on here and there towards the bottom.
17- The cloth was highlighted with a mix of Black Green and Vallejo Stone Grey. The boulder was highlighted with a mix of AK Turquoise, Camouflage, and Snow Blue (the same as the basecoat but with a bit more Stone Blue added). I switched the bird nest color to AK Dark Green (worried there was too much yellow going on), The egg was painted Arcane Blue and the bird itself was painted Magenta. And then my favorite part: AK Frog Green for the crystal in the boulder. I also used it for the little rocks in the pouch. I guess they’re crystal too.
18- Final highlights of pure Vallejo Stone Grey are applied to all the cloth. Pure AK Snow Blue is used for the final highlights on the boulder and other rocky ornaments. The bird’s nest just didn’t look right with a green highlight so in the end I settled for AK Dark Sand to pick out the individual strands. I think the green basecoat was enough to get it the nest to stand out. The little worm in the boulder was painted with AK Salmon and the leaves were painted with Mud Brown. The most important step though was blending in bands of AK Dark Green with the AK Frog Green to get the crystals looking a little more crystalline.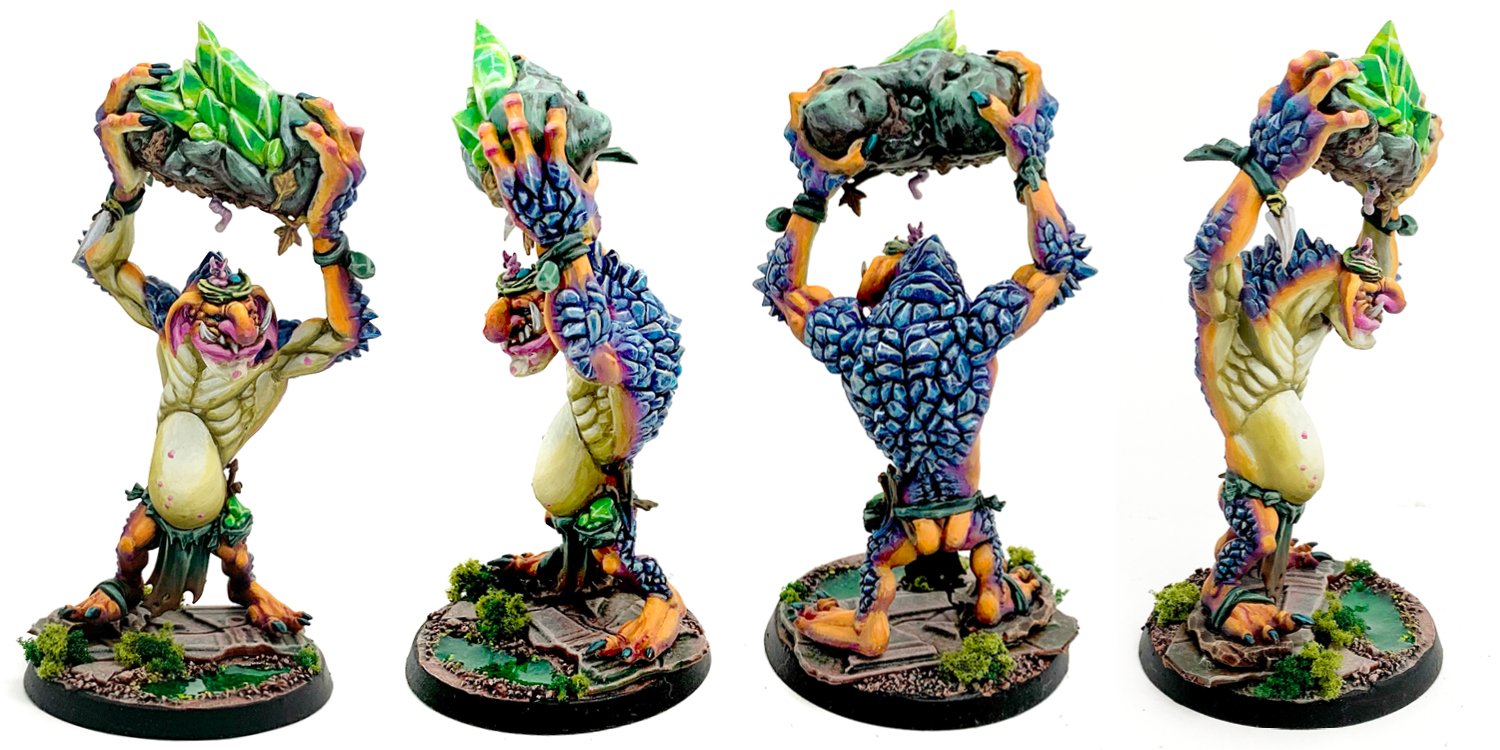
19- Finally we have a finished Trogg but there are still a few more steps to explain. All the edges of the green crystal received edge highlights of Ivory. The worm on the bolder got some segmented highlights with a mix of Salmon and Ivory. The baby bird was highlighted with the same colors – except the eye. This was painted with a mix of AK Salmon and AK Black, with a little more Salmon added as a highlight. The leaves were highlighted with Dark Sand. The toenails and fingernails got little streaks of AK Turquoise highlights. Also there’s this whole slingshot thing on the trog’s belt that I never mentioned. It was painted with AK Mud Brown, and washed with Agrax Earth with a little AK Dark Green added. Once the wash is dry a few more more streaks of Mud Brown go on as a highlight. The slingshot strap is painted with AK Dark Sand.
Whew! I think that covers it all. Hope this was all helpful to any other painters out there! And don’t think you can only use it for Trogs – this is actually the same scheme I used for an unfinished Lizardman army I started back in the days of the old world. But I think you could take it even weirder places. Why not a bright orange Great Unclean One with Purple boils and pustules?
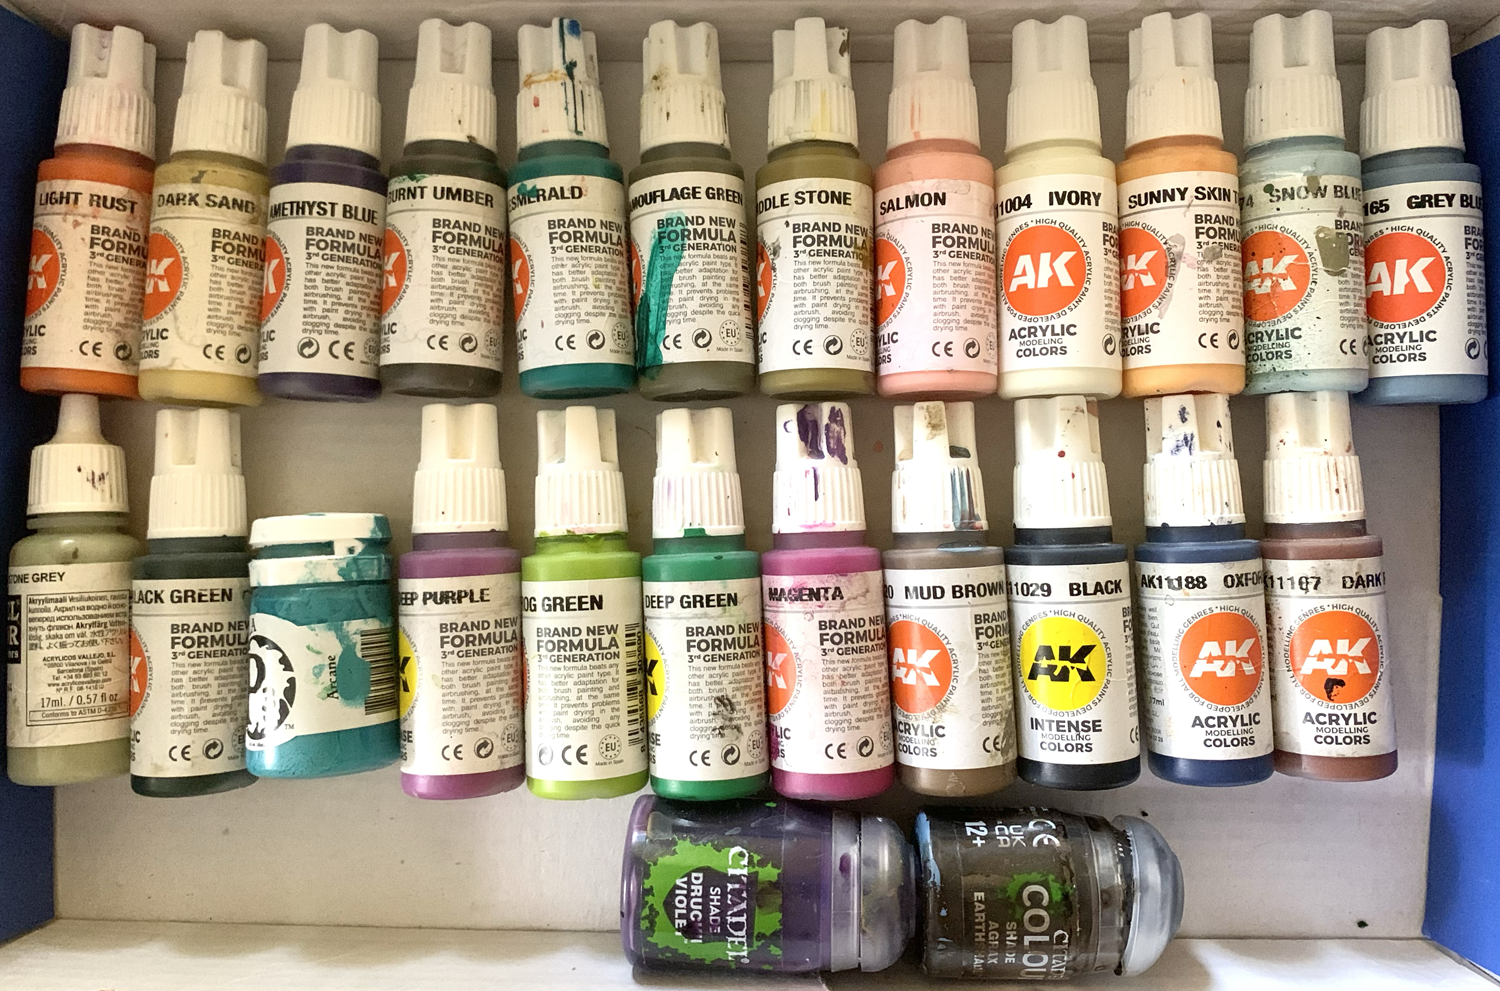
And here are all the paints I used to see what they look like still in the bottles.
~Hope you enjoyed the article! You can follow me on Instagram if you like pics like these. I go by @t00mini. Thanks for looking!