WFB: Using the Battlefield, pt. 2
Understanding the battlefield is the key to success, the player who both understands their army and the field it is played upon will always have the advantage.
Hey everyone, this is Adam from TheDiceAbide.com and this week I will be continuing where I left off, to give you some more general strategy and insights to using the battlefield to your advantage. Of my general categories that I laid out last week, I have discussed 3 of the 5, leaving Obstacles and Buildings. I will also be talking about strategy when deploying terrain, and some things to consider during this part of setting up the battlefield.
Obstacles
Fences and walls are all pretty simple to describe, basically, they’re on the field to make your units behind them harder to shoot at and harder to hit in combat. If you are playing a game where your opponent will be coming to you, then if you can defend an obstacle, then by all means do! Aside from giving to-hit penalties for shooting and melee, obstacles do a lot to help protect targets that are vulnerable to cannons, as each one will effectively absorb one cannon ball, which your monster would have not appreciated.
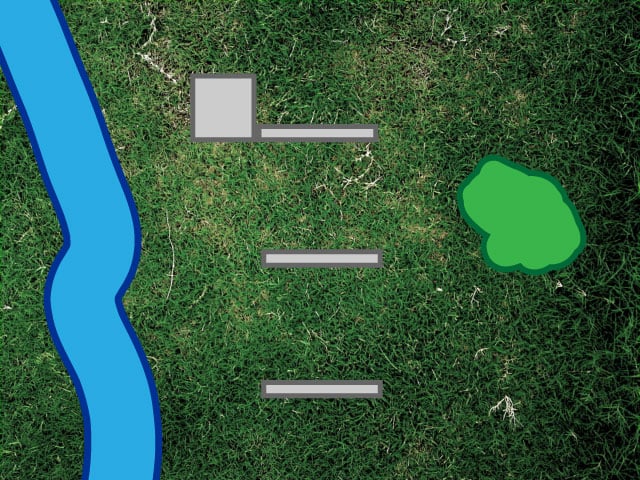
When I get the opportunity to deploy obstacles, and if I’m running monsters or ogres, I typically will space them out like this diagram, about 12″ apart, so that my unit can march up between each one, giving them protection for several turns against cannonballs.
Buildings
Garrisoning a defensive position inside a fortified manor, or even a small house, makes your unit much more difficult to get rid of (usually). Compared to editions past, 8th edition did a lot to make these usable as something more than impassible terrain.
The easiest use for a building is as a shooting bunker. 5 models per floor can fire from a building, so if you’re using a GW watchtower model for example, you can have 15 models shoot from it. This is extremely handy for handgunners, crossbows and any other weapon which doesn’t have the volley rule, effectively giving you a few more shots per turn. Unfortunately, you can’t build a list relying on buildings being present, but this is a nice little bonus should you have one in your deployment zone. Alternatively, you can simply stick a piece of artillery in there and enjoy the extra protection from ranged attacks.
Another very handy use for buildings is similar to ranged attacks, but actually using them as a mage bunker. Putting your caster(s) in a unit which is occupying a building means that they will have great 360° LoS to shoot off their spells, plus a ton of protection. If an enemy doesn’t successfully eject your unit from a building, they are pushed back 1″, which means that your unit is no longer engaged and your caster is free to use their spells with ease. Lastly, if your wizard’s unit looks like they’re about to take it in the face by a nasty enemy unit (like say, Khorne warriors with additional hand weapons and the flaming banner, which is probably the grossest thing to face in a building), then you can simply hop out the back of the building, putting a large piece of impassible terrain between the enemy and you. If you can get your wizard into a tower (appropriate, no?), then I would typically recommend it.
Lastly, is my favorite trick with buildings. A unit which enters a building (normal movement only), is free to leave the building the following turn, as long as one model in the unit is touching the building and no model is further away from the building than double their movement. That essentially gives your unit a free reform and potentially even a march, which could effectively give them a huge boost in movement. Allow me to illustrate:
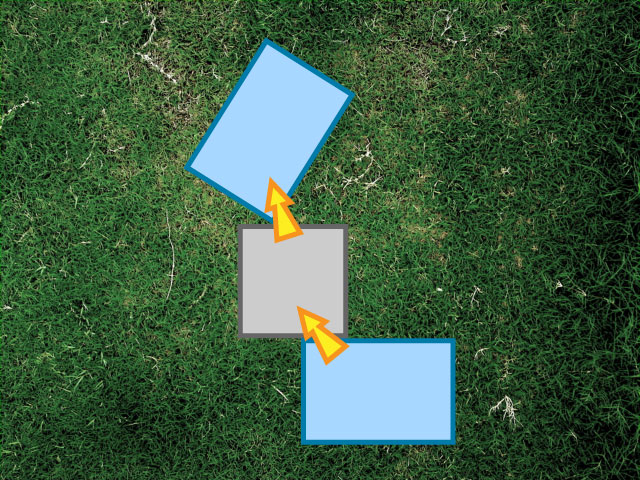
You can use that to get around enemy defenses, move further with a new facing that you might not have been able to reach, or just simply protect a unit en route to the enemy lines.
Setting up the Battlefield
Before the game begins, both players take turns deploying a total of D6+4 pieces of terrain. When you do this, you have the opportunity to set up the field in your advantage, and you should probably think about where you place the terrain.
Here is an example battlefield, and I will talk about the points where I chose to deploy terrain.
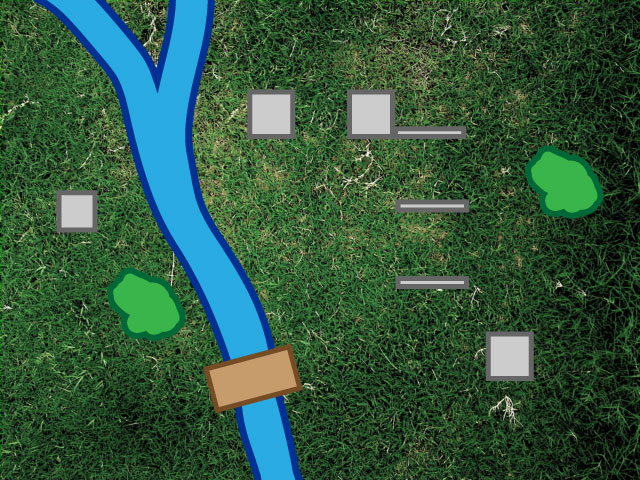
Alright, this field had several pieces of impassible terrain, or buildings, some forest, obstacles and a river. I placed the obstacles in a fashion similar to how I mentioned previously, this will protect my units as they advance, absorbing any cannonballs that the enemy may have.
Since my ogre units (assuming I’m playing ogres, or another elite army with narrow units) are relatively narrow in frontage, whenever my opponent placed a building, I was sure to put down another building or piece of impassible terrain nearby, creating bottlenecks, so that enemy horde formations will have to reform to fit through, also protecting the flanks of any units I put in there. Additionally, to help counter any hordes that they may be facing, the only areas wide enough to fit a big unit through either have woods or a river in the way. By choosing to deploy the terrain in such a fashion, I am able to keep the enemy on their toes, and help tailor the field to my advantage before the game even begins.
Not every game will have every piece of terrain, but understanding how to use them to your advantage, as well as knowing how to use the unique properties of each one will give you the leg up in your battles. In tournaments, you probably wont be able to move or deploy the terrain, so it is very important to understand how you can lure your opponent into unfavorable situations by using the field against him. Good luck!

