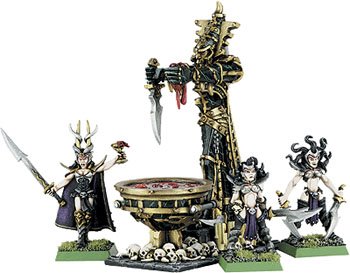
WFB TACTICA: Cauldron of Blood
A Guest Tactica by Austin’s own Minus67
With the new Dark Elves army book shaking up the design, flavor and tactics of your Dark Elf army, I think it’s time to share with you some of the new tricks and tips I have discovered while using the new Cauldron of Blood. This rarely used (in my experienced) unit will soon be making a comeback in many people’s armies given the amount of tactical flexibility it provides a Dark Elf army.
CAULDRON 101
First, let’s start with the basics. No longer is the Cauldron of Blood a rare choice nor is it 0-1. This means it is no longer competing with Reaper Bolt Throwers or with the new Hydra. In addition, you can have more than one, which I highly suspect you, like myself, will want to experiment with. The new Cauldron of Blood is now an upgrade to a hero choice: the death hag. Dark Elf heroes always lead a strange life due to their low toughness and less-than-stellar strength value. However now that assassins are no longer hero slots, you will find yourself with room for at least one cauldron at all times.
Rules
Let’s review some of the base rules that the Cauldron has.
Eternal Hatred: Like all Dark Elf units in the book, the crew of the Cauldron of Blood (two Hags and a Death Hag) has Hatred as described by the Warhammer Fantasy Rulebook and will have it every turn against High Elves. This combined with the *13* attacks that the crew has makes it have one of the most durable crews in the game.
Frenzy: This is part of the reason your unit of three gals has 13 attacks and it makes you immune to psychology which can randomly allow you to be immune to spells. Luckily the rulebook spells out that you do not have to charge even if in range, contrary to the frenzy rules.
Khainite: Means only Khainiate characters can join you, but also means that your crew is stubborn because they are within 12” of the Cauldron. Thirteen attacks and Stubborn 9 seems good to me.
War Machine: The Cauldron of Blood is a War Machine and must follow the rules of it. However the machine is indestructible and you still randomize hits. So 2/3 of the shots fired at your unit will be instantly discarded. This also means the Cauldron can move 5” each turn which is more important than you may think as we will discuss later.
Terror: That’s right, Terror. This bad boy will send low level raiders (Goblin wolf riders, Skaven gutter runners etc) packing. It’s a great way to keep Beastmen raiders from bothering you.
Magic Resistance (1): Just the icing on the cake since, Dark Elves are notoriously weak on magic defense outside of the Ring of Hotek.
Poisoned Attacks: So this unit has 13 rerolling misses to hit, poisoned attacks. Need I say more?
Ward Save: It also provides its crew with a 4+ ward save at all times. I’ll say it again: this thing is tough.
Abilities
Now that we have revealed the inherent neatness of this war machine, let’s talk about what it can actually do and how to best put it to use.
Each turn, the cauldron may choose of its three abilities to put on a friendly unit within 24”, even if its crew is engaged in Close Combat.
-Give a friendly unit +1 attack until the start of the unit’s next turn.
-Give a friendly unit Killing Blow in Close Combat until the start of the unit’s next turn.
-Give a friendly unit a 5+ Ward Save until the start of the unit’s next turn.
That alone should get you to raise your eyebrows and get some gears turning. Sadly, mounts and creatures pulling chariots are not affected.
DIRTY TRICKS
Now here are nasty tricks you can pull with this thing.
Super-Assassin:Move it up behind a unit containing an assassin. At the beginning of the turn reveal your assassin and have him charge out of a unit, declare a challenge. You opponent has two options:
-Take the challenge, in which case your assassin your will slaughter most characters since, when properly built, he has 5-8 rerolling misses to hit Killing Blow attacks. He might even generate enough combat resolution to win combat, or, if he doesn’t, he will be Stubborn on LD 10.
-He declines the challenge; your assassin should be more than enough match for 2-3 rank and file models since any survivors are usually hitting him on a 5+. Since he will most likely be losing combat he will still be Stubborn on a 10 thanks to the Cauldron.
The next turn you charge in the flank with a supporting unit and crush the unit.
Hag Tea Party: The Cauldron doesn’t have to be crewed to work. The rulebook says that a War Machine that is not crewed cannot shoot. Since the cauldron doesn’t shoot, and since it says you measure the effect from the cauldron, not the crew, the Death Hag and the two Hags attendants can go wander off and have a nice tea party behind a hill if you don’t want them to get shot or are in danger of getting charged by a unit you can’t handle. As long as they are alive somewhere on the table, the Cauldron can continue to hand out effects.
The Hydra Wall: Many players will find themselves taking two Hydras; they are a great unit for the Dark Elves especially when playing a calvary-heavy army or Aggressive Infantry. By placing those hydras on the flank of your battle line or in front of your expensive elite units, you can protect them from enemy shooting with the bulk of the Hydra since it is a large target. The Cauldron gives the Hydra a 5+ ward, which when stacked with a Regeneration save and 4+ Scaly Skin with makes the Hydra a great magnet for shooting along the way. It should take about 20 Empire Hand Gunners to do a single wound the Hydra this way. The more telling fact is that it should take about seven High Elf Bolt Thrower shots to cause a wound on your wall, the whole time your precious elite infantry and cavalry are safe from a good percentage of your opponents shooting.
Faux-Assassin:Turn any Dark Elf unit into an Assassin: Enemy character coming your way? Throw killing blow on the unit next in his path and watch what he does. Many players will think twice about charge a super-choppy character into the front of those crossbowmen when they all have killing blow. It even lets your lonely champion look a little scarier when accepting challenges from a chaos lord.
Executioners: The Cauldron is what makes these guys viable; their biggest problem as their light armor and one attack apiece. With a Cauldron supporting them, more of them can get across the table while being stubborn (they are khainite). When the eventual charge comes, six Executioners is enough to send most units packing with 13 rerollable, strength 6 killing blow attacks. These guys can pretty much wreck anyone they come across if you have the Cauldron there to help out.
Hydras Stunts: These guys are enough natural fit for the Cauldron since the effect affects both the handlers and the Hydra; it can lead to some pretty staggering numbers. +1 attack sees them come in with 8 strength 3 rerollable Armor Piercing attacks and 8 strength 5 rerollable attacks.
Killing Blow seems them landing 13 attacks which is a threat to any Calvary unit of Character they come across. As mentioned before the 5+ Ward Save makes them ridiculously hard to hurt.
I hope I showed you why the Cauldron of Blood is one of the best hero choices in the Dark Elf book and I hope to hear from you once you’ve tried some of these tricks on your unsuspecting opponents. Hopefully you’ll even do it in a sneaky and backstabbing way, like a true Dark Elf would.
~Bigred here, It was about time we got around to a Fantasy Tactica. Expect more of these in the future. I’ve had some success with the Cauldron with my fledgling Dark Elves army, but am agonizing over some way to convert and improve on its “eccentric” minis.


