40K: Winning the No-Win Scenario


Hi all, Jwolf here. This week we’re examining what the conventional wisdom of the Internet calls the “draw” scenario, and with a bad match-up to boot. Capture and Control, Spearhead Deployment, Imperial Guard vs. Dark Eldar.
Here are the 1850 point lists:
Imperial Guard
HQ
Command HQ: Master of Ordnance, Officer of the Fleet, Bodyguard, Carapace Armor, Medic, Meltagun, Lascannon. Officer has Plasma Pistol and Power Fist.
Lord Commissar – Carapace Armor and Power Fist
Elite
4 Ratling Snipers
Troops
Platoon
Platoon HQ: 4 Flamers. Chimera with Multilaser and Hull Heavy Flamer
Squad 1: Meltagun, Sarge with Power Weapon and Meltabombs, Commissar with Power Weapon
Squad 2: Meltagun, Sarge with Power Weapon
Squad 3: No extras
Heavy Weapon 1: 3 Lascannons
Heavy Weapon 2: 3 Autocannons
Veterans: Carapace Armor, 3 Meltaguns, Sarge with Power Fist. Chimera with Multilaser and Hull Heavy Flamer
Fast Attack
Armored Sentinel with Autocannon
Hellhound
Valkyrie with Multiple Rocket Pods
Heavy Support
Griffon Mortar
Medusa with Armored Crew Compartment
Demolisher; Hull Lascannon and Sponson Heavy Bolters
Dark Eldar
HQ
Baron Sathonyx
Haemoculus with Power Weapon, Stinger Pistol, Liquifier Gun and Soul Trap.
Elite
6 Incubi, Raider
3 Trueborn, 2 Blasters, Venom with 2 Splinter Cannons
3 Trueborn, 2 Blasters, Venom with 2 Splinter Cannons
Troops
15 Hellions, Heliarch with Splinter Pistol and Agonizer
10 Wyches, Haywire Grenades, 2 Hydra Gauntlets, Hekatrix with Agonizer. Dark Lance Raider
10 Warriors, Blaster and Dark Lance, Sybarite. Dark Lance Raider
Fast Attack
5 Scourges with 2 Haywire Blasters
5 Scourges with 2 Haywire Blasters
Heavy Support
Ravager with 3 Dark Lances, Flickerfield
Ravager with 3 Dark Lances, Flickerfield
Even with the +1 to go first due to the Baron, the Dark Eldar are going second.
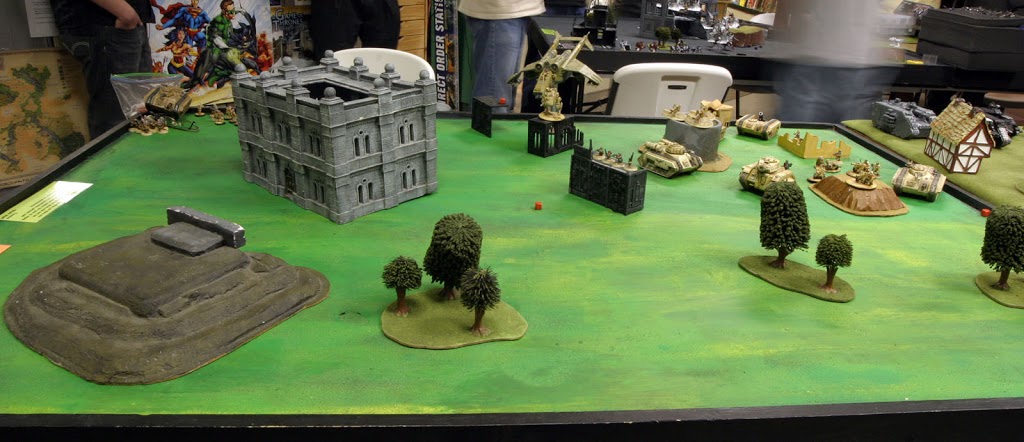
Let’s look at the Imperial Guard Deployment.

The Objective is under the Griffon.
The Heavy Weapons Teams are in cover and within 6” of the Lord Commissar, which means they are Leadership 10 and very likely to get orders as well as stick around through anything that doesn’t kill them. Nevertheless, taking a stand or two off of these units would help with the survivability of the Dark Eldar vehicles substantially.
The Command HQ is deployed, meaning they can be shot. Let’s look at applying the full firepower of both Venoms at this unit: 24 shots. 16 hits. 8 wounds. An Average of 2 wounds get through the 4+ armor/ cover and 4+ Feel No Pain. Not enough to even cause a morale test. And the advisors are annoying – The Officer of the Fleet gives Reserves a –1 penalty and the Master of Ordinance means that any cluster of hiding Dark Eldar Vehicles presents itself with a decent chance of getting shot with a 9/3 Barrage shot.
The vehicles are overall bad news. Hellhounds are the bane of Dark Eldar everywhere. Armored Sentinels make a mockery of Incubi and Wyches (even with Haywire Grenades it takes a 10 strong unit of Wyches approximately forever to deal with an Armored Sentinel). The Griffon hits targets out of LOS 55% of the time and is very likely to kill or immobilize an AV 10 vehicle with each hit. The Valkyrie is empty on deployment, and will likely Scout into the empty quadrant to its right, giving it a good shot at the best hiding spot available to the Dark Eldar. The Demolisher and Medusa provide large 10/2 blasts that nothing in Dark Eldar land wants anywhere near them.
The Veterans are in Reserve in their Chimera. The 31 troopers of the Platoon are also in Reserve, and likely to come into play in either a 31 strong blob or a 21 blob and 10-man scoring unit.
How to deploy?
The obvious answer is as close to the center as possible behind the large building, all clustered together.

This is the most likely mistake you can make, and will cause you loads of pain. Sure, if you manage to roll a 6 and Seize the Initiative, you’re going to look brilliant and quite possibly break into the Imperial Guard successfully. This plan might be acceptable in an Annihilation mission, as your units might trade themselves for equal numbers of IG units, or maybe even better. Maybe, but not likely. Nevertheless, in Annihilation, you certainly would have to go at the Guard, because the story in a long-range battle isn’t one you’re going to get to write. But that is not the mission, and we want to avoid rushing into the lion’s den if we can.
One possible deployment looks something like this:
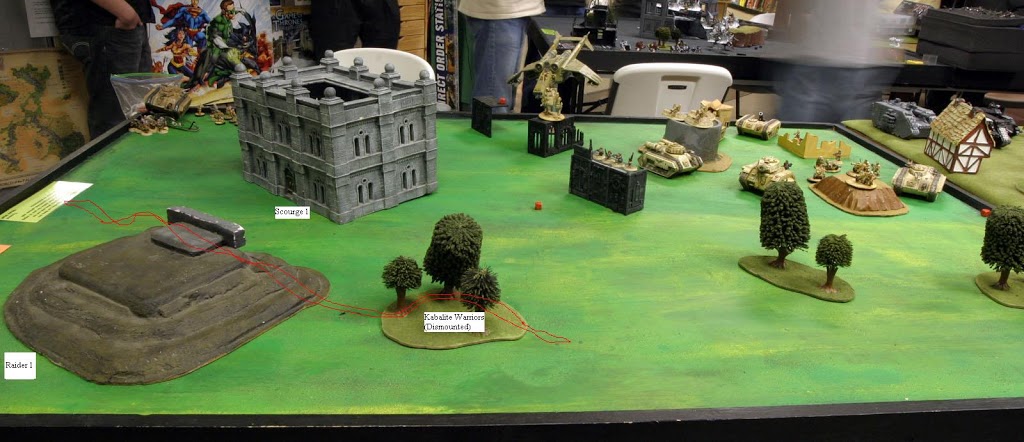
The Warriors have their Dark Lance, Blaster, and Sybarite in the Trees; the rest of the Squad spreads out so that 2 more are in the trees and the rest are as far apart as possible, mostly closer to the board edge. Their Raider is in the far corner, hidden behind the large tomb structure.
One unit of Scourges is behind the giant building, against the base to get cover from it, and is praying to be forgotten.
The red squiggle is the Baron and his Hellion unit. The Baron gives his unit Stealth, which means he has a 3+ cover save.
Everything else goes into Reserve. Which means you are feeding your army to the guns of the Imperial Guard piecemeal, especially with that –1 penalty on Reserves. Most players will not choose this option because they want to eliminate the chance element that Reserves generate.
The second deployment option I would look at is this:
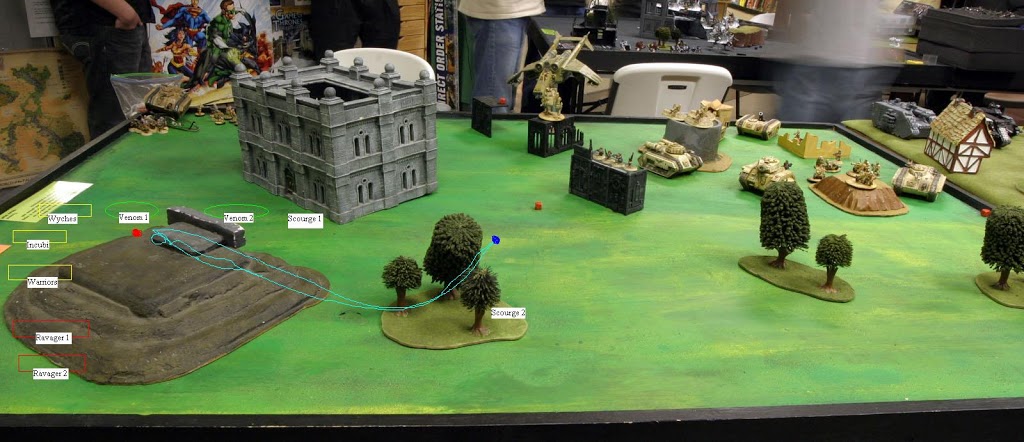
The Baron is the dark blue dot at the end of the light blue line, and the Haemonculus is the Red dot at the other end.
Math tells us that the Ravagers are out of range of almost everything in the Imperial Guard army they face, and the Raiders are facing reduced amounts of danger as well. The Venoms can be hit by the Griffon, but since their job is primarily suicidal anyway, they will just have to deal with it.
Scourge Unit 1 is in place to either hide or try and lock-down either the Hellhound or Valkyrie. Scourge Unit 2 is looking towards the Hellhound with the Demolisher as a possible target (if the Ravagers do their job and destroy the Hellhound).
What do the vehicles with troops in them do? The Venoms are poised to deliver their passenger’s Blaster shots into the face of Imperial tanks and their own Splinter Cannons into the Lascannon teams.
The Raiders are either sweeping left towards the Imperial Board Edge or forward into the center of the board. I would go towards the center because the Imperial Reserves are almost certain to come into play in an unfortunate way if you sweep left – not to mention that sweeping left doesn’t get you closer to the target area, it just exposes you to more firepower.
So clearly option 2 is better – no chance of getting chewed up and destroyed without getting a chance to do anything… right?
No. Remember we have a goal here. That goal is to win the game, not to tie. By putting pressure on the Imperial home objective on turn 1, we reduce the chance that the Imperial player will commit heavily to getting our objective. Simply put, if that 31-man blob ends up coming in near the Imperial home objective, we can kiss taking that goodbye – sure the Hellions have some great antipersonnel ability, but they simply cannot move a unit like that by themselves, and once the Imperials turtle-up, they are the only unit that has a decent chance of getting there.
So what we need is the appearance of vulnerability, and the first deployment gives that. The Baron and his unit will get smacked around and flee into multiple levels of the building (meaning that only a few will be hit with the Hellhound’s Inferno Cannon), and the Imperial player will move towards their own goal of winning, advancing tanks to threaten our objective (which is just off screen, in the far bottom left corner). This leaves us with the ability to hit the tanks on the flanks (important against Chimeras) and knock them out of action as our fresh units come into play.
Our priority targets are, in order, the Hellhound, Valkyrie, and Veteran Chimera. The Platoon HQ Chimera will become a more important target if it heads straight towards our objective on turn 1 (since it will require 6 turns to get there), but its starting position means it is probably not going to do so. Similarly, if the Veteran Chimera isn’t in play by turn 3, if becomes much less of a threat to our objective.
The last picture gives an idea of what I see as the unfolding tactical scenario. With the Baron in the building, the Imperials will work to flush him out, and will hopefully commit their Infantry Reserves towards the building (going to ground so that the Baron is “stuck” and can’t get away helps in this – we want the Imperials confident that their Blob will reach a weakened Baron unit). Win or lose, by the time the Imperials get into the building and fight the Baron, that blob won’t be of any use to either keeping our mounted units away from the Imperial objective or threatening our home objective – good news even if it costs us the Baron.

Our main Reserve sweep is the Purple Arrows. The Goal is simple – get a unit, any unit, within 3” of the Imperial objective at the end of the game OR keep any Imperial tropp unit from being there (nothing is starting within 3”, but the Lascannons could easily get there in one move, and the Platoon HQ could also drive, jump out, and Run! Run! Run! there as well).
The Pink Arrow represents our Objective grabbers. One of two things will be true; either the Wyches will have to be used to grab the Objective or the Warriors will run over there. Either one is fine; it just depends on the luck of the Reserve rolls and timing. If we have a massive sweep of Reserves on turn 2 and the Hellhound dies, the Wyches might be well committed towards the Imperial Objective; planning-wise, we will assume that will not be the case and plan to misuse the Wyches to ensure we don’t just give the game away. If the Baron wasn’t likely to be require in pulling the Imperial Reserves out of place, his Hellions would be great for perching on the objective and going to ground – 2+ cover holds up to A LOT of Ordnance Barraging.
In conclusion, I want to be clear that I don’t think my idea is anything like a guaranteed win – this is the worst mission, deployment type, and opposing codex that the Dark Eldar player can get. I do think that playing against the common wisdom in this situation is called for – you have to get the opponent out of position if you’re going to have a shot at winning this mission, and using Reserves has a much better chance of doing that than going for a knock-out punch that simply will not work.
-Jwolf out, Comments cadets?


