X-Wing: Swarm Theory Part 4
It’s time to look at one of the archetype builds for X-Wing. Here’s how to actually move the 6 TIE block around.
It’s that time again, to look at one of the archetype builds for X-Wing. Last time we looked at Howlrunner and what she adds to your Squad. This week we look at how to actually move the 6 TIE block around.
After looking at the Math of why Howlrunner is good and how to build her into a 7 TIE swarm we are now going to look at some basic plays to make her and her six TIE block work.
The goal of this article is not to give you a step by step guide on how you have to move in the early turns as it will revolve around your personal play style, the asteroid set up and your opponent.
I am hoping for people to pick up some simple maneuvers and to be able to assess some options after looking at their opponents Squad and the Asteroid set up and make their own plans.
It would also be remiss of me to talk about a swarm in this age of Wave 4 and the threat that the Anti-Swarm focused Ordnance list that have been doing the rounds. So we will start there.
This is going to get fairly basic but some people may not know about the rule of 11.
The basic premiss is that if both players deploy on the Range 1 Line of their deployment (as close as possible to each other) then they will have to travel 11 Ship lengths between them to be in range of each other.
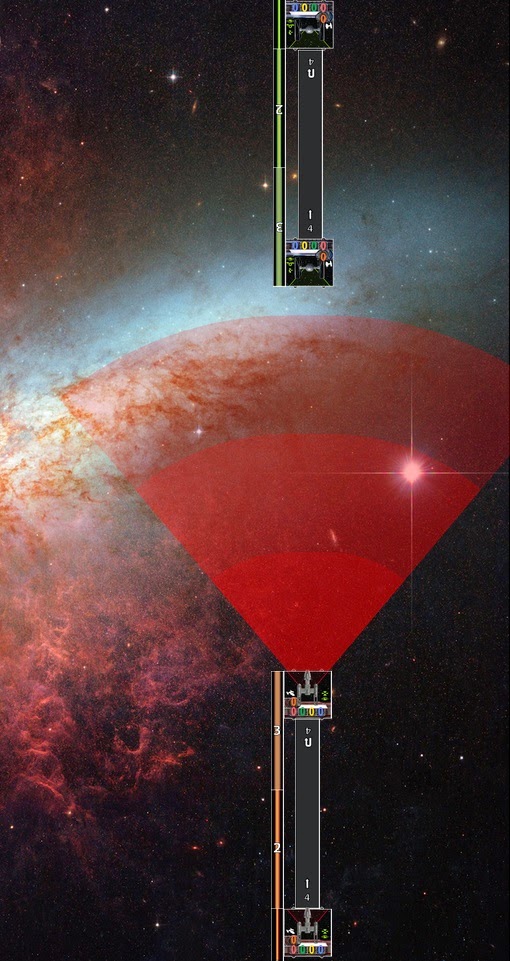 |
| The Rebel Y-Wing moves 5 Ship Lengths (4 Ahead + its Base) and so does the TIE Fighter. |
From the perspective of the Rebel player (or the player wanting to use the ordnance) they will want to land at exactly 11 Ship lengths to gain the Target Lock and then next turn land at Range Band 2 so that they can have a Focused attack as the ideal. This is a fairly unrealistic proposition against most ships, as if you have landed at Range 3 and been Target Locked most people will power into the enemy to try to negate the ordnance.
This means that most people playing with any type of ordnance based list against a Swarm will launch once they have the Target Locks and the new Munitions Failsafes only make this even more likely.
The Correct play is therefore to try to land outside Range 3 and then next round hit Range 1 with your full swarm. Sounds Easy…
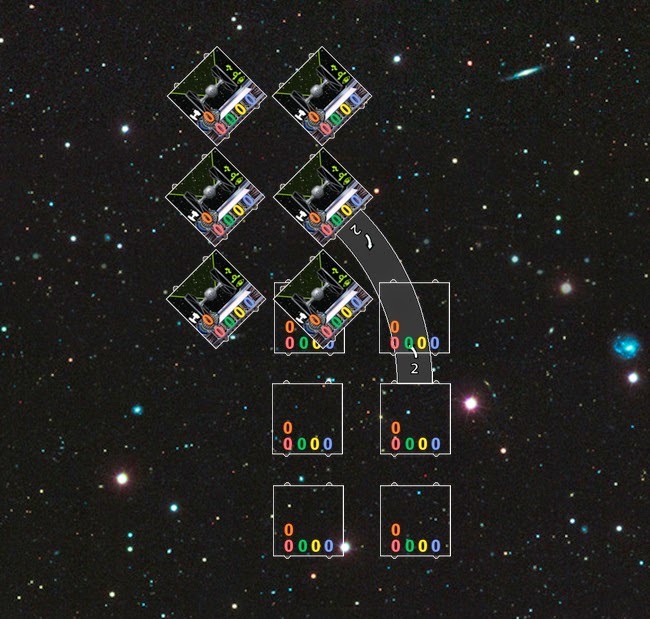
If you are flying in Ranks straight towards your enemy who is flying right back at you it is not too bad (remember you are well within your rights to ask what your opponents ships maneuvers options are if you don’t know them). What you want to avoid is opening an engagement like this in Column as the back ships will be at range two of your opponents and still within Range 1 of all of your ships, meaning that Assault Missiles will still hurt your whole swarm.
| Top Six TIE’s in Ranks Bottom Six TIE’s in Column |
Why not just set up in Ranks and fly at your opponent then?
We now go back to the last article and look at the fact that the majority of your swarm is going to be low Pilot Skill. Even if you managed to make a 6 TIE list with Black Squadron Pilots as your lowest Pilot Skill, in the emerging Meta where Higher Pilot skill has become more important against the Wave 4 Phantom you will likely be deploying the vast majority of your Swarm before your opponent has placed a ship.
Any enemy that sees your ships in ranks would be foolish to deploy opposite them, even if they are using an anti-swarm list. This is because of the way that both formations can react to a threat to their flank.
Flanking either of these formations will give you a good advantage but if you can get to the flank of a formation flying in Ranks than it is in a much worse position as the first response would be to want to Turn in to you.
This leaves you in Column which if your opponent has anything about them will put the rear most TIE’s at Range Band 3 or even worse out of range entirely. Your other option would be to Bank but as the TIE only has access to a Two or a Three Bank than you can not stagger the formation properly to hold a line meaning you are either breaking formation or just spending two turns to perform a longer turn.
Hopefully this shows that it is always preferable to be reacting from a Column so that you engage in Ranks.
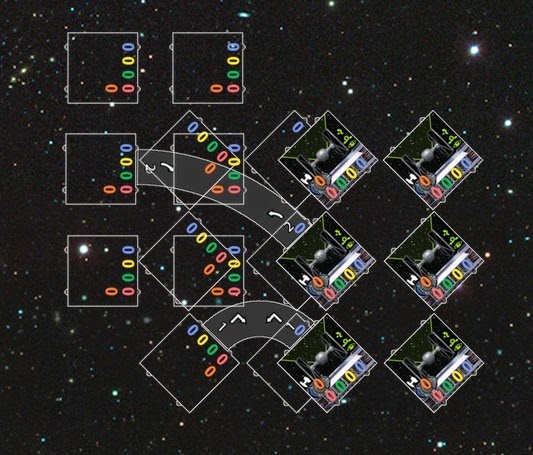
The above diagram demonstrates the versatility of the Column’s Bank, a Bank will leave either formation in what is referred to as a Checker Board Formation which is a very powerful position to be in due to the options it opens up.
Depending on the engagement angle and position of your enemy the above formation could Barrel Roll as its action to dodge arch whilst holding formation or if positioning for a later round you can perform a second Bank to complete the Turn in to Column or if the enemy is looking to fly past you a Hard Turn will position to counter that move.
Not forgetting that both Straights or K-Turns are available to you as well.
One thing that it is easy to forget when picturing these moves is that Howlrunner will be moving at Pilot Skill 8. This means that Barrel Rolls are not available from some positions as you have to move her last. A clever opponent will use this against you and you also need to remember it for moving around asteroids in formation.
If in Column, Howlrunner should be placed in one of the rear corners which means that you cannot Barrel Roll back towards your table edge if you perform a Turn.
If moving from Ranks with a Turn then you will not be able to Barrel Roll towards Howlrunner or she will crash. That is not to say that you should never do it as sometimes a crash will be advantageous but if you are looking to hold formation you need to remember it!
My next step would have been to demonstrate all of this in a game but due to my own loathing of flying the 7 TIE swarm (it just does not suit my play style I like the freedom of my 8 TIE build) and people looking to play with Wave 4 stuff I have not had chance to get a Battle Report done. If you keep checking my Blog at The Dice Hate Me I will post a report as soon as it’s done – Kris
I hope this gave you guys some insight as to both the strengths and weaknesses of the 6 TIE block, what to be looking out for when playing with and against it and again I can only stress the importance of getting some ships on the table and experimenting with where you will end up after a maneuver and how tight a gap you can fit through etc… If you have anything to add please leave a comment and Next Week we will be having a look at a Rebel Swarm I have been fooling around with!


