TUTORIAL: Rebasing your Fantasy Models

Today, Mengel Miniatures shows you how to get your old square based minis onto rounds – without destroying your precious basing work!
Many of us probably have entire armies of Warhammer Fantasy models on square bases. Now, you can use any base you want in Age of Sigmar, and a lot of people will probably just stick to squares. If, however, you want to switch to rounds it may seem a bit daunting, but here is a fairly simple way to transfer your army’s bases into the new game.

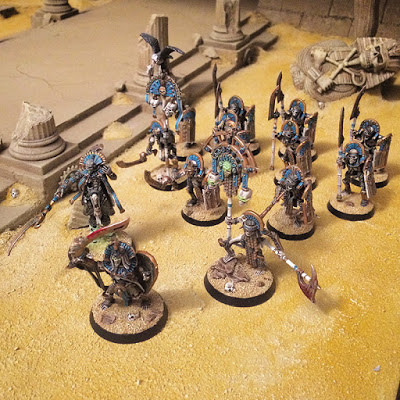
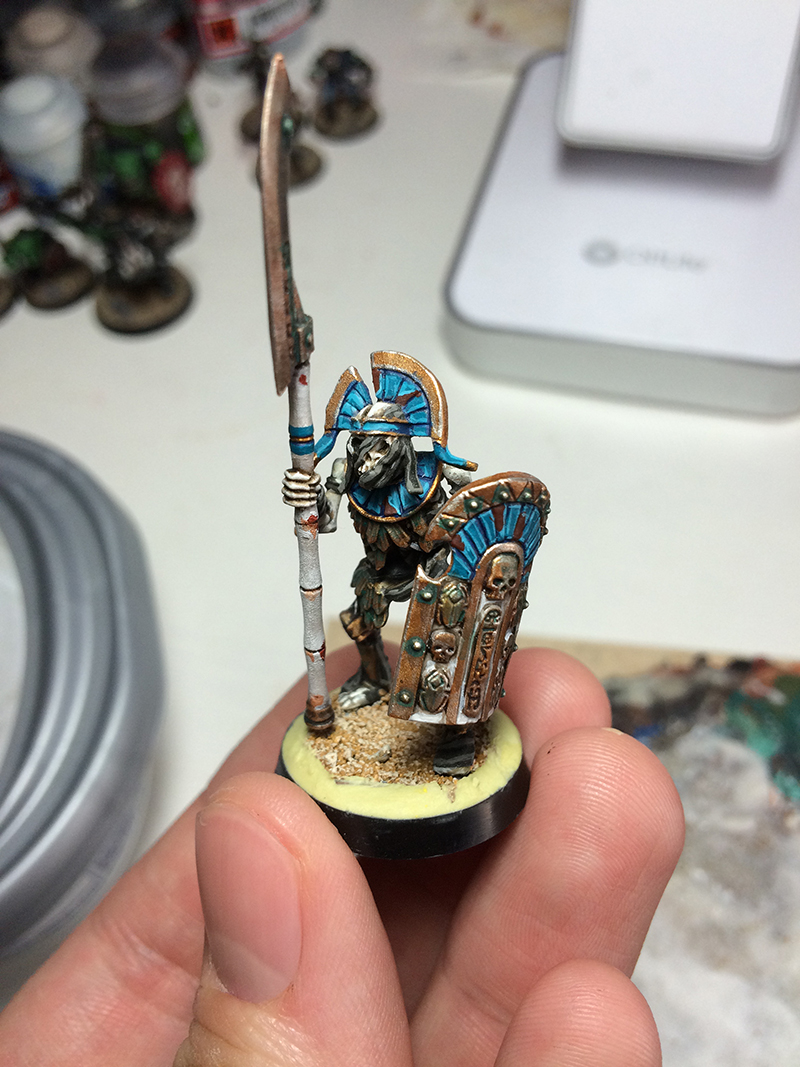
I personally really like how Age of Sigmar plays, so I am starting the slow process of switching my Tomb Kings over to rounds. A lot of my models either have stuff modeled on their bases already, are too delicate to safely remove from their existing bases, or are somehow attached to them for better or worse. I decided to start with my Tomb Herald since he rarely saw use in 8th edition anyway, so their’s no harm in switching him to a round. You can see that he has a pile of rocks modeled on to his base that he is standing on, so it would be a huge pain to just remove him from it completely.

Luckily there is a solution. I took a pair of standard hobby cutters and started carefully cutting away the rims on my base. Take your time with this, since you don’t want to accidentally damage the top surface of it.

In the end you should be left with something like this. All I have left is the top of the base. You want to make sure the bottom of it is as flush as you can get, which may mean a little more trimming around the edges.

Then just simply glue this on top of your new round base, making sure none of the edges of your old square are sticking over the edges of the round. With my Herald I was going from a 20mm square to a 32mm round, so it fit on top no problem. Other models, like the majority of my skeletons, will be going from 20mm to 25mm bases, which might be a little tighter of a fit. In those cases you may need to trim the edges of the top of your square base to fit on the round. Just be careful not to damage to much of the top of the base, but make sure the whole square is smaller then the round. You don’t want it going right up to the edge.

Next I got some cheap modeling putty. In the States we have Milliput, which I use for a lot basing project actually. It’s relatively cheap for how much you get, and it dries rock hard.

I then mixed a tiny bit of the putty and blended the raised surface of my square base down into the round base. This is why you need to make sure you leave space between the two edges. You want to create the look of a very small and shallow hill. Make sure that you blend the putty into the top edges of the plastic on the square base, not the top of whatever basing material you have on top. This is because, in my case, I will be gluing sand on top of this putty once it dries. You want the sand to be level with the existing sand, so the surface you glue it onto needs to be slightly lower.

I took this as an opportunity to add a little bit of detritus and character to the base since it was such a larger space now. This helps keep it interesting. With smaller round bases, like 25mm ones, you probably won’t have room to do this. Now set the model aside and let the putty dry.

After the putty hardened I glued down some sand, overlapping it with the already painted sand where it made sense. This helped blend it in a bit, but for the most part I left the already painted sand alone.

Once the glue was dry I went ahead and painted the expanded part of the base to match the already existing square base.

As you can see, it’s pretty much impossible to tell where the original square base ends.

Adding the extra rocks and the skull to the new part of the base really helped to draw the eye all the way around. Without them there would have been a good chance that the new part of the base would have seemed overly plain compared to the original section. This was really fairly simple, and fast to boot. If I had to give an overall time to how long it took when I take out drying time, I would say it was less then an hour.

Some bases have a slot, tab, dimple, or pin on the bottom. In these cases you will have to cut a corresponding hole in the round base for it to fit in. It only take a few more minutes and isn’t very hard at all. Just make sure you plan out where the hole will need to go.
This same process can be done for smaller bases as well. This guy went from a 20mm square to a 25mm round. The only issue here is you have less space to smooth out the transition to the edge of the base. This results in a less shallow and subtle “hill” and more of a bubble.

On this guy it turned out pretty smooth, but on some of them it’s more jarring. I may mess around with completely removing some of my skeletons from their square bases, but I am worried about their tiny skeleton ankles. It will require a bit of X-acto blade work and patience.

Here is one more character model on a 32mm round. I started adding some other bits of bone besides skulls to the base as well. I have a ton of extra skeleton arms for weapon options I didn’t use, so I might as well utilize them.

Onwards into the Age of Sigmar we go!
So are you going to be rebasing your existing Fantasy armies?
Tyler is a life long painter and hobbyist and took home his first Golden Demon award at the 2012 Chicago Games Day with a follow up at the 2013 North American Games Day. More of his work can be found at his blog, Mengel Miniatures.


