X-Wing Academy: The Combat Phase Explained!

Star Wars X-Wing has gotten a bit more complicated after 7 Waves. It’s time to go back and take a look at the basics of The Combat Phase!
Welcome Rookies and Vets alike to the X-Wing Academy. Today’s class is a quick break down of the Combat Phase. This is a pivotal part of the game because it’s how you damage the enemy – but it is also a part of the turn when a lot of different effects can trigger. Timing can be a little tricky – which is why we’re take a good look! So, lets get started – Professor Clint, take’em to School!
I’ve seen a lot of questions on rules forums about weapons, ability effects, and face-up Damage card text that can be resolved by simply taking a really close look at the Combat Phase. As I’m not immune to stuff like this either (I just figured out last week when writing up that article on the Ion Cannon that I’ve actually been playing Ion Weapons wrong), I thought perhaps an X-Wing Academy: The Combat Phase was in order.

Before You Start
Bear in mind, what we call “hits” and “crits” when we roll the dice are not actually hits or crits. I think this is where a lot of folks get confused with rules and card text. “Hits” and “crits” (local parlance) are simply filled explosion symbol results (what most folks call “hits”) and unfilled explosion symbol results (what we call “crits”) until Step 6, so throw the “hits” and “crits” thing out the window for now.
Just realize if you haven’t already, if I say “local parlance”, I’m talking about what people say (i.e. die results, not a rules defined hit), otherwise when I use the term hit I’m talking about what the rules say.
Clear as mud? Ok, let’s go.
The part in the rulebook we’re looking at is the Combat Phase, page 10-13.
1. Declare Target – Ok. Right. Pretty standard stuff here, the only thing I’d draw attention to is not being able to target an enemy ship you overlapped in the maneuver phase that’s still touching you (i.e. “bumped”). Also note that you’re totally fine pre-measuring to see if your intended target falls within the range of your weapon at no penalty (meaning if he’s out of range, you can still choose to fire on somebody else this turn that’s in range, in arc, etc.).
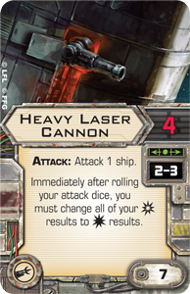
2. Roll Attack Dice – Determine the attack value of the weapon you want to fire, pick up that many red dice, roll them on the table. Simple enough. Remember if you’re at Range 1, you roll one extra die unless you’re using a Secondary Weapon System (in which case, you get no extra dice).
3. Modify Attack Dice – This is where you can spend action tokens and resolve abilities that re-roll or otherwise modify attack dice results. There are some defender abilities that resolve against the attack dice. If you’re in a situation where both the attacker and defender have abilities that modify the attack dice, the defender resolves his modifications first, then the attacker resolves his.
 I roll ALL the dice…But I get no “Crits”
4. Roll Defense Dice – Defender rolls number of defense dice equal to his ship’s Agility value. He gets an extra green die if he’s at Range 3 from you (unless you’re firing on him with a Secondary Weapon System), or there’s an obstacle between the attacker and defender. I’ll talk about this more in-depth in a later article, but for now, if the shortest path between your base and his base (which is how the “Determining Range” rule works) crosses an obstacle, he gets an extra green die.
5. Modify Defense Dice – Same deal as attack, but for the defender this time – spend those Action tokens if you’ve got them and you want to use them. Also note if both the attacker and defender have abilities that resolve against the defense roll, the attacker’s abilities resolve first, then the defender’s abilities.
6. Compare Results – This is where the die result cancellation actually happens and is the first time the word hit is actually used in this context. Note when cancelling, Evade results and tokens are applied to filled explosion symbols (“hits”, in the local parlance) before the unfilled explosion symbols (“crits”).
7. Deal Damage – If the defender was successfully hit (official rules definition) by the attacker, he loses shield tokens (if applicable) and/ or receives Damage cards based on the damage it suffers – uncancelled filled explosions result in a Damage card, uncancelled unfilled explosions result in Critical Damage (which is a Damage card turned face up). Note that “crits” (local parlance) have the same effect as “hits” (local parlance) against shields – it’s only when they hit the hull that something different happens.
Of course, if a ship incurs damage equal or greater than its Hull value, it’s immediately destroyed (unless subject to simultaneous attack rule – long story short, you and the other guy are at the same PR) and the model is removed from the game.
 In Star Wars the Lasers are Green….not Blue.
Well there you have it class! I hope this helps clear up some of the confusion about the order of operations when firing. It sounds more complicated than it is in practice. Just get out there and roll some dice and if you get stuck, well – Read The Manual.
Class Dismissed!
This series was originally written by Clint Weisgerber of themetalbikini blog. It has been updated and reprinted with permission.