Tales from the Yawning Portal: Dungeon Design

Tales from the Yawning Portal is a great way to learn about Dungeon Design…
We continue our Tales from the Yawning Portal coverage with a look at Dungeon/Encounter Design. After all, this book features 7 wildly different dungeons, each with their own set of traps, monsters, layouts, themes, etc. And it’s a perfect tool for those aspiring gamemasters who want to design their own dungeons–each of these modules is self-contained and can teach us a lot about design

First off, here’s a crash course in thinking about design. Dungeons are a bunch of rooms linked together, usually with a theme (i.e. you’re raiding a wizard’s tower). Think of each room as an encounter, whether there are any creatures there or not. Each encounter has a few different parts–they are combat (any monsters or whatever you fight), narrative (how does this fit into the story), puzzle (any thinking things), and reward (what do you get out of exploring here). These will be highlighted to different degrees in each room, but in general you’ll want 2 or 3 of these elements present in each room to some degree.
Figuring out how these elements relate to each other is what takes your series of linked encounters and transforms them into a dungeon that feels like a place that might exist in the world. The Sunless Citadel is a fantastic teaching tool because it’s meant for new players AND new GMs. Let’s take a look!
The Sunless Citadel
This dungeon has a reputation for being one of the best intro to D&D modules you can pick up. It’s great for players and GMs alike–there’s a little of everything in this dungeon. The encounters are dynamic, there are traps, and things get fairly complex, but there’s a definite build towards the difficult fights. This dungeon teaches you everything you’ll need to succeed in the first five rooms. Check it out:
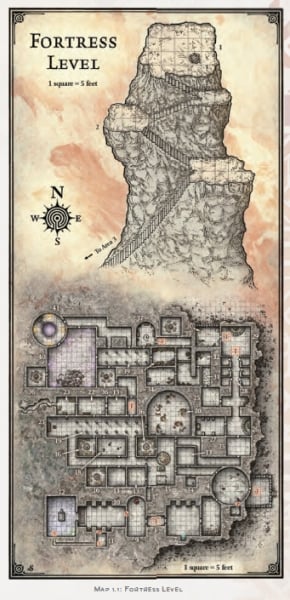
Room 1. The first place that we come to is a Ledge overlooking the Sunless Citadel–a fortress that sank beneath the earth long ago.
A sandy ledge overlooks a subterranean gulf of darkness to the west. The ledge is wide but rough. Sand, rocky debris, and the bones of small animals cover it. A rough-hewn stairwell zigs and zags down the side of the ledge, descending into darkness.
Lurking in this room are three giant rats, who hide iand ambush the characters if they become aware of them. A successful DC 10 Wisdom (Survival) check reveals humanoid footprints, as well as rat tracks of unusually large size. And finally, there’s an old ring of stones that was once a firepit.
So let’s take a look at what’s at work here. From a distance, this room isn’t all that much–it’s a 5×4 square piece of dirt at the outset of the dungeon, and the only combat encounter here is a few rats–but look at how everything’s presented. Starting with the combat encounter–there are three giant rats that await characters who come rushing in. As the room puts it:
They try to hide if they become aware of the characters, and they ambush the first character who arrives on the ledge without being quiet about it.
This sentence teaches you so much about running the game–for starters, it encourages you to think about the monsters as an active force in the game. The rats aren’t just there waiting to activate when the players arrive. They might become aware of the characters–and if they do, the GM gets to have them ambush the players. This encourages fledgling GMs to look at how the rats might become aware of the players. Flipping to their stat block, they have a +0 perception bonus–but unless the players are being especially stealthy, the rats’ passive perception of 10 should be more than enough to hear the players’ approach.

Then they hide–which is a simple +2 and since the GM will just have thought about their passive perception, it should be relatively easy to figure out if the PCs have spotted the rats or not. As for the fighting, the rats aren’t much of a threat–but they’re not meant to be. They’re there to surprise players and let them know that, hey, you’re entering dangerous territory and can expect to be attacked. If your players are new, this is a pretty simple encounter, and one that they will likely win–which is good. We want that. And fighting three means that in a standard party they should be dealt with in no more than two rounds or so–but there should be enough to give everyone a chance to do something.
It also teaches the players that sometimes the monsters can be hiding–and if they are ambushed, it might teach them to try and be stealthy. All of these are great lessons to learn, but the dungeon doesn’t beat you over the head with it–it just lets players learn the lesson (likely the hard way) but when the stakes are nice and low. Three giant rats are a grand total of CR 3/8…they do an average of 2 damage with any given attack, and are hitting AC 15 (which is a pretty good baseline) only on a 13+, so they’re only hitting 35% of the time. So with three rats, it’s likely that they’ll output 2-4 damage per round between the three of them–which isn’t even a threat to a wizard anymore.
Now let’s look at the narrative aspect of the room. Another way you can think of this is–what purpose is the room. What gives this encounter a sense of place and purpose? How does it fit into the world? This is how you make your dungeon feel real–it’s an element that helps immerse players in the world of the game. In this room, it’s the sense of being at the precipice of adventure. Here was a lookout station for the Sunless Citadel. People have been here before and used it–the firepit is still ringed with stones and ash…but it’s abandoned. The layers of dust convey a sense of time–little sensory details like that can draw a player in, evoking the sense that, they’re the first to step into this place in a while. And yet…

That brings me to the puzzle component of the room. Puzzles can be traps, secret doors, actual puzzles, anything that rewards the player for thinking or interacting with the world in a not necessarily combative way. So here the puzzle element is fairly easy–it’s the Survival check to spot the footprints (and potentially the perception check to spot the rats). It’s a DC 10 check–so odds are good that even if the players don’t have someone proficient in survival, they’ll pass the check. This does a couple of things–it rewards them with a little bit of extra narrative information (there are rats here, which they might notice before they get attacked) and it alerts them to the fact that they aren’t the only humanoids to come through here recently. So already it begins building a mystery. And though it’s easy to find, it’s still rewarding to the players. Making the check is a victory, plain and simple–and little victories like these are great training tools to try and subtly encourage the players to search the rooms they’re in. It gets them thinking and on the lookout.
There’s no tangible reward component to this room–nothing worth writing home about. But the exploration does yield more information–sometimes that’s enough.
Room 2. This one is much simpler. It’s a switchback staircase with a series of landings that leads up to the fortress:
A fortress emerges from the darkness. The subterranean citadel, though impressive, seems long forgotten, if the lightless windows, cracked crenellations, and leaning towers are any indication. All is quiet, though a cold breeze blows up from below, bringing with it the scent of dust and a faint trace of rot.
This “room” is mostly narrative–it adds the sense of depth to the citadel. Look at the language–it’s meant to evoke abandonment and decay, both things that key the players into the themes of the dungeon. This isn’t the normal world anymore–something happened here. Something that’s only hinted at by the “faint trace of rot.” It’s connective tissue, sure, but it follows up on the “zig zag staircase” mentioned in the first room. Also worth noting is the sentence:
They aren’t dangerous to traverse, however, except that combat while on the narrow path can be risky.
Now there’s no monsters in this area–this is just a transition room, but it suggests to the GM that hey the players might move here during the fight (how many fights have you had that stayed central to a single room). Even when not actively being used, it’s important to consider how players might interact with a room.
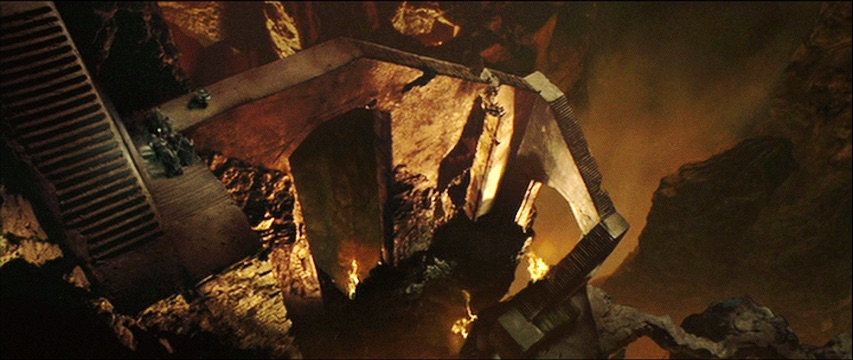
Fighting on stairs can be risky…
Room 3. This one is a great example of how failure isn’t necessarily a bad thing, and of other ways to encourage players to explore:
The narrow stairs empty into a small courtyard, apparently the top of what was once a crenellated battlement. The buried citadel has sunk so far into the earth that the battlement is now level with the surrounding floor. That floor stretches away to the north and south, composed of a lyer of treacherous, crumbled masonry which reaches to an unknown depth. To the west looms the surviving structure of what must be the Sunless Citadel. A tower stands on the west side of the courtyard.
There’s a lot to unpack in this room. First up there’s the combat component: this one is interesting in that combat may never happen in the room. But there’s plenty of potential here. The room is littered with debris, and if players can’t pass a check, they fall into a debris lined cavity.
Each time a character does this, there’s a 10 percent chance that 1d4 giant rats (who infest the rubble field) will be drawn to the characters and attack. But note that failing the check doesn’t really impede their progress. It carries consequences, and gets them attacked by rats (possibly) but the fall never deals damage directly, it just sort of allows the players to fail skill checks in a very low stakes environment. After all it’s only a DC 10 acrobatics check to make every 10 feet (and failing by 5 or more is needed before you fall in, so odds are this will never happen).
There’s also a lone, non-random giant rat here, though it is hidden in a pit trap.
No I said pit tra–actually this gives me an idea…
Next we get the narrative component. This is where they really play up the sunken citadel motif. The players walk down to the top of the fortress–again reinforcing the monumental collapse that brought it here–and then they are immediately given a destination. A lone tower standing to the west. What could be more inviting to adventurers?
And then there’s the puzzle component. In this room, it’s a hidden pit trap. The trap is placed right outside the tower door, so that there’s no way for players to avoid interacting with it. By now the players might be on the alert–cautious players who’ve either fallen in the masonry, or been ambushed by rats might want to search the room. But it’s equally likely they haven’t picked up on that yet. This pit is hidden a little more thoroughly. It’s a DC 15 Perception check to spot it, which is still within the range of possibility for first level characters, though by no means guaranteed.
Players who don’t spot the pit fall in when they step on it, getting trapped in a 10×10 pit with three dead goblins and a giant rat. This is another little bit of narrative mixed in here. It’s the first time the players encounter something that isn’t a rat. They’ll find two skeletons (which suggest goblins have been here a while) and a much fresher goblin which is a preview of the things to come. Little details like that add to the overall cohesiveness of the dungeon. Especially since the rat had climbed into the pit to feed on the goblin–another moment for the GM to pick up on how the creatures might interact with the dungeon–they are an active part of the environment.

What? How do your monsters stay active?
Anyway, players who succeed in spotting the pit will have a much easier time. A much simpler DC 10 Investigation check clues the players in to the narrow catwalk around the pit, as well as figuring out how the mechanism of the pit works. From there it’s a DC 15 check with thieves’ tools to try and disable the pit, either by jamming the lid shut or jamming it open. Either way, it again reinforces the idea of checking for traps–and even players that fall in the pit and get trapped there with the rat will likely survive (though they’ll take more than a little damage after falling 10 feet and being nibbled on).
Room 4. The Tower at last. Finally we’re getting to the Sunless Citadel–by now players have had plenty of time to warm up to the idea of what they’re exploring, and have hopefully been getting excited.
This circular area is cobbled with cracked granite, upon which sprawl the bodies of four goblins, apparently slain in combat. One corpse stands with its back against the western wall, the spear that killed it still skewering it and holding it upright. Three wooden doors lead from this area. A hollow tower of loose masonry reaches thirty feet into the air, but the intervening floors and stairs are gone, except for a couple of crumbled ledges.
No combat component in this room, but man talk about some narrative components. This is the first place you get to see the impact of the citadel’s collapse–evident from the ruined tower–but there are also four goblin bodies. Just to make sure that any players who never set off the pit trap still get the foreshadowing of goblins in the Citadel. Only now it looks like someone was fighting them. Huh, wonder what that’s all about.
This is a great prompt for players. It’s the first chance they have to investigate something interesting in the environment. The goblins have all been dead a while and have been looted, making players wonder “by who?!” while adding to the sense of immersion–the PCs aren’t the only ones with apparent agency in the world. Moving the goblin that’s pinned to the wall reveals the word Ashardalon in draconic runes (Ashardalon, in addition to having a board game all about him, was the big bad of the campaign [of which the Sunless Citadel was only the first in a long line of adventures]). Though it means little now–it’s great foreshadowing and is unique enough to make the players take notice.
Players who found the pit trap–or who find the cryptic writing on the walls might then be tempted to look for more secret things. There’s a hard to spot secret door in here–it takes a DC 20 check to find it. And once you find it the door is trapped–although not very severely. This serves as a teaching moment to players. If they cautiously pull on the lever, they’ll see the trap before they even set it off (and can thus deactivate it) and even if they don’t it only deals 1 point of piercing damage. Again, not deadly, but a good lesson that “hey, you should check for traps.”
Room 5. Finally we have a secret chamber where skeletal archers await our heroes:

This pocket chamber is damp and cold. The skeletons of three long-dead archers slump against rubble-filled arrow slits along the east and south wall.
The skeletons animate and attack. These are the first non-rat monster the players can encounter. They signify that something bad happened here–these archers were cursed with undeath when the citadel sunk. This is the hardest fight yet at CR 3/4 (total)…but by this point the players will likely only be down a few hit points, so they should still succeed–but this should be the first time they’re not certain from the outset.
And the narrative component here is manifold. You have the skeletons who were clearly hanging out for a purpose. They were the archers on guard duty, hanging out in a room filled with arrow slits. There’s a reason the room is here, and that these particular monsters are in it. Finally, five rooms in, we come to our first real reward. Each of the skeletons has a quiver containing a +1 arrow, which granted, is not the fanciest thing to write home about, but these arrows will come in handy later on in the dungeon.
By this point the players will have had some combat, had a chance to search for traps, secret doors, and learned that their actions carry consequences (though not always game-ending ones) and by the time they’ve gotten actually inside the dungeon, done everything they’ll need to succeed in the dungeon at least once. It’s a tutorial level, but a well-done, disguised one that lets the players experience these things organically.
Phew. That was a little more involved than I thought. Thanks for sticking with me folks… hope you enjoyed this delve into dungeon design–I’d love to take you through some of the other adventures you can find in the Yawning Portal. So please, leave a comment if you’re interested.
And for more on Dungeon and Design, check out Extra Credits, who have thought about this way more (and better) than I have.
Happy Adventuring!


