FoW: Mastering the Charge
 |
Good day internet. Wraith here with another FoW topic for your consumption and this time I want to touch on a subject that drives many FoW players’ nuts: assaulting.
Now FoW, like 40k, has an assault phase. And like 40k, a well timed assault can make or break a game. But unlike 40k, an assault in FoW is not something you potentially do on the fly. In FoW, an assault must be planned and prepared for because of one rule 40k does not have, and that’s defensive fire.
Defensive Fire 101
Defensive fire allows your opponent to react to your charge by shooting the assaulting unit with every available stand within 8″ of an assaulting team. This 8″ bubble rule allows a player to layer their defense by placing units next to each other or even interwoven with each other to allow them to get more shots on a charging unit. While defensive fire can be outright devastating due to the casualties it can cause, it can also be devastating by pinning down your charging unit. In FoW, once a unit recieves 5 or more hits against it from shooting (or 10 for certain Soviet units), it is Pinned Down. This basically means that the unit is taking cover/hiding to reduce its losses from the sheer number of bullets coming its way. A pinned down unit cannot advance toward the enemy and will fire at a reduced RoF when shooting. While a player can take a motivation test to remove the effects of being pinned down, this is done at the beginning of that player’s turn, so being pinned down during your assault phase (at the end of your turn) and right in front of a unit you just tried to kill can be a very bad situation to find yourself in. Because of defensive fire and the potential for being pinned down right in front of the enemy, an ill-timed assault can be devastating to an attacking player. As a result, knowing when to charge and how to prepare for that charge are key things to know for any FoW player.
Making the Charge
While defensive fire seems like a powerful measure to overcome and can be a great deterrent for a defensive player, there are ways to mitigate its impact. Obviously, the first way to mitigate its affects are by killing the enemy. The less stands your opponent has, the fewer number of shots you will be taking on the way in. But causing casualties can be difficult to achieve, especially against dug in or concealed units, and especially against infantry. With their universal 3+ save, infantry can be notoriously hard to eliminate, and if they are dug in or concealed (or worse, both), then it can be nigh impossible to get rid of them through shooting. As a result of this difficulty in the direct approach, the other major ways of negating defensive fire is through pinning down your intended target, bombarding it with smoke, and carefulling positioning your attacking unit.
As stated earlier, a unit will be pinned down after receiving 5 or more hits from shooting. So shooting an opponent’s unit in your shooting phase just before you intend to assault can be an important part of preparing for an assault. Another advantage for an attacking player is that any hits for an artillery bombardment or an air strike automatically pin down a unit, so if you’ve got artillery or air, use it to hit the unit you intend to charge and pin’em down. One caveat to this rule is armored vehicles. Tank teams cannot be pinned down (well they can, they just ignore its affects), but they can be bailed out and a bailed out tank cannot shoot defensive fire during an assault. So even if you can’t kill a defending tank, you can still limit its impact on your charge by bailing it out (there are other ways to deal with tanks in the assault phase, but that’s a topic for another day).
Along with providing fire support, certain artillery units can also drop smoke bombardments on the intended target. While smoke obscures the target (thus making it harder to shoot at), it does provide cover for an assaulting unit (thus, making it harder for them to get shot in defensive fire). Combining these two effects simultaneously can be difficult, but if achieved can drastically reduce the impact of defensive fire on a charging unit.
The final way to mitigate an opponent’s defensive fire is by choosing where to charge. While the rules state that you must take the most direct route when charging an opponent, by strategically placing your unit, you can make the shortest route the most advantageous one. For example, lets say your opponent has an infantry unit of 7 stands mixed with a machine gun unit of 4 stands. Your opponents has placed the machine guns in such a way that to charge the infantry, you will get hit by defensive fire from the machine guns. Now in Diagram 1, by placing your 10 stand infantry unit in this fashion, you will get hit by defensive fire from every gun (red circles) and infantry in the two units.
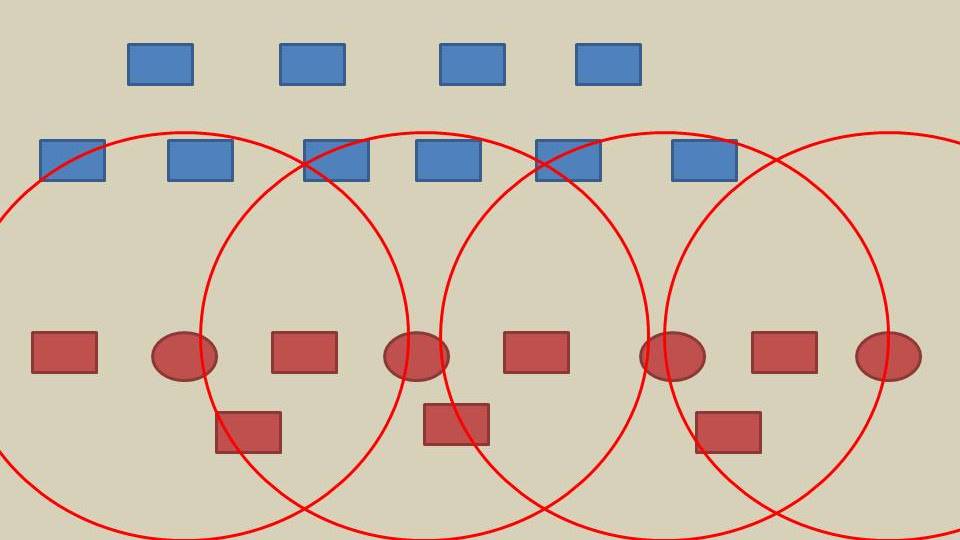 |
| Diagram 1 = Bad |
Even if you pin down both units, the amount of shots coming your way still has a good chance of pinning your attacking unit down. Now, if we look at Diagram 2, you can see that the attacker has positioned the unit in such a way that you can still charge the infantry, but with only two of the machine guns getting defensive fire, thus reducing the potential for the charging unit to get pinned down.
 |
| Diagram 2 = Better |
And there you have it. By using shooting, artillery, smoke, and clever positioning, you can mitigate the effects of your opponent’s defensive fire and launch a successful assault. While there are no guarantees in war (game), by applying some good tactics and with the luck of the dice, victory could be closer than you think.
While these are some the most utilized ways of prepping for an assault, what other methods do you use before fixing bayonets? Flamethrowers to burn them out or do you just charge without looking back? Comments and suggestions are always welcomed!


