Warmachine – Cygnar Minuteman

Since the arrival of the Stormwall and Cygnar’s rise in favor in my court, I’ve been spending a lot of time with some of their later releases, especially the new Minuteman Light Warjack. While I wasn’t completely enamored with the Minuteman when we received his rules about a year ago, I found that the more time I spent working on list builds, the more often Minutemen crept into them.
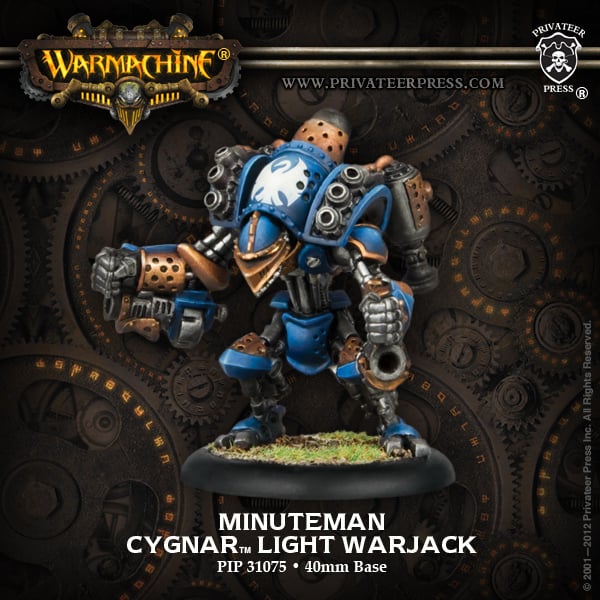
I’ll start by discussing the basics of the warjack for the uninitiated. First, it runs on the same chassis as the Grenadier and consequently has the same stat line (SPD 6, MAT/RAT 6, DEF 14, ARM 15) as well as the Advance Deployment rule. The most notable things about the model are its jump packs, which give it the Bounding Leap rule, allowing the Minuteman to spend a focus point to place itself completely within 5″ of its position after making a full advance during its activation. For ranged weapons, the Minuteman is armed with a pair of RNG 4, POW 14 Slug Guns. These two things (Bounding Leap, paired Slug Guns) are what provide the Minuteman warjack with its basic battlefield role: a highly-mobile, fast-response platform with a solid, one-two punch. With SPD 6, the 5″ place from Bounding Leap, and RNG 4 on the Slug Guns, the Minuteman has a nice, 15″ threat range with a pair of POW 14 attacks. It additionally has a pair of low-P+S Open Fist attacks and the Flak Field rule that I’ll cover later.
Bounding Leap provides more than additional threat range; it can be used for a variety of sneaky maneuvers, be it extricating the Minuteman from melee in order to avoid a free strike, jumping behind a line of enemy models to attack higher-priority targets behind, or getting into a model’s rear arc so that the target can’t benefit from a Shield or Buckler. Bounding Leap has a lot of potential applications, so a player should always be aware of it in order to best exploit the Minuteman’s strengths to the utmost.
One specific trick that I’ve become fond of is using Bounding Leap to jump behind a troublesome heavy warjack, warbeast, or even a colossal, and perform a weapon lock or headlock while in the target’s rear arc. While weapon locked/headlocked, the target cannot move or use the locked weapon until the beginning of the target’s next combat action when they attempt to break the lock by making a compared STR roll on a single d6 with ties favoring the locked model. While the Minuteman’s paltry STR 7 won’t often keep a target locked, it will prevent the model from moving, since the attempt to break the lock doesn’t happen until the beginning of the target’s combat action, which comes after movement. Consequently, if you lock a target from behind, that target will not be able to attack the Minuteman since it won’t be able to turn to face it. If you can lock a Shield or Buckler from behind, other models will be able to attack the target while ignoring the bonus to ARM that they provide. This is also a handy way of holding down targets that can move out-of-turn to avoid damage, like a Protectorate warjack under Enliven.
The last important thing to mention is the Flak Field rule, which allows the Minuteman to, once per activation, deal a POW 12 damage roll to all models in base contact and a POW 6 to all other models within 2″. You have several options for when to use Flak Field during the Minuteman’s activation, like before movement, after movement, or after using Bounding Leap. Not only does it give the Minuteman yet another way to escape from being bogged down by enemy models (specifically lower-ARM infantry in this case), but it also gives it some effectiveness against swarms of light infantry like Zealots, Sea Dogs, or Nyss Hunters. Since Flak Field is not an action and does not require an attack roll, it can be a highly effective tool for dealing with models that have stratospherically-high DEF values like the infamous Kayazi Assassins with Iron Flesh.
Since no model is without weaknesses, I’d be remiss in discussing the Minuteman without mentioning how fragile it is. While its DEF 14 will help quite a bit from getting hit, it’s ARM 15 and damage grid do not provide much protection once it finally does take it on the chin. A single, boosted Hand Cannon shot can cripple the left or right arm with even below-average damage rolls. If your opponent manages to land a solid shot with something bigger, your Minuteman will most likely be subject to Bad Things. With that in mind, be careful about placement during the early game. Take care to keep your Minutemen in Cover or screened by more threatening models; don’t just run straight at the enemy on turn one. It’ll take more finesse to use than something as simple as an Ironclad.
One of the big challenges that I find with the Minuteman is that it’s a bit of a focus hog. Bounding Leap requires a focus point, and you’ll often want to boost either the attack or damage roll on those hard-hitting Slug Guns depending on the nature of the target. Consequently, you’ll often find yourself wanting to give it three focus on turns when it’s going to have to carry some weight. Keep this in mind when choosing warcasters with whom to pair the Minuteman.
I’ve found a good deal of success pairing a Minuteman with Siege, since Flak Field can completely wreck an entire swath of enemy infantry during his feat turn, and that’s before it uses those Slug Guns on a nearby heavy warjack or warbeast. Nemo 1 has done great things for the Minuteman as well, being able to increase its threat range by up to 3″ via Locomotion and give it up to five focus for Bounding Leap and boosting both attack and damage rolls on its Slug Guns. Nemo 2 also brings some good synergy via his feat, providing three focus to all warjacks in his battlegroup, and Energizer, which can also give the Minuteman (as well as all other models in his battlegroup) an additional 3″ move.
One of the places where my Minutemen have been all-stars has been in scenarios that use the Reinforcement Artifice, since warjacks that come on as Reinforcements get three focus for free when they arrive on the board. In 50-point games, I can actually take two of them as Reinforcements. With their 15″ threat range, the 20″ limit for Reinforcement deployment off the right side of the table, and the additional 3″ off that plus room for base size, it can affect a huge portion of the board when it comes on. In this role, my pair of Minutemen have already claimed a fully-healthy Warpwolf Stalker after advancing, Bounding, and putting a pair of boosted shots into the Stalker while Temporal Barrier was up.
Cygnar players, if you haven’t picked up a Minuteman yet, I’d strongly suggest giving it a look.


